
Microscope slides are used to examine single-celled organisms and to look up-close at small plants and organisms. There are two types of prepared slides: dry mounts and wet mounts. Each type of preparation method is used for mounting different types of cells. If you're wet mounting a particularly pale or translucent specimen, you may need to stain the specimen so it's visible beneath the microscope.
Preparing a Dry Mount
Select a clean slide
Hold a slide up to a light source and look through to make sure it's free from smudges and dirt. Most microscope slides are flat on top and bottom and rectangular in shape. They are clear, allowing light from the microscope to pass through and illuminate the translucent sample specimen. If your slide is dirty or smudged, you won't be able to effectively examine your specimen.
If you find that your microscope slide has any contamination on it - including your own fingerprints - give it a quick wash with liquid soap and water. Dry the slide using a clean cloth. Do not use tissues or paper towels, as these can leave lint behind.
Inspect the specimen to determine if it needs to be sliced
The sample specimen needs to be translucent (or semitransparent) to transparent in order for light to pass through. If light cannot fully pass through the specimen and into the microscope's eyepiece, you won't be able to see the specimen through the microscope.
Some of the specimens (e.g., a strand of hair or an insect wing) are thin and translucent on their own, and will not need to be sliced with a razor blade.
Slice off a thin piece of the sample specimen
Use a razor blade to cut your specimen material into a thin, translucent slice. Dry mounts are the simplest to prepare since they do not use any liquid between the slide and the specimen. A dry mount is ideal for inspecting samples that are not at risk of drying out. Materials that are commonly dry mounted include:
Cork or balsa wood.
Flower petals or leaves.
Insect legs or wings.
Hair, fur, or feathers.
Place the sample specimen on the slide
Use a pair of forceps to pick up the thin slice of your sample specimen. Delicately lay it on one side of the slide. If you are using a concave slide (in which one side dips down), place the specimen in the center of the concave area.
Mount the specimen on a concave slide if you're concerned that the specimen will roll or slide off the flat slide. For example, use a concave slide if you're preparing a curled flower petal that rolls to one side or the other.
For all other types of specimens, a flat slide will work fine.
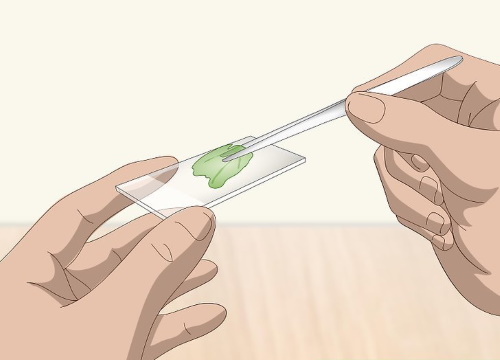
Set a cover slip over the sample specimen
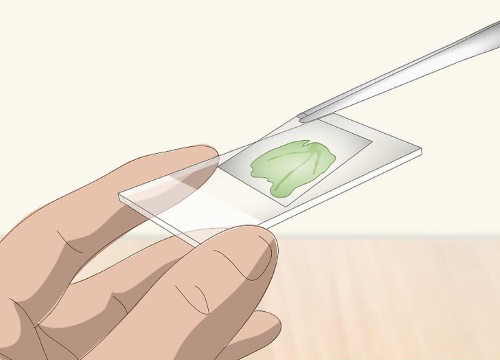
The cover slip prevents the sample specimen from tumbling off the slide. The slip will also protect the sample specimen in case one of the microscope's users accidentally lowers the lens so much that it taps the specimen.
Cover slips are very thin, transparent pieces of glass or, more commonly, plastic. Each slip is about 3/4 inch (1.9 cm) in both width and length.
Your prepared slide is now ready to be inspected beneath a microscope.
Preparing a Wet Mount
Place one drop of water onto your slide
Use an eyedropper to drop 1 drop of water onto the exact center of either a flat or concave slide. This water droplet is what gives the wet mount its name. The liquid keeps the sample specimen moist and prevent wet, organic sample specimens from drying out and distorting their shape. The water also preserves living specimens, such as single-celled organisms.
If you'd like to make a permanent slide using dead organic material, you can use a thin layer of clear nail polish instead of a water droplet.
Scrape or slice a section of wet sample specimen
Sample specimens used for wet mounts are typically wet or living organic material. Use a razor blade or toothpick to cut or scrape up a small amount of your wet specimen. Materials commonly used to make wet mount slides include:
• Cheek cells or tooth plaque (scraped from your mouth with a toothpick).
• A thin cross-section of a plant stem (cut with a razor blade).
• If you're studying single-celled organisms-e.g., an amoeba or paramecium - tweezers
will do little good. Instead, use a clean eyedropper to pick up a couple of drops of the water in
which the single-celled organisms or algae are swimming.
Place your sample specimen in your drop of water
Depending on the type of material you're using as your sample specimen, use a pair of forceps, tweezers, or a toothpick to transfer your specimen to the slide. Set the specimen in the center of your water droplet, so that it's suspended in the liquid.
If you're using an eyedropper to pick up single-celled organisms, place 1 or 2 drops into the water drop already on the slide.
Set a cover slip on top of the wet specimen
Hold the cover slip at a 45° angle. Set one of the edges down right next to the specimen on the water drop. Then lower the other side of the slide until it's flat on top of the specimen. You should see the water drop(s) spread out beneath the cover slip until they reach its edges.
Do not tap or press on the cover slip once it is in place. If you do you'll risk squishing the sample specimen and water off of the slide.
Staining Cellular Specimens
Place a paper towel sheet against one edge of the cover slip
Set the towel against the slip's edge without disturbing the material under the cover slip. The absorptive paper towel will draw some of the water out from under the cover slip, and pull the staining agent under the cover slip and onto the specimen.
If your wet-mounted slide specimen is pale or colorless (e.g. a cross-section of a colorless plant stem), it may be difficult to see when looking through a microscope. Staining the specimen will allow you to better see its shape and texture.
This is usually done after you have already examined the wet specimen in a slide without staining it. The slide may be already prepared, even if it is not stained.
Place one drop of iodine or methylene blue on the other side of the cover slip
Use an eyedropper and drop the staining chemical on top of the microscope slide, directly next to the cover slip. Be careful to only dispense 1 drop. Excess staining agent may run off of the slide.
Iodine or methylene blue can be purchased at any education store or biology supply store.
An alternate way of doing this is to add the drop of staining agent to the water on a wet-mounted slide when you first prepare it. In this case, you do not need a paper towel.
Wait while the staining agent is drawn under the slide cover
The staining agent will begin to seep under the cover slip as the paper towel draws water out from the other side. It may take as long as 5 minutes for the iodine or methylene blue to soak completely under the slide cover and saturate the specimen.
Once the iodine or methylene blue has drawn all the way under the slide cover, the specimen is fully dyed.
Wipe up excess staining agent with a clean paper towel
Clean off the surface of the slide so that no loose liquids spills off the side. Your wet-mounted slide is now stained and ready to observe under a microscope.
Article source: wikiHow wikiHow is a group effort to create a great resource: the world's largest free how to manual. wikiHow articles help people solve their everyday problems. wikiHow licenses all content under a Creative Commons License. The license allows wikiHow content to be used freely for noncommercial purposes. The Creative Commons License also allows for the creation of derivative works.

More Science, Technology, Engineering, and Mathematics Information:
• What Is an Electronic Circuit?
• RC Filters
• Vectors and Scalars
• Electronics Lab
• How to Prepare Microscope Slides
• Types of Numbers
• Magnetism Permeability and Retentivity
• Lithium Ion Battery Chemistry
• CrowPi is a Raspberry Pi Project System Housed in a Laptop-Like Body
• Brief Description of the Chemical and Physical Properties of Elements in the Periodic Table