Windows provides tools that can be used to repair the operating system if it becomes damaged. On some systems these tools are installed in a special recovery section of your hard disk, if not on your system, you'll need to boot from the installation disk.
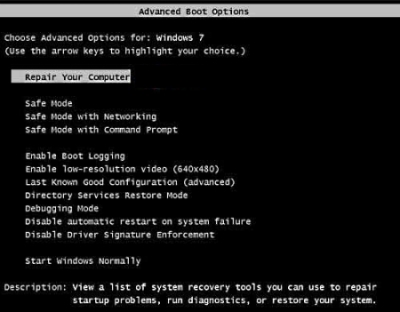
If the repair tools are installed on your system, make sure all floppy disks, CDs, and DVDs are removed from your computer, then then restart your computer using the computer's power button. Press and hold the F8 key as your computer starts. If the Windows logo appears, you need to try again. Wait until the Windows logon appears, then shut down and restart your computer.
If you need to boot from the installation disk, your computer will need to be configured with the CD /DVD drive first in the boot sequence. Do this by restarting the system and entering the BIOS setup screen. To enter the BIOS setup screen, you'll need to press a special key as the system boots. Which key to press is specified at the bottom of the screen when you first restart the system.
If the repair tools are NOT installed on your system, and you didn't receive a system restore or installation disc with your system, you can create a System Repair disc. To create a System Repair Disc, open Control Panel and, in the System and Security group, click on Backup and Restore. In the Backup and Restore window's left panel, click on Create a System Repair Disk.
A system repair disc can be used to boot your computer. It contains the system recovery tools. However, you need to have created a system repair disk before hand in order to use this option. You can't use a system repair disk from another computer because it checks the product key.

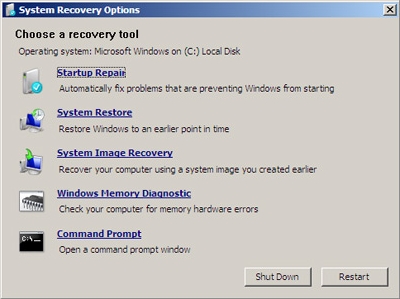
On the Advanced Boot Options screen that appears, use the arrow keys to highlight Repair Your Computer, then press [Enter]. The System Recovery Options screen will appear.

The System Recovery Options screen lists several tools that can be used to repair the operating system if it becomes damaged.
Startup Repair
Choose Startup Repair if your PC will not start. It will check the system files required to start Windows, and if they're damaged or missing, it will replace them.
System Restore
System Restore is a Windows service that saves your registry settings and other system information at regular intervals. These are called restore points. It doesn't affect your other files, such as e-mail, documents, photos, or music. System Restore will let you "roll back" your system to a chosen an earlier point in time when your computer worked properly.
Once you've used System Restore to go back to an earlier restore point, you can't undo it. You can, however, run System Restore again and choose a different restore point, if one exists.
System Image Recovery
You can use System Image Recovery to restore the contents of your hard disk. A System Image is an exact copy of the PC's hard disk including Windows 7 and your system settings, programs, and files such as e-mail, documents, photos, or music. However, you need to have created a system image beforehand in order to use this option.
Immediately after you finish installing Windows 7, installed all your applications, and configured your PC to your liking, one of the first things you should do is create a system image. It's better to restore a system image than to reinstall Windows because a system image will restore all your applications, and settings.
Windows Memory Diagnostic
Windows Memory Diagnostic scans your computer's memory for errors. Actually, any time Windows detects a possible memory fault, it automatically runs Windows Memory Diagnostic. However, this option lets you run it now.
Command Prompt
The Command Prompt allows advanced users to use command line tools for diagnosing and troubleshooting problems. The Windows Graphical User Interface (GUI) doesn't need to be able to start to use the command line. With command line tools you can work with text files, scan for viruses, change configuration settings, and perform other recovery-related operations.
Note: Some computer manufacturers customize the System Recovery Options screen by adding their own tools or removing the default recovery tools.

Learn more at amazon.com
More Windows Troubleshooting Articles:
• Wireless Router Problems and Solutions
• How to Spot a Failing Hard Drive
• How to Fix Windows XP Errors
• How to Fix propsys.dll Error
• Free Firewall - ZoneAlarm
• What's With All Those Error Messages?
• Use chkdsk to Find and Repair Disk Errors in Windows 7
• A Thorough Guide to Fixing That Printer That is Not Working
• Windows 7 Startup Repair Tool
• Troubleshoot With Reliability Monitor
