Previous to html5, to play sound on your webpage required that the webpage load a codec, a piece of software that decompressed streaming digital audio data. The problem was that the links to the specific codecs required for a given audio file format often didn't work, so sound was unreliable. With html5, support for some audio file formats is built into the browser. To access it, use the audio element.
<audio src="SugarplumFairy.mp3" autoplay></audio>
One of the supported formats is the popular mp3 format. The code above shows how to play the music file "SugarplumFairy.mp3" in the background as soon as the webpage has loaded. When the sound file is in the same directory as the webpage all that is required is the music file name. If the sound file is NOT the same directory as the webpage, you'll need a relative or absolute path to the music file. The autoplay attribute causes the sound to play immediately.
<audio src="panther.mp3" controls></audio>
Configuring the sound to play automatically is discourteous to your website's visitors. Replacing the autoplay attribute with the controls attribute, as shown above, causes the audio element to display controls that allow your website's visitors to adjust the loudness, or to stop the sound. Of course you can use both the autoplay attribute and the controls attribute together.
![]()
Audio Control
<audio src="SugarplumFairy.mp3" controls loop></audio>
Since you've added controls, allowing your website's visitors to stop the sound, it would not be discourteous to add the loop attribute, as shown above, which causes the sound to continuously repeat, at least until the visitors uses the control to stop it.
![]()
Music Buttons
One cool thing you can do is provide your own buttons to allow your website's visitors to play, pause, and adjust the volume of your music, as shown above. Here I've used code for the most basic buttons. With style code or graphic image buttons you can make your sound controls much more interesting.
<audio id="player" src="bundy.mp3"></audio>
<div>
  <button onclick="document.getElementById('player').play()">Play</button>
  <button onclick="document.getElementById('player').pause()">Pause</button>
  <button onclick="document.getElementById('player').volume += 0.1">Vol+</button>
  <button onclick="document.getElementById('player').volume -= 0.1">Vol-</button>
</div>
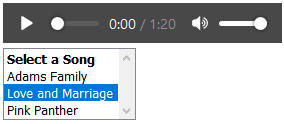
Another cool thing you can do is allow your website's visitors to select a song from a list. The code shown below uses an html select elements onChange event to change the src attribute of the audio element, and then executes the audio element's play() function. Anytime the visitor clicks on the name of a song in the list, it begins playing. Plus controls are provided so the visitor has complete control.
<audio id="myaudio" controls></audio><br />

<select id="mylist" size="4" onChange="playAudio();">
<option value="0" style="font-weight: bold;">Select a Song</option>
<option value="adams.mp3">Adams Family</option>
<option value="bundy.mp3">Love and Marriage</option>
<option value="panther.mp3">Pink Panther</option>
</select>

<script>

function playAudio()
{
   var oAudio = document.getElementById("myaudio");
   var selects = document.getElementById("mylist");
   var selectedText = selects.options[selects.selectedIndex].value;
   if(selectedText != 0)
   {
      oAudio.src = selectedText;
      oAudio.play();
   }
}

</script>

Music List
This is the most simple example of a audio element with a select list, with style code you could make a much fancier music player. Someone may want to create a music player with an actual play list. For that you would give the select tag the multiple attribute. Then use a loop to place all the selected items in an array.
for(i = 0; i < selects.options.length; i++)
{
    if(selects.options[i].selected)
    {
        selectedArray[count] = selects.options[i].value;
        count++;
    }
}
Then use an event listener for the audio element's ended event to execute a function that runs through the array feeding each song file name in the array to the audio element's src attribute and executing the audio element's play() function for each one.
myaudio.addEventListener("ended", PlayNext);
I'm not providing an example for a multiple song playlist application, I have to let you have some fun. Maybe if enough people ask, I will provide an example.
More Java Script Code:
• Date Picker For Your Web Site
• Easy Rollovers
• JavaScript to Copy and Paste Text to the Clipboard
• Create a Mouse Click Sound Effect
• HTML5 Canvas lineCap and lineJoin Attributes
• Java Script to Get Selected Item from Drop-down Select List
• Learn JavaScript Visually
• HTML5 Canvas Drag-and-Drop
• Code for Java Script Cylinder / Cone Volume Calculator
• Regular Expression Basics : Match a Set of Characters

