

If you only have a single hard drive available in your PC, you need to create separate areas (called partitions) on the hard drive for Windows and Linux. This article walks through the process of how to do that, but first, you need to understand how partitions work.
Three types of partitions are available: primary, extended, and logical. A hard drive can have three primary partitions and one extended partition. Each primary partition acts as a separate hard drive as far as the operating system is concerned. Inside the extended partition you can have up to 12 logical partitions - think of an extended partition as just a cardboard box that contains the logical partitions.
Logical partitions behave similar to primary partitions and hold data; extended partitions just hold logical partitions. Because I can't predict what software you want to install, I recommend having at least 10GB of space available in a partition for your Linux installation. More is always better because it gives you more room for downloads and even more programs.
TIP: Make a note of the partition you dedicate to Windows and the one you dedicate to Linux. You need this information when installing Linux.
Those who aren't starting from scratch for a dual boot likely need to make changes to their current installation. Proceed to the next section to find out how.
How to partition a hard drive with Windows tools
If you already have Windows installed on the entire hard drive, you'll need to shrink that partition down so there's room for Linux. The first step is to check your existing hard drive for how much free space is available to dedicate for Linux. You can do that using the File Explorer tool in Windows by following these steps:
1. Open File Explorer by clicking the folder icon in the taskbar, or typing file explorer in the search area in the taskbar and selecting File Explorer from the search results.
2. When File Explorer opens, click This PC on the left-hand side of the window. This displays the status of the various storage devices you have connected to your PC. This figure shows an example of what you might see in File Explorer.
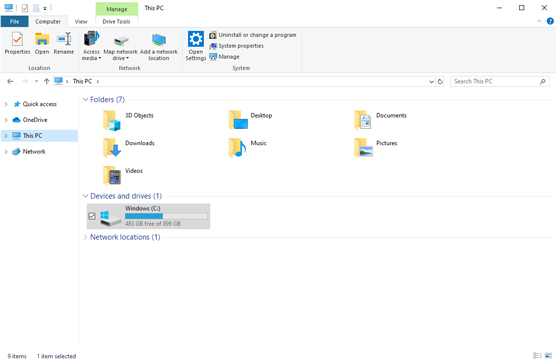
The Windows 10 File Explorer window.
The example shows a single hard drive connected to the PC (assigned as drive letter C). File Explorer shows the drive is 899GB in size, and has 483GB available for use as a second partition.
TIP: It's usually not a good idea to allocate all the free space on your hard drive to Linux; you'll want to leave some extra room in the Windows partition so you can continue doing things while you're running Windows, such as downloading and installing patches or saving new files.
After you determine how much space you want to dedicate to Linux, you're ready to partition the hard drive.
The Windows utility you want to use is the Disk Manager program. Follow these steps to use it:
1. Right-click the Start icon in the taskbar.
2. From the menu that appears, choose Disk Management.
The Disk Management dialog box appears as shown. The dialog box shows all the hard drives installed on the PC, along with the partitions for each one.

The Windows 10 Disk Management tool.
3. Right-click the partition that indicates it is assigned as a Windows partition and assigned a drive letter (usually the C drive).
You can click either the partition entry in the text list, or the graphical picture of the partition.
WARNING: As shown, many modern PCs create one or more hidden partitions that aren't assigned drive letters in Windows. These partitions don't appear in File Explorer, but are used by the PC to contain recovery data to reinstall Windows in an emergency. Don't mess with those partitions!
4. Select Shrink Volume from the pop-up menu. The Shrink Volume dialog box appears, as shown.
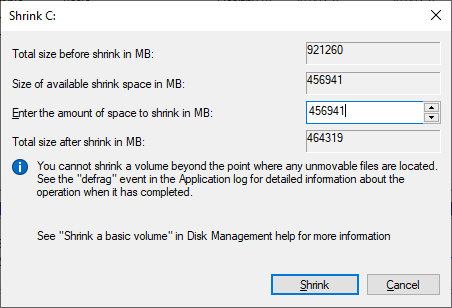
The Shrink Volume dialog box
5. Enter the amount of space you want to assign to the Linux partition in the text box. Note that the entry is in MB (megabytes) instead of GB (gigabytes). One gigabyte is equal to 1024 megabytes, so just multiply the available GB space value by 1024 to get the MB value to enter here.
6. Click Shrink.
WARNING: During the shrink process Windows tries to move any data stored near the end of the partition towards the front to make room for the new partition. However, some system files can't be moved, which may cause a problem and produce an error message. If this happens there are ways to move those files, but it gets much more complicated that what I can cover here. Fortunately, you aren't the first person to need to do this, so there's plenty of help available. One place to consult is the Microsoft Windows forum at answers.microsoft.com and you'll see lots of postings on how to handle this situation.
When the shrink process completes, a new partition appears in the Disk Manager listing. This new partition appears as Unassigned, and not have a drive letter assigned to it by Windows.
REMEMBER: If you have lots of space available on your existing Windows partition you'll probably want a lot more than 10GB of space. The 10GB is the minimum recommended for most Linux distributions to fit the operating system. However, if you download lots of multimedia, you'll quickly eat up whatever was left after you installed your software! Give Linux as much space as you think you can spare from your Windows environment.
How to partition a hard drive with Linux tools
If you're in a situation where you don't currently have Windows installed on the hard drive but would like to partition the hard drive first, you can use Linux tools to do the work for you. The easy solution is to boot your PC using a Live distribution and use the disk management tools available. Plenty of Live distributions include disk management tools by default, but by far the most popular is the KNOPPIX Linux distribution.
The KNOPPIX Linux distribution was the first to create a live Linux version, even back before there were DVDs (it was called a LiveCD!). What keeps KNOPPIX at the top of the list of popular Linux distributions is the myriad of utilities it includes by default. It touts itself as a rescue disk - a way to boot your PC if things go horribly wrong with the existing operating system, and be able to troubleshoot and possibly fix issues.
Follow these steps to partition your hard drive using KNOPPIX:
1. Download the latest KNOPPIX CD or DVD ISO image from the KNOPPIX website.
2. Burn the ISO image onto a bootable CD, DVD, or USB stick using a standard ISO image burning tool.
3. Boot your PC using the KNOPPIX LiveDVD. At the boot: prompt, press the Enter key to start KNOPPIX.
4. Select Graphical Programs→startlxde from the main menu. The KNOPPIX graphical desktop environment comes up. It's a fairly bare-bones graphical desktop so it can run on just about any PC, but it gets the job done.
5. From the KNOPPIX graphical desktop, click the Terminal icon in the taskbar at the bottom of the desktop. A Terminal session starts that provides access to the command prompt.
6. At the command prompt in Terminal, enter the command: sudo gparted. The GParted application is a popular disk management tool for Linux. It provides an interface similar to the Windows disk management tool, as shown.
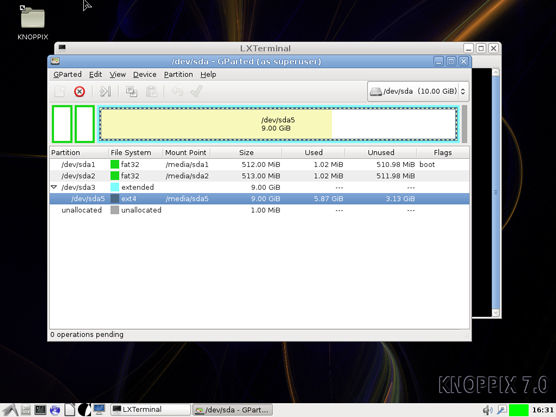
The Linux GParted disk management tool main window.
7. Right-click inside the partition you need to shrink.
8. Select Resize/Move from the pop-up menu. The Resize/Move dialog box opens, as shown.
9. In the Resize/Move dialog box, either drag the right end of the partition graphical box to resize the partition, or enter a new value in the New Size textbox. The colored portion of the box indicates where the existing data in the partition is stored. You should be able to move the end of the partition down close to that area.
10. Click the Resize/Move button to initiate the resizing process.
After the hard drive is partitioned you can exit the tool and shutdown KNOPPIX. And that's all there is to it!
About the Book Author
Richard Blum holds the Linux+ and Security+ certifications and has worked in the IT industry for more than 30 years. He is an online instructor for Linux and programming courses used by colleges and universities across the U.S. With experience as both a systems and network administrator, he has written numerous books on Linux and open source.

Nine previous editions of this popular benchmark guide can't be wrong! Whether you're new to Linux and need a step-by-step guide or are a pro who wants to catch up with recent distributions, Linux For Dummies, 10th Edition has your back. Covering everything from installation to automation, this updated edition focuses on openSUSE and Ubuntu and includes new and refreshed material-as well as chapters on building a web server and creating simple shell scripts.
In his friendly, no-jargon style, IT professional and tech higher education instructor Richard Blum draws on more than 10 years of teaching to show you just why Linux's open source operating systems are relied on to run a huge proportion of the world's online infrastructure, servers, supercomputers, and NAS devices-and how you can master them too.
• Study the thinking behind Linux
• Choose the right installation approach
• Pick up the basics-from prepping to desktops
• Get fancy with music, video, movies, and games
Whatever your Linux needs-work, fun, or just a hobby-this bestselling, evergreen guide will get you up and coding in the open source revolution in no time at all.
