If your computer keeps crashing, freezing, or randomly rebooting, one likely cause could be a bad memory chip. Before Windows 7 you had to download a memory diagnostic tool off the internet, but now Windows includes a built-in memory diagnostic tool. Here's how to use Windows built-in memory diagnostic tool.
To properly test memory, you'll want to release as much of it as possible from allocation by applications, so save any open files and close running applications before running the diagnostic tool.

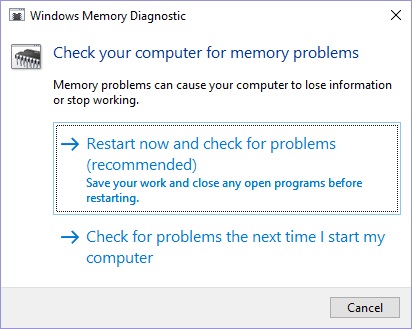
Open Control Panel and click on Administrative Tools. In the Administrative Tools group, double-click the Windows Memory Diagnostic shortcut.
Click Restart now and check for problems option. Note that you also have the option to schedule the test for the next time you restart your computer. Your computer will restart in the Windows Memory Diagnostics environment and begin the tests immediately. The screen will advise you as to the progress of the test.

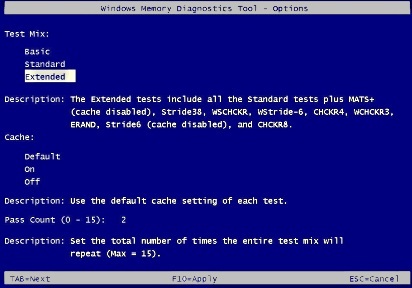
You can use TAB key to navigate to different test options. Extended mode includes every test in the Standard mode, plus many additional tests, however more tests are going to require more time. You can also select to turn off the cache, which will allow the tool to access RAM directly. After you've completed selecting options, press the F10 key and the scan will restart automatically.
Once the test completes, your computer will restart automatically, and the results are displayed in a notification pop-up. If the results indicate errors, you can get more information about the errors using Event Viewer. In the taskbar search box, search for eventvwr.exe. In Event Viewer expand the Windows Logs folder, right-click System and in the right panel click on Find. In the find dialog box type MemoryDiagnostics-Results, and click the Find Next button.
A computer's main memory usually consists of multiple chips mounted on one or more printed circuit modules (called "sticks") plugged into the mother board. The Memory Diagnostic tool may not provide you with enough information to determine which module caused the errors. You may need to remove memory modules one at a time to determine which one is defective. Always replace a defective memory module with one that is compatible with your machine.

Learn more at amazon.com
More Windows Troubleshooting Articles:
• PC Troubleshooting - Symptoms of a Bad CPU
• How to Fix Sqmapi.dll Error
• Troubleshooting Broadband Cable Modem Problems
• Make a Bootable Windows 7 USB Drive
• Clear DNS Cache to Fix Network Issues
• The Windows Recovery Console
• A lot of Beepen and Tooten But No Booten?
• Fix 0x80070035 Error on a Windows PC
• Can't Boot From CD or DVD Drive
• How to Spot a Failing Hard Drive
