If you have damaged the screen of your Dell Latitude E5520, don't despair. It's fairly easy to fix. This step-by-step guide will show you how to remove and replace the screen of a Dell E5520. However, most laptops are similar. It's important to make sure the new screen is the proper match for your laptop before you begin.
1. Manually shut down the laptop. Unplug the charger cable and then hold down the power button for a few seconds. This will completely kill the power of the inside hardware.

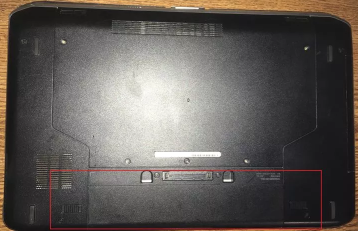
2. Remove the battery. The battery is located on the bottom at the back of the laptop. The battery can be removed by pushing the two slide latches.

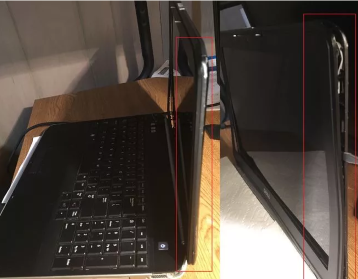
3. Remove the bezel. The Dell E5520 does not have screws on the front. Use a flat screw head to separate the LCD bezel from the side. When using a screw head, be sure to use it carefully. The front cover can break if it is not carefully done. Slowly remove all four sides.

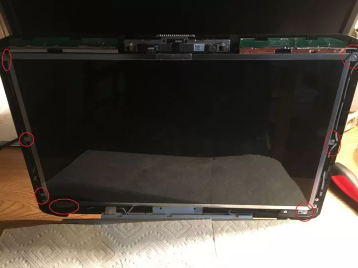
4. Remove all the screws from the front mounting bracket.
5. Carefully separate the LCD from the cover and place it face down on the keyboard.

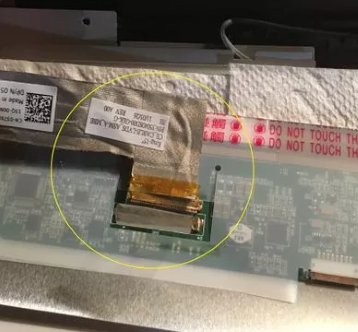
6. Remove the cable. In order to do this, peel off the tape that attaches the cable of the screen then detach the cable by gently pulling it out. Be careful when doing this step.
7. Take the broken screen out. Remove mounting brackets from the broken screen. In order to remove the bracket be sure to remove the screws from the side of the mounted screen.
8. Once your new screen is ready, unpack it and make sure it matches the old one. Installing the new screen is basically the reverse of removing the old screen.
9. To place the new screen on the laptop, transfer all mounting brackets to the new screen.
10. Connect the cable and inverter back through and latch them into place.
11. Before replacing the bezel and its screws, test the new screen. Attach the charger or reinstall the battery, and power on the laptop. If the screen does not work properly, power down the laptop, then double-check the inverter and video-cable connections.
12. Once the screen is working then screw the laptop hinges Back to the laptop. Make sure all the screws are tighten properly.
13. Snap the laptop bezel back into place, and close the laptop. Make sure to test it with your nails to see if there is any gap or not.

14. Insert battery and power on your laptop. You should have a perfectly working new screen.
Article source: wikiHow wikiHow is a group effort to create a great resource: the world's largest free how to manual. wikiHow articles help people solve their everyday problems. wikiHow licenses all content under a Creative Commons License. The license allows wikiHow content to be used freely for noncommercial purposes. The Creative Commons License also allows for the creation of derivative works.
More Windows Troubleshooting Articles:
• Don't Have Permission to Write to Drive
• Computer Repair with Diagnostic Flowcharts
• How to Create a Windows XP Boot Disk
• Understanding the boot.ini File
• Introduction to Windows 10 Resource Monitor
• Troubleshoot Windows with Event Viewer
• How To Fix AppHelp DLL Errors On Your PC
• CD-ROM Problems
• Fix Windows 7 Repeatedly Tries to Update
• Troubleshooting Windows 10 DHCP is not enabled

