Although Windows was designed to be usable without a pointing device, doing so really kills your productivity. So when your mouse pointer disappears, its very important to get it back. To do so, you need to navigate the pointing devices configuration screens using the [Tab] and [Arrow] keys. The steps required are listed below.

1. Click on the Windows button to pop up the Start menu.
2. Type in "Mouse & touchpad settings". The Settings windows will appear with Mouse & touchpad highlighted.
3. Press [Tab] key to tab down to "Additional mouse options" link at the bottom of the window. When link is highlighted, press [Enter] button. The Mouse Properties dialog box will appear.
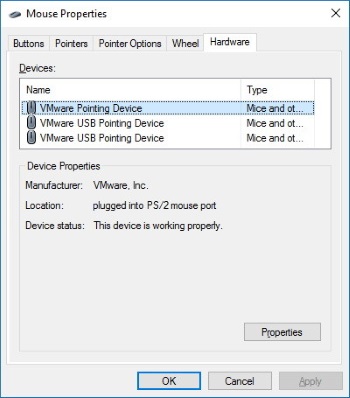
4. Use the [Ctrl][Tab] keys to select the Hardware tab.
5. On the Hardware tab, in the Devices: list, use the arrow keys to highlight the device in the list.
6. Use the [Tab] key to highlight the [Properties] button and click on the button. The Properties dialog box for that specific device will appear.
7. In the device's Properties dialog box, press the [Tab] key to tab down to the [Change settings] button.
8. In the next Properties dialog box that appears, you can use the [Ctrl][Tab] keys to select each tab to identify the problem with the mouse or change the device's driver.
More Windows Troubleshooting Articles:
• Windows XP's Built-in Help and Support Center
• Solving Image Problems on HP Laser Printers
• Printer Troubleshooting
• How to Create a Windows XP Boot Disk
• How to Fix Windows XP Errors
• Windows Doesn?t Shut Down
• How to Spot a Failing Hard Drive
• How to Fix Extensible Storage Engine Errors
• First Stop When Troubleshooting Windows 7 - Control Panel
• How to Fix iisutil.dll Error

