After booting up your computer, with factory installed Vista for the first time, be sure to create a set of recovery discs of the full factory image. The recovery discs are used to start up (boot) the computer and recover the operating system and software to factory settings in case of system instability or failure. While the steps listed here are for a Compaq PC with Windows Vista, different manufacturers have slightly different instructions and these will give you a general overview of the process.
Steps
1. Click Start | All Programs | Recovery Manager.
2. Select Recovery Manager. This will open Recovery Manager.
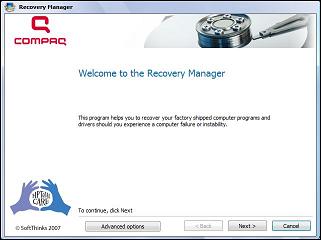
3. Click Advanced Options. If you are using a laptop and operating on battery power alone you must connect to an AC power outlet before you can go to the next step.
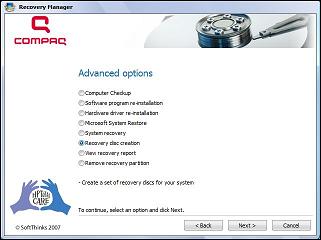
4. Select Recovery disc creation. Click Next. The Recovery Manager will begin creating the necessary files. This may take a while, so be patient until the bar has reached 100%.
5. Read the table of requirements that appears. Depending on the type of discs you use, more or less may be needed; if you use ordinary CDs, Recovery Manager will require more compared to fewer discs if DVDs are used.
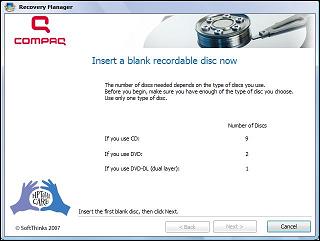
6. Insert your first blank disc, having made sure it is fully labeled, such as "Recovery Disc 01" or "Recovery Disc 1 of 2". The optical drive of your computer will have automatically opened. If not, open manually. Close the optical drive and click Next.
7. Understand and confirm you want to go through with the operation using the type of disc you have inserted by clicking Next.
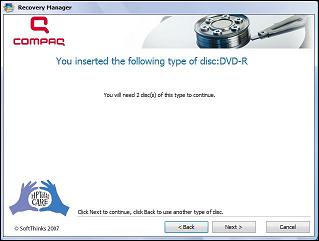
8. Wait while Recovery Manager now creates the first disc. This may take 20-40 minutes as it collects the files, writes the files and verifies the files to disc.
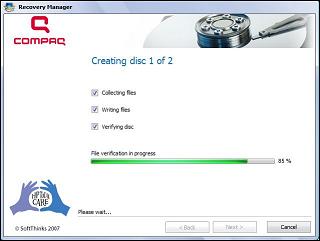
9. Remove the disc and insert the next after the first has been finished after clicking Next. Continue the creation of discs according to the necessary requirements, up until the last has finished creating files.
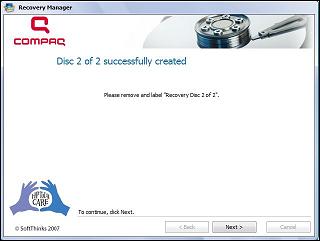
10. Click Next after removing the disc and then Finish to complete the session. Congratulations! You have just made yourself a set of recovery discs.
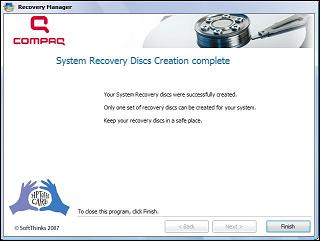
11. Use the recovery discs to recover your computer in case of system instability or failure.
Tips
- The number of discs you will need, whether CDs or DVDs, is highly variable across all computers. Do not take the table of requirements for granted.
- Remember, if using a laptop you must be connected to an AC power outlet to create recovery discs.
- Be sure to label all discs in numerical order as they are created. If the time comes when your computer has crashed, and you don't know the order in which your recovery discs are to be inserted, your system may be in very big trouble.
- You will need high-quality CD-R, DVD-R, DVD-R with double-layer support, DVD+R, or DVD+R with dual-layer support discs (all discs purchased separately with computer).
- Re-Writable discs (RW) are not compatible with the Recovery Manager software.
- Permission may have be sought from the computer administrator (unless you are one) in order to start creating recovery discs.
- These instructions are based on a Compaq Computer with Windows Vista, and are not intended for previous versions of Windows such as XP.
- Sony's recovery disc creator is in a bit more unusual spot. Look in the Help & Support menu to find the recovery disc creator.
Warnings
- Only one set of recovery discs can be made per computer, so do not lose them. Handle the discs carefully and keep them in a safe place.
Things You'll Need
- A computer
- OS (operating system) of Windows Vista
- High-quality discs
- A Compaq or HP computer with Recovery Manager
Article source: wikiHow wikiHow is a group effort to create a great resource: the world's largest free how to manual. wikiHow articles help people solve their everyday problems. wikiHow licenses all content under a Creative Commons License. The license allows wikiHow content to be used freely for noncommercial purposes. The Creative Commons License also allows for the creation of derivative works.
More Windows Troubleshooting Articles:
• Video - Dell Laptop CPU Replacement Tutorial
• How to Fix "USB Device Not Recognized"
• Windows XP's Built-in Help and Support Center
• Troubleshoot with Free Process Explorer Utility
• Windows Don't Start Because of a Corrupted Registry
• Hard Drive Does Not Boot
• Fix Windows 7 Repeatedly Tries to Update
• Windows 7 Startup Repair Tool
• Troubleshooting a Dead Computer
• Your Computer Can't Keep Time


