

Technical Stuff: It's more important than ever to learn how to work from home or from other offsite locations. During the COVID-19 lockdown, millions of people suddenly required equipment that they may not have had in their homes before: a webcam, a second display, a better keyboard, a computer desk, or even an office chair. They also had to familiarize themselves with apps and tools for remote work. Learn more below about how to make these tools (both physical and technological) work for you.
How to enable Remote Desktop connections
Remote Desktop connections allow Windows devices to connect to one another through the internet or your local network. When you are connecting remotely to another Windows PC, you see that computer's desktop. You can also access its apps, files, and folders as if you were sitting in front of its screen. This is useful for IT professionals and business users who must work remotely.
If you want to connect remotely to the Windows 10 PC you are on from another PC, or you want to let others connect to it, you must enable Remote Desktop. Here's how:
1. Click or tap the Start button, and then the Settings icon. The Settings app opens.
2. Open the System category of settings, and on the left, click or tap Remote Desktop. On the right, you see the Remote Desktop settings, shown in the figure below.
3. Click the switch to Enable Remote Desktop and confirm your choice. You may also want to dwell and click Advanced Settings, to see how Remote Desktop is configured to work in Windows 10.
4. Close Settings.
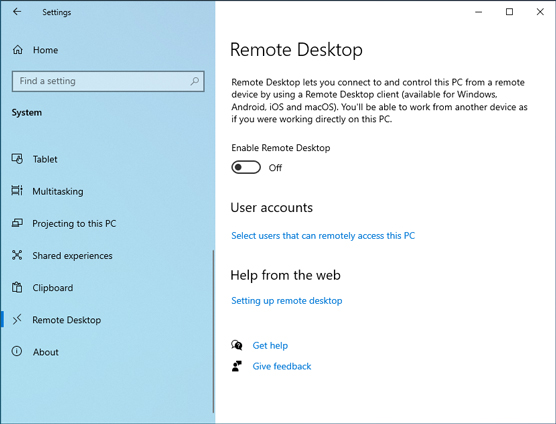
Enabling Remote Desktop in Windows 10.
Warning: This procedure works only on Windows 10 Pro or Enterprise. If you run another edition, such as Windows 10 Home, you can't enable this feature. In Windows 10 Home, if you open the Remote Desktop section in the Settings app, you see a message stating that Your Home edition of Windows 10 doesn't support Remote Desktop.
Remember: Don't forget that you turn on Remote Desktop to let other computers connect remotely to yours. You do not need to enable Remote Desktop if you want to connect from your computer to another. However, the computer to which you want to connect must have Remote Desktop enabled for the remote connection to work.
How to connect with Remote Desktop Connection
If Remote Desktop is enabled on the PC that you want to connect to and you know the IP address and details of a user account that exists on that computer, you can connect to it from your Windows 10 PC by using the built-in Remote Desktop Connection app. Here's how to establish a remote desktop connection from Windows 10:
1. In the search box next to the Start button, type remote, and click or tap the Remote Desktop Connection result. The Remote Desktop Connection app opens, asking you to enter the address of the computer that you want to connect to, as shown.
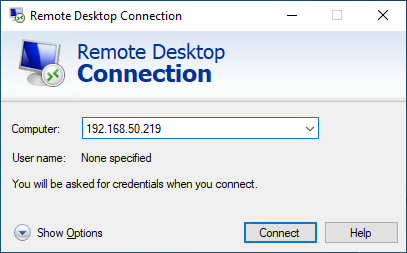
The Remote Desktop app allows you to connect to other computers.
2. Enter the IP address of the computer you want to connect to, and click or tap Connect. Remote Desktop Connection may take some time to establish the connection, after which it asks for the username and password to use to connect to that PC.
3. Enter the details of the user account to use to connect to the remote PC, and then tap or click OK.
4. If you see a warning message that problems exist with the security certificate of the PC you want to connect to, tap or click Yes to continue. When the connection is established, you'll see the desktop of the remote PC as if it were your own. A toolbar at the top displays connection information, as shown.
5. When you've finished working on the remote PC, click or tap the X button in the toolbar on the top of the screen.

Tip: If you want to control how the Remote Desktop connection works, click or tap Show Options, and configure the available settings. You can also set the username so that you don't have to enter it manually every time. Also, connect to only trusted computers.
How to connect a second monitor
Working on two screens at the same time can increase productivity, especially in times of lockdown, when you have to be working from home. To connect a second display to your Windows 10 laptop or PC, first check out the ports on the display and on your Windows device. The figure shows you how all the video ports look.
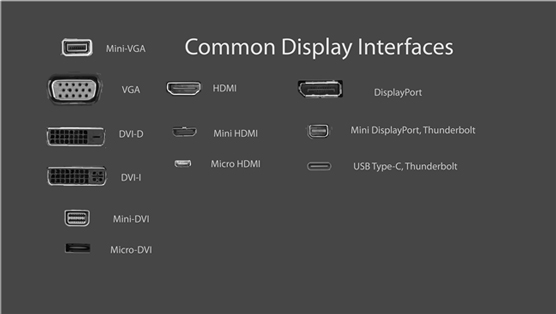
Courtesy of Wikipedia
All the ports used by monitors, new and old.
There are two possible situations:
• Your monitor and your laptop or PC share the same video port. Buy a cable that has the same video port on both ends (HDMI, DisplayPort, USB Type-C, and so on).
• Your monitor and your laptop or PC do not share a common video port. Buy an adapter to convert the video signal from your laptop or PC to the external monitor. Depending on what video ports you have on your laptop or PC and monitor, you might need a DisplayPort-to-VGA, HDMI-to-DisplayPort, USB-C-to-HDMI, VGA-to-HDMI, DVI-to-HDMI, or Mini DisplayPort-to-DisplayPort adapter. You can find inexpensive adapters in electronics shops for almost any type of video connection.
After you have the necessary cable, do the following to connect the second monitor:
1. Using the appropriate cable, connect the monitor to your Windows 10 laptop or PC.
2. Turn on the second monitor by plugging it into a power outlet and pressing its power button. Windows 10 takes a few seconds to detect the external monitor. Note that the external monitor may not display anything after it's detected.
3. Press Windows+P to display the Project options. You can view the desktop only on your PC screen (the main display) or only on your second screen, view the same desktop on both screens, or extend the desktop and have two different desktops side by side.
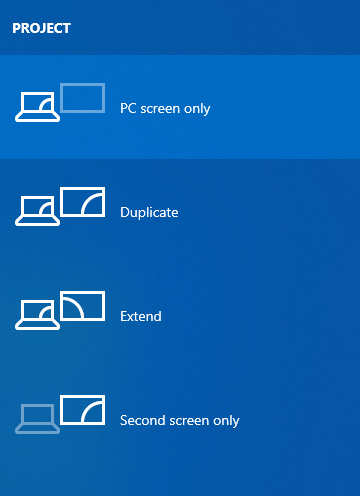
The Project options in Windows 10.
4. Press Windows+P to cycle through the Project options and view the results. You can also click to select an option. The image changes with each selection.
Tip: If you want more help on this subject, check out a great Digital Citizen tutorial that covers all possible scenarios for connecting a second display, including establishing a wireless connection to a Smart TV or a Miracast-enabled display.
How to install a webcam
During the COVID-19 lockdown, webcams became a hot item. Millions of people began working from home and had to rely on webcams to join countless conference calls. If you are in the market for a webcam, realize that most people don't need a high-end model with 4K video recording. A simple webcam with 720p or Full-HD video recording should suffice.
Installing a webcam is as simple as plugging it into a USB port on your computer and waiting for Windows 10 to detect it and install its drivers. One of my favorite webcams is Microsoft LifeCam HD-3000. It covers the basics, is affordable, and is plug-and-play.
Some webcams include software to activate features that may be useful to you. That's why it's a good idea to do an internet search for the Support page of the webcam's manufacturer and download from there the latest software and drivers for your webcam model. Install the webcam's software, and you should have no problems using it for Skype, Zoom, Teams, and Google Meet video calls.
How to add clocks to the Taskbar
If you work with a team from a multinational corporation, it's a good idea to set Windows 10 to display a clock from that corporation's time zone. That way, you can quickly check the time in the country of your team members so you don't call someone as they're trying to get their beauty sleep! Here's how it works:
1. Right-click the clock in the bottom-right corner of the screen. A large menu appears, with many options for customizing the taskbar.
2. Choose Adjust Date/Time. The Settings app opens, displaying options about adjusting the date and time.
3. Scroll down to Related Settings on the right, and click Add Clocks for Different Time Zones. The Date and Time window appears, as shown.
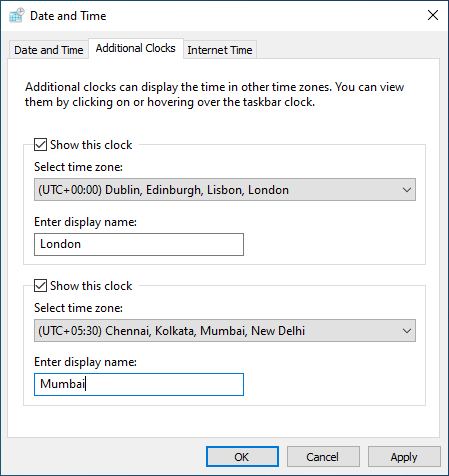
The Date and Time window where you add clocks to the taskbar.
4. Select the first Show this Clock box, choose a time zone from the list, and enter the name of the city/country that interest you.
5. Select the second Show this Clock box, choose another time zone from the list, and enter the name of the city/country that interest you.
6. Click OK.
To see the additional clocks, move your mouse cursor over the clock on the taskbar. You can also click the clock and see the additional clocks just above the calendar, as shown.
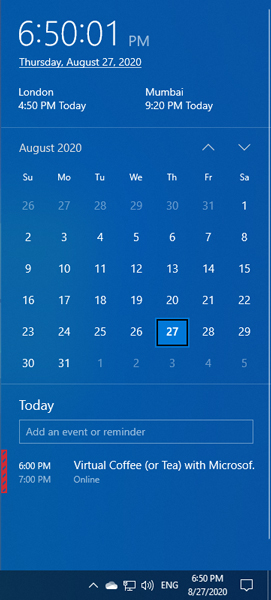
The clocks you added appear just above the calendar.
About the Book Author
Woody Leonhard was one of the first Microsoft Consulting Partners and Microsoft beta testers. His monthly Q&A columns in ZD Smart Business magazine have one million readers, and he has been honored with multiple Computer Press Awards.
Ciprian Rusen is co-founder and chief editor of Digital Citizen, a tech-focused blog at digitalcitizen.life. He is also the author of a number of technology books on Windows, Microsoft Office, and other topics.

Dig into the ins and outs of Windows 10
Computer users have been "doing Windows" since the 1980s. That long run doesn't mean everyone knows the best-kept secrets of the globally ubiquitous operating system. Windows 10 All-in-One For Dummies, 4th Edition offers a deep guide for navigating the basics of Windows 10 and diving into more advanced features.
Authors and recognized Windows experts Ciprian Rusen and Woody Leonhard deliver a comprehensive and practical resource that provides the knowledge you need to operate Windows 10, along with a few shortcuts to make using a computer feel less like work.
This book teaches you all about the most important parts of Windows 10, including:
• Installing and starting a fresh Windows 10 installation
• Personalizing Windows 10
• Using Universal Apps in Windows 10
• How to control your system through the Control Panel in Windows 10
• Securing Windows 10 against a universe of threats
Windows 10 All-in-One For Dummies, 4th Edition is perfect for business users of Windows 10 who need to maximize their productivity and efficiency with the operating system. It also belongs on the bookshelf of anyone who hopes to improve their general Windows 10 literacy, from the complete novice to the power-user.
