When you delete a file in Windows 7 it's not really deleted. By default it's moved to a special hidden system binary file at the top of each drive named $Recycle.Bin. By doing this, you can easily restore the deleted file by right-clicking on the Recycle Bin icon, selecting "Open" in the popup menu that appears, right-clicking on the name of the file, and selecting "Restore" in the popup menu that appears.
But what if you're one of those people who, when they say "delete" they really mean delete? Actually deleting a file has two advantages. 1. Unauthorized users of the same computer can't access your deleted files, and 2. the stored files take up space on your drive. Well, you can easily configure the Recycle Bin to immediately delete files.
Note: Under certain circumstances, even deleted files can be restored by using special file recovery software, or by a user that knows how to use scripts. However, if you use an application like the free File Shredder utility, the file really is gone.

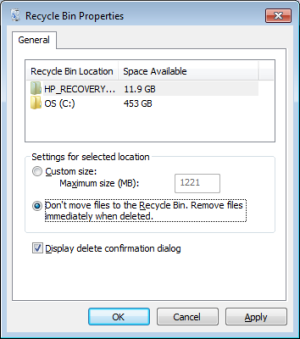
To configure the Recycle Bin to immediately delete files, right-clicking on the Recycle Bin icon and in the popup menu that appears, select "Properties". In the "Recycle Bin Properties" dialog box that appears, set the radio button next to "Don't move files to the Recycle Bin, Remove files immediately when deleted." Then click on the [Apply] button, then click on the [OK] button.
Now when you right-click on a file name on Windows Desktop or in Windows Explorer, and select delete in the popup menu, it does not get saved in the Recycle Bin, it really does get deleted.

