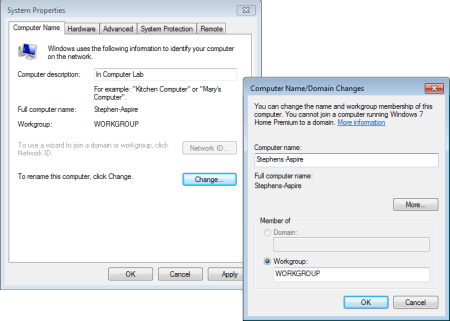
A computer might have a default name provided by the individual who built it, or you may have inherited the computer from a family member or from another employee who changed positions or left the company. The computer's name may no longer apply. Fortunately, it's very easy to change a computer's name.
1. In Control Panel, select the System and Security group. on the System and Security window, under System, click on See the name of this computer.
2. On the View basic information about your computer page, the current name of your computer is listed under Computer name, domain, and workgroup settings. Click on the Change Settings link. If the User Account Control warning box appears, click on the [Yes] button.
3. In the System Properties dialog box that appears, make sure the Computer Name tab is selected.

4. The text box near the top of the Computer Name tab is NOT for the computer's name, it's where you might type in a description of the computer. To change the computer's name, click on the [Change...] button next to "To rename this computer, click Change.".
5. In the Computer Name⁄Domain Changes dialog box that appears, enter the new computer's name in the Computer name" text box, then click on the [OK] button.
Note: The new computer name doesn't take effect until after you restart the computer.
Note: Depending upon the type of network the computer is connected to, changing a computer's name can cause it to lose access to the network. For example having two computers with the same names on a network can cause problems.

