Windows 7 WLAN AutoConfig Service discovers and allows you to connect to and disconnect from WLANs (Wireless Local Area Networks). If you have a wireless adapter from a manufacturer that requires a special driver you need to disable WLAN AutoConfig. Or if your computer is connected to a Cabled LAN, you may want to disable WLAN AutoConfig for security reasons. Here's how to turn off WLAN Autoconfig:
1. In Control Panel, select the System and Security group.
2. In the System and Security click on Administrative Tools.
3. In Administrative Tools windows right panel click on Services.
If the User Account Control warning dialog box appears, click on the [Yes] button.

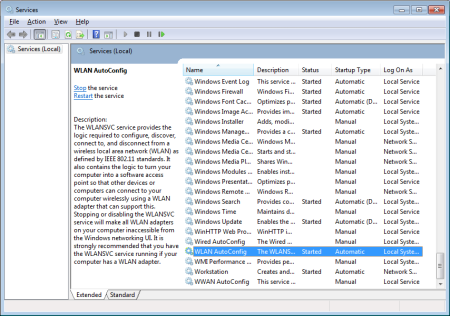
4. In the Services window, scroll down to and select WLAN AutoConfig.
In the WLAN AutoConfig row, in the Started column it may display Started, and in the Startup Type column it may display Automatic.

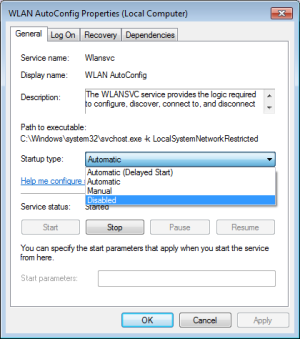
5. Double-click on WLAN AutoConfig and in the WLAN AutoConfig Properties dialog box that appears, in the Startup type: drop-down list select Disabled. In the Service status: section click on the [Stop] button.
6. Click on the [Apply] button. Then click on the [OK] button to dismiss the WLAN AutoConfig Properties dialog box.
In the Services window the WLAN AutoConfig service the Started column should now be blank and the Startup Type column column should display Disabled. Disabling this service makes your computer inaccessible by wireless networks. If you need to turn this service back on, follow the same procedure, except in the WLAN AutoConfig Properties dialog box set Startup type: to Automatic or Manual and click on the [Start] button.

