Whenever you add or remove software or hardware on your computer, there is a posibilty of something going wrong. In fact, whenever you make a major configuration change something can go wrong. And if you edit the registry directly - good luck. It's very wise to create a restore point before you make any major changes to your PC. A restore point saves a copy of system files, driver files, registry keys, installed programs, etc. If something goes wrong with your system change, you can use System Restore to return the system back to its previous state.
But when you're itching to install that new software or hardware, who's got time to figure out how to create a restore point? Actually, you go to Control Panel | System and Security group | System | System Protection, and in the System Properties dialg box that appears, select the System Protection tab and in the Protection Settings section, click on the [Create] button. See what I mean? Why not put a link to that button right on your desk top?
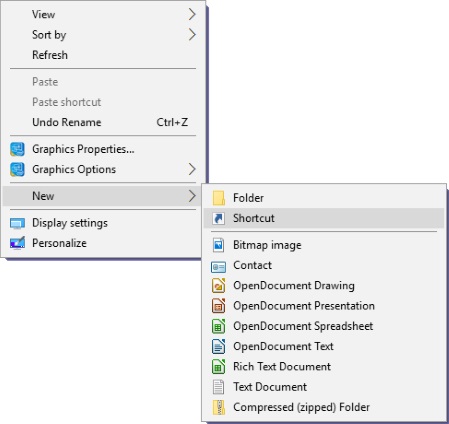
1. Right-click on an open area of your desktop and, in the popup menu that appears, select New > Shortcut.

2. In the Create Shortcut dialog box that appears, type in:
control.exe sysdm.cpl,@0,4
3. Click on the [Next] button and in the next page of the dialog box type in a name for the shortcut e.g. Create Restore Point. Then click on the [Finish] button.
To create a restore point, double-click on the shortcut and the System Properties dialog box will appear with the System Protection tab already open, all you need to do is click on the [Create] button. Now, if your new software or hardware installation goes bad, all you need to do is double-click on the shortcut again, except this time click on the [System Restore] button.
By the way, if you're interested in what that text you typed in means, it opens up Control Panel System properties (sysdm.cpl) dialog box to page 1 (@0) tab 4. Actually the @0 isn't required because the System properties dialog box has only one page, but you still need to put the separating commas.

