The Windows 10 backup program, File History, saves the files that you've created. It doesn't back up your apps and programs. After all, apps and programs can always be reinstalled. But many of the moments that inspired so many of your photos, videos, and documents can never be re-created.
To keep your files safe, File History automatically makes a copy of every file in your Documents, Music, Photos, and Videos folders. It copies all the files on your desktop, as well. And File History automatically makes those copies every hour.
File History makes your backups easy to see and restore, letting you flip through different versions of your files and folders, comparing them with your current versions. Should you find a better version, a press of a button brings that older version back to life.
Remember: File History doesn't work until you turn it on, a process I describe in Chapter 13. Please, please, flip back a few chapters and turn it on now. The earlier you turn it on, the more backups you'll have to choose from when you need them.
To browse through your backed-up files and folders, restoring the ones you want, follow these steps:
1. Click the taskbar's File Explorer icon and then open the folder containing the items you'd like to retrieve.
For example, click This PC in the folder's left pane to see your most commonly used folders, Desktop, Downloads, Documents, Music, Pictures, and Videos. Open any folder by double-clicking its name.
2. Click the Home tab on the Ribbon atop your folder; then click the History button.
![]()
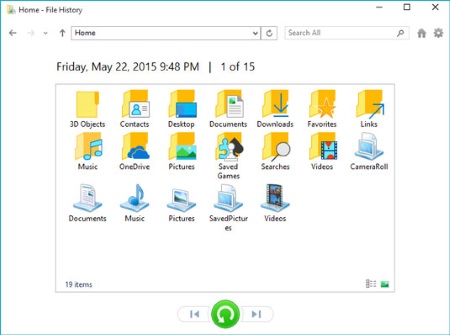
Clicking the History button, shown here, fetches the File History program, shown in the following figure. The program looks much like a plain old folder. For example, the figure shows what happens if you click the History button in any folder and then click File History's Home button: That button lets you see all of your backed up folders.

The File History program lets you restore backups from any of your main folders.
The File History program shows you what it has backed up: your main folders, your desktop, your contacts, and your favorite websites.
Feel free to open the folders inside the File History window. You can also peek inside the files you find there to see their contents.
3. Choose what you'd like to restore.
Point and click your way through the libraries, folders, and files until you spot the item or items you'd like to restore:
• Folder: To restore an entire folder, open it so you're viewing its contents.
• Files: To restore a group of files, open the folder containing them, so the files' icons are on screen.
• One file: To restore an earlier version of a file, open that file from inside the File History window. File History displays that file's contents.
When you've found the file or folder you want to restore, move to the next step.
4. Move forward or backward in time to find the version you'd like to restore.
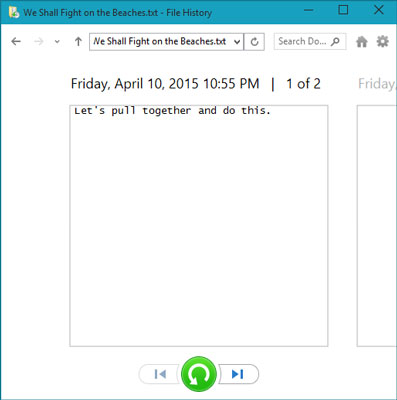
To browse through different versions of what you're currently viewing, choose the left-pointing arrow along the bottom, as shown here. To see a newer version, choose the right-pointing arrow.

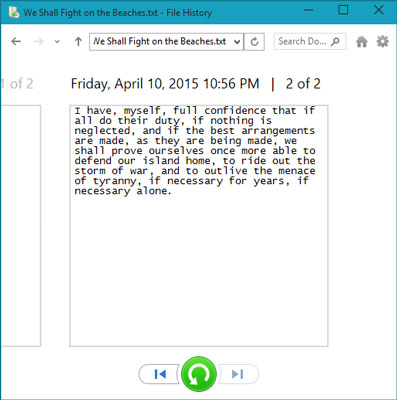
When looking at a particular file's contents, click the left or right arrow along the bottom to see newer and older versions of the file.

A newer version of the same document.
As you move forward and backward through time, feel free to click open folders or individual files, peeking inside them until you're looking at the version that you want to retrieve.
Not sure whether a folder contains your sought-after item? Type it into the Search box in File History's top-right corner.
5. Click the Restore button to restore your desired version.
Whether you're looking at an individual file, a folder, or an entire library's contents, clicking the Restore button places that item back in the place where it used to live.
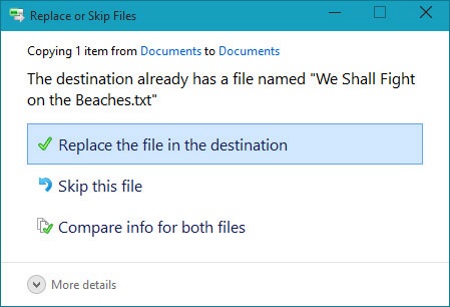
That brings up a potential problem, however: What happens if you try to restore an older file named Notes into a place that already contains a file named Notes? Windows warns you of the problem with the window shown, which brings you to Step 6.

Choose whether to replace the existing file, skip the file, or choose which file to keep.
6. Choose how to handle the conflict.
If Windows notices a naming conflict with the item you're trying to restore, File History offers you hree ways to handle the situation.
• Replace the File in the Destination Folder. Click this option only when you're sure that the older file is better than your current file.
• Skip This File. Click this if you don't want to restore the file or folder. This option returns you to File History, where you can browse other files.
• Compare Info for Both Files. Often the best choice, this option lets you compare the files' sizes and dates before choosing which one to keep, the incoming file or the currently existing file. Or, if you want, this choice also lets you keep both files: Windows simply adds a number after the name of the incoming file, naming it Notes (1), for example.
7. Exit File History by closing the window.
You close the File History window just as you close any other window: Click the X in its top-right corner.
Tip: Want to know more about File History? Read on:
• In addition to backing up everything in your main folders and on your desktop, File History stores a list of your favorite websites, listed earlier in Figure 18-2 as Favorites. It also backs up the OneDrive files you've synced to your PC.
• When buying a portable hard drive, flash drive, or memory card to create backups, don't skimp on size. The larger the hard drive you choose, the more backups you can save. File History comes in very handy.
This is an excerpt from:
Millions of Windows users have turned to Windows 10 For Dummies for quick, friendly, and easy-to-understand help with their computers. Windows 10 For Dummies 3rd Edition continues this tradition as it helps you navigate the twists and turns of Windows. Start at the beginning to discover the basics of the Windows interface or flip to later chapters to help you work with Windows apps, connect to the Internet, or customize your privacy settings.
Updated to cover the latest changes to Windows 10, this revised edition is ideal for first-time Windows users who need a guide to their operating system as well as experienced users who need a road map to the latest features. Inside, the book quickly and easily shows you how to do everything from establishing a user account, to corralling your photos, to setting up a printer, to using Windows on a tablet—and everything in between.
• Manage the start-up menu and the Windows desktop
• Get to know the programs that come with Windows 10
• Discover troubleshooting tips and privacy tricks
• Be productive at home or in the office
If you use Windows 10, you’ll want to keep this updated edition of the trusty companion nearby as you make your way around the new OS.
Reader F. David says, " Windows 10 For Dummies was just what I needed to understand and manage my Windows 10 based computers. This publication provides all of the information and operating instructions to take advantage of all of the features that Windows 10 contains. It is unbiased and helps with features decisions including the use of new tools/apps within Windows 10, and those third party systems that are a must have. And it will help you, if an when problems arise. I also suggest that that you place an advanced order from Amazon for the new 2016 Networking for Dummies volume to round out your library on Windows 10 based systems. A great reference set!"
More Windows Administration Information:
• SMART Disk Drives Warn You Before They Fail
• How to Create a Bootable USB Drive
• How to Setup a VPN Between Two Computers
• Set Up Parental Controls
• Video - Microsoft Remote Desktop - Part One
• How to Configure the msdos.sys file
• Check Your Version of PowerShell
• Network Security Through the Principle of Least Privilege
• How to Share a Printer
• Script to Identify Your Systems HAL


