How to Create a Product Box in Photoshop
Do you want to design an attractive box for your product? With Photoshop, you
can easily create one, just like this:

Steps
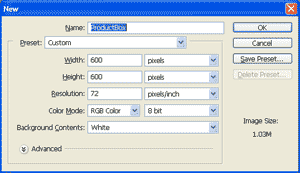
1. Start Photoshop and create a new document by typing CTRL+N. To have plenty
of space to work with, for "Name:" enter ProductBox, "Width:" enter 600, for
"Height:" enter 600, "Resolution:" enter 72, and "Background Contents:" enter White. Click "OK."

2. Add the front and side of the box.
1. Create a front and side for the product box as separate documents, or open the
front and side images downloaded from the "Things You'll Need" section below. For
this How-to, the images being used are the downloaded images. If you want to create
your own front and side, download the images from below and use them as a starting
point for your own images.
2. Activate the product_box_front document by clicking its toolbar. Type CTRL+A to
select the entire document, and then CTRL+C to copy the contents of the document.
3. Activate the ProductBox document we just created by clicking its toolbar. Type
CTRL+V to paste the front of the box into the document.
4. Activate the product_box_side document by clicking its toolbar. Type CTRL+A to
select the entire document, and then CTRL+C to copy the contents of the document.
5. Activate the ProductBox document we created, and
type CTRL+V to paste the side of the box into the document. You can now close the
front and side of the box documents, you don't need them anymore.
| 
