Step 1 - Before Beginning
Creating a customized home Wi-Fi network is a great weekend project that you can accomplish with some patience and the proper tools. Before you dive into the wireless world, make sure you know what lies ahead of you. Make a thorough analysis of your networking needs, what you need to accomplish, and what you expect to receive as a reasonable return on your investment. Assess your networking needs; determine how many workstations you'll need to connect and where you can best utilize them. We recommend that you have the following equipment and information:
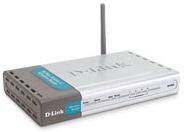
- A Wireless Router
- Wireless adapters and/or a wireless-enabled system or laptop

- A broadband connection to the Internet (typically via cable or DSL modem)
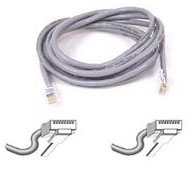
- An Ethernet cable
- Pen and paper to write down current network settings, such as IP and MAC addresses

- The IP address assigned to your system by your ISP if you use a static IP address
- If you use DSL, the username and password assigned to you by your ISP
- The MAC address for all wireless network adapters
The core of any Wi-Fi network is a wireless router or gateway. For our demonstration, we are using the D-Link DI-624 AirPlus Xtreme G 802.11g router. The Airplus Xtreme G DI-624 delivers transfer rates up to 108Mbps in the 2.4GHz frequency and offers enhanced security to protect wireless communications. You'll also need a wireless adapter for each system that's connecting to the network.
We installed two D-Link AirPlus Xtreme G 802.11g wireless adapters: a DWL-G650 PC Card adapter for a Windows 2000 notebook PC and a DWL-G520 PCI adapter for a secondary desktop running Windows XP Home Edition. Plus, the DWL-G650 and DWL-G520 also include a configuration utility to discover available wireless networks and create and save detailed connectivity profiles for those networks most often accessed. The primary PC, connected to the router via Ethernet cable, was running Windows XP Professional.
Step 2 - Preparing for the Installation Job
Before you start your installation, you'll need to gather some essential information in order to set up your router correctly. You can get this information directly from your PC.
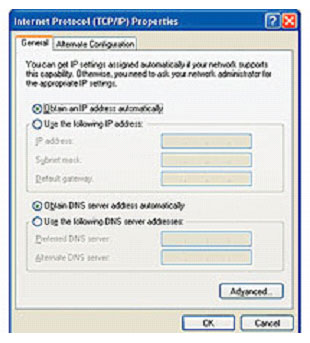
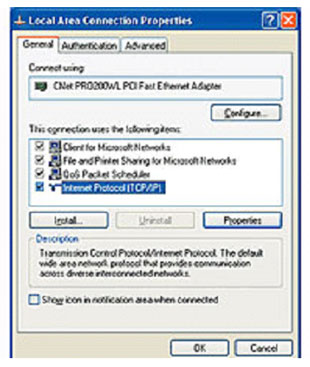
- Double-click the Network Connections icon within the control panel
- Right-click the icon for your PC's Ethernet adapter
- Choose Properties > Internet Protocol (TCP/IP) > Properties.
If "Use the following IP address" is highlighted, that means your Internet access uses a static IP address. Jot down the IP address, the subnet mask and the default gateway. Then click "Obtain an IP address automatically." Click OK to apply your changes and OK again to close the dialog.
If you have a DSL connection, you'll probably need the username and the password your system requires to connect to your ISP. If you don't know the values, try looking within the software your ISP provided. You may need to uninstall the PPPoE connection software that your ISP provided. To find out, check your router's documentation.
Now is also a good time to collect the MAC addresses of any wireless-network adapters you'll be installing. The MAC address should be printed on the Wi-Fi PC Card or the PCI adapter.
Step 3 - Installing the Wireless Router
Before you install the router, power down your PC and modem, then disconnect the Ethernet cable from your PC and connect it to your router's WAN port so that the Ethernet cable connects the modem to the router. Now, you'll need to string a second Ethernet cable between your PC's Ethernet port and one of the router's Ethernet ports.
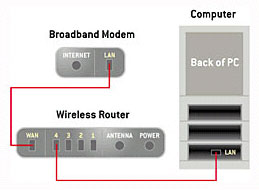
Connect your modem to the WAN port on the router and open your PC to an open Ethernet plug on the router.
Turn on the modem and wait until it connects. Plug in and power on the router and turn on your PC. When your system boots, open a browser window and try a few Web sites to test your Internet connection. If all seems to be working, go to the next step
Step 4 - Configuring the Router
Using the PC connected to the router, launch your browser. In the URL address field, enter the router-configuration IP address provided in the documentation. For the D-Link KL-624, the IP address is 192.168.0.1. You will also need to enter the configuration-utility ID (usually admin) and the default password.
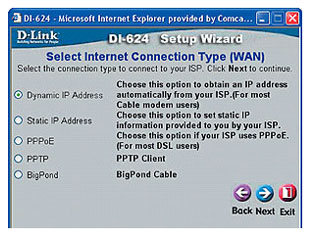
DSL users likely will have to choose a PPOoE Connection type.
Next, enter the information you collected in step 1 as instructed in your router's installation guide. If you jotted down an IP address in step 1, set the router to use a static IP address and enter the address and other information. If you're a DSL user, you'll likely need to choose a PPPoE Internet-connection type, then enter the username and password you selected to log on to your ISP. Leave other settings such as encryption and SSID at their defaults for now, exit your router's configuration routine, and check your Internet connection. If you still can't access any Web sites, check your router's documentation for troubleshooting advice and call the manufacturer for technical support, if necessary.
Step 5 - Installing the Wireless Adapters
If you're using the D-Link PC Card and PCI adapters, you must install the software from the CD before installing the wireless adapters (these adapters will connect wirelessly to the router). Next shut down your system, install the adapter and reboot. After Windows boots the Found New Hardware wizard should appear and begin the driver installation. Select "Install the software automatically" and click "Next." If you see a message warning you that the driver has not passed Windows logo testing, click "Continue Anyway."
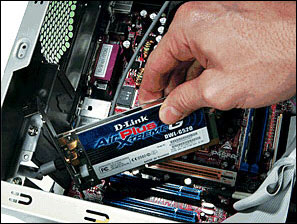
Install a PCI card in each desktop system you want to connect to your network.
Note: If you have a notebook with built-in Wi-FI you won't need the PC card adaptor.
Step 6 - Configuring the Wireless Systems
At this point, if you are unable to connect your wireless systems to the Internet you might have a couple of more steps to go before completing your wireless networking project. If you're using a Windows XP system try disabling the Windows wireless-configuration feature in order to establish a connection. This step is also necessary if you want to use the bundled utilities. To disable this feature, click the XP Networking icon (it looks like two computer monitors) in the system tray at the bottom right of your screen. When the Wireless Network Connection dialog appears, click the "Advanced" button and select the "Wireless Networks" tab. Uncheck "use Windows to configure my wireless network settings" and click "OK" to accept the change. Finally, reboot your system to bring the connection to life.
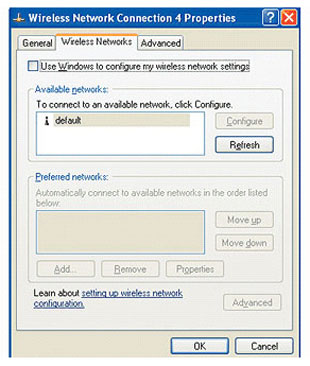
If your wireless systems won't connect to the Internet, try disabling Windows XP's wireless connection utility.
If you are using an operating system other than Windows XP, a simple reboot may be all that's necessary to get your Wi-Fi adapter running correctly after driver installation. However, if a simple reboot doesn't solve the problems, the next steps probably will.
Step 7 - Setting the Password
To secure your new Wi-Fi network, go to your wireless router's configuration utility again by entering its IP address in your browser. Using the router documentation or built-in help, if necessary, find the option that lets you change the default password. With the DI-624, this option is located within the Tools page. Apply the change, but leave the configuration routine open for the next step.
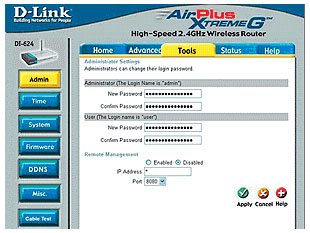
The Tools page in the DI-624's configuration utility allows you to change the router's password.
Step 8 - Setting the Service Set Identifier (SSID)
To put the finishing touches on securing your network, you must change its name. This is usually referred to as the Service Set Identifier (SSID). When using the DI-624, you can reach the SSID setting by clicking the Wireless button. Change the default SSID to anything you like. However, avoid entering values that a thief might guess such as your last name. Apply the change, but do not exit. Note: Your router may also allows you to disable DID broadcasting. This will keep your neighbors or potential intruders from seeing your wireless network among their Wi-Fi connection choices.
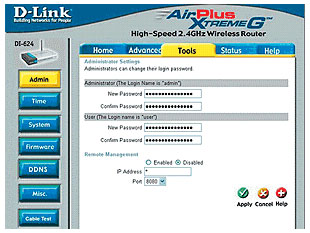
The Tools page in the DI-624's configuration utility allows you to change the router's password.
Enable Encryption
Now it's time to enable encryption. If your router and all of your wireless adapters support it, use Wi-Fi Protected Access (WPA) encryption with a pre-shared key. This provides more than adequate security for most home users. If your hardware doesn't support WPA, enable Wired Equivalent Privacy (WEP) encryption.
Most routers let you create WEP or WPA keys by entering a pass phrase. You'll likely need to enter the pass phrase twice for verification. Apply the changes without exiting.
Tip: Don't use a pass phrase that's easy for an intruder to decipher. Mix it up; create one that's hard to guess, with a combination of numbers and letters.
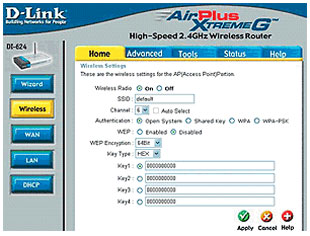
For added security, choose WPA encryption over WEP if you have a choice.
Filter MAC addresses
As a final security precaution, consider limiting access to network adapters with specific MAC addresses. To use MAC address filtering, you'll need to enable the feature in your router's configuration routine. Look for a filtering button or a menu option. Then enter the MAC addresses you recorded in step 3 for your Wi-Fi adapters. Apply the changes and exit the router's configuration utility.
Tip: Most 802.11g routers come configured to work with both 802.11g and 802.11b clients. If you've purchased 802.11g devices for all of your wireless systems, choose an 802.11g-only mode to boost performance
Step 9 - Configuring, Part 2
If you've followed our instructions faithfully, your wireless systems will now be unable to connect to the router. To reestablish the connection, change the SSID within the wireless-configuration utility for each wireless adapter to match the value you entered for the router. You'll also need to enable the same type of encryption you enabled in the router and provide exactly the same pass phrase. After you apply the changes to each system, it should connect to the router and the Internet.
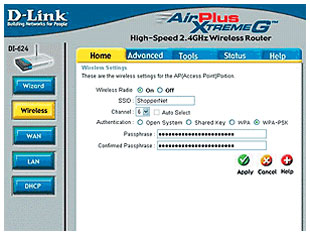
Enter the SSID and the encryption pass phrase into each system that you want to connect to your network.
Sharing Files and Printers with Your Wi-Fi Network
You can do more with a home wireless network than merely sharing your broadband connection. Installing a wireless network is also a great way to share files and printers. In order to share files and printers go to (in Windows XP) Control Panel | Network Connections and click "Set up a home or small office network." When asked for a connection method, choose "This computer connects to the Internet through another computer on my network or through a residential gateway."
Unless you're networking only Windows XP systems, choose "Create a network setup disk" when given the chance. This creates a floppy you can use to run the wizard on non-XP systems.
Now run the wizard on each additional system on your network. On non-XP systems, browse the floppy and run the file netsetup.exe. When configuring each system, assign each PC a different name but use the same workgroup name.
The Network Setup wizard automatically enables sharing on any printer connected to a PC during setup, but before you can use the printer from a networked PC, you'll need to install the printer driver on that system.
Each system configured with the Network Setup wizard should also have at least one shared folder given the name SharedDocs. To access these shared subdirectories within Windows XP, choose Start | My Network Places. You can easily set up additional subdirectories for sharing, but the more directories you share, the more you expose your drive in the event of a security breach.
More Networking Basics:
• Fiber Broadband Internet Service
• A Complete Explanation of Cloud Computing
• Overview of Cloud Computing
• What is Cloud Computing?
• Wireshark and Ethereal Network Protocol Analyzer Toolkit
• Comparing Different Cloud Architecture Types
• What is IPv6 Anycast Routing?
• How to Study For and Pass the CompTIA Network+ Exam
• What You Need to Know About a Career as a Network Engineer
• CompTIA Network+ Video Mentor

