
You can connect two computers to one another using an Ethernet cable. Once you've connected the computers, you can share files between them by using both computers file sharing settings.
You Might Need an Ethernet Crossover Cable
Ethernet cables, e.g Cat5, Cat6 etc., use an 8-pin RJ45 connector on each end. When connecting a computer's Ethernet port to a device such as a switch or router, you would use a straight-through connector. That means pin 1 at one end is wired to pin 1 at the other end, pin 2 to pin 2, and so on.
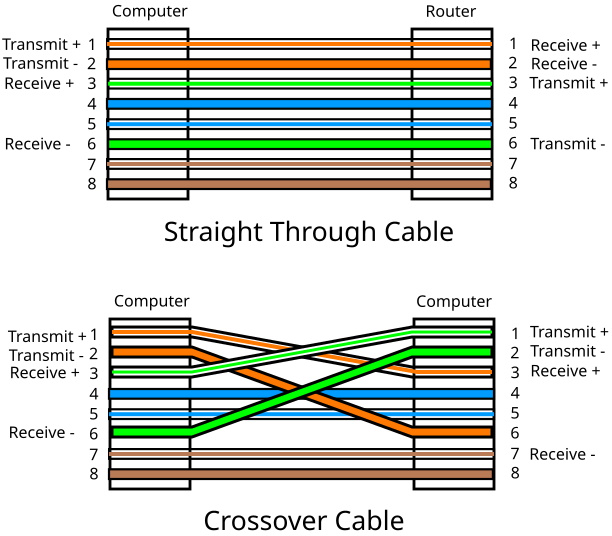
But when connecting two computers together without a switch or router in between you need a special cable, called a crossover cable, that has the transmit wire pair swapped with the receive wire pair.
If you have Gigabit Ethernet, it has a technology called Auto-MDIX that automatically detects whether straight-through cable or a crossover cable is being used and automatically configures the Ethernet interface to use that cable.
If you're connecting older computers to each other and you run into problems, you may have to buy or make a crossover cable.
Plug in the Ethernet Cable
Plug one end of the Ethernet cable into the Ethernet connector on the first computer. The Ethernet cable's connector should fit into the Ethernet connector on your computer with the lever side facing down. Plug the other end of the Ethernet cable into the Ethernet connector on the second computer. Then start both computers.
Set up File Sharing
In the taskbar search box, type Control Panel, Then open the Control Panel. In the upper-right corner of the Control Panel window, in the View by: drop down list, choose Small icons. Then click on the icon labeled Network Sharing Center.
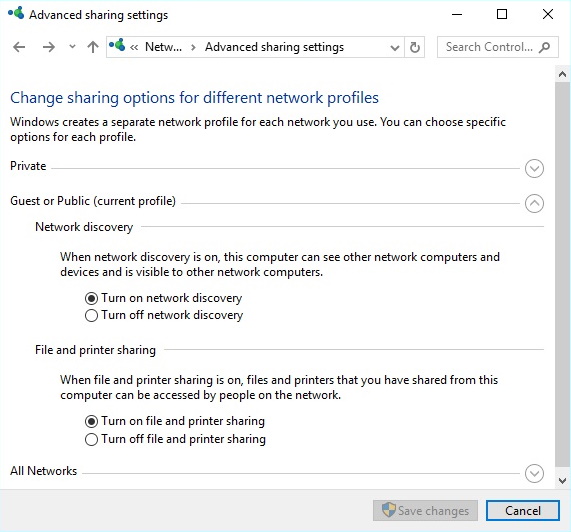
In the Network Sharing Center page, left panel, click on "Change advanced sharing settings". In the Advanced sharing settings window, set the radio button for Turn on network discovery, and set the radio button for Turn on printer and file sharing. Do this for both computers, then close Control Panel.
Share a Folder
To view and edit files from the other computer, you'll need to configure sharing of that folder:
1. Right-click on the folder you want to share, and in the popup menu that appears, select Properties.
2. In the folder's Properties dialog box that appears, select the Sharing tab.
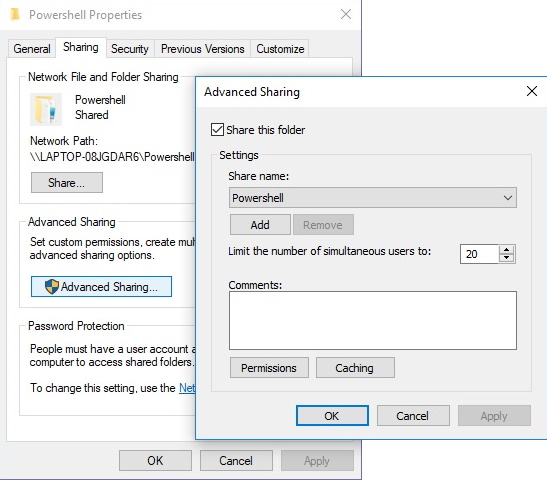
3. On the Sharing tab, click the [Advanced Sharing] button.
4. In the Advanced Sharing dialog box that appears, set the Share this folder check box.
Then click on the [Apply] and [OK] button.
Access the Shared Folder
Now, when you open File Explorer, in the left pane, you'll see the computer names of the computer that you are on, and the computer at the other end of the Ethernet cable. When you click on the name of the other computer, a message box will appear requesting a network password. You will need to enter a user name from the second computer (from Windows (C:)/users) and the password related to that user name. After entering a user name and password for the second computer, in File Explorer, a list of shared folders on that computer will appear.
Now you'll be able to access, copy, and move files from the second computer. If you share a folder on the first computer, you'll be able to access, copy, and move files from the first computer to the second computer.
Some people consider a folder configured for sharing as a security risk. For this reason you may want to turn off file sharing after you've completed transferring files between your two computers.

More Network Troubleshooting and Support Articles:
• Data Center and Server Relocation Planning and Execution
• Building the Backbone Network
• Simple Checks to Diagnose Windows Network Problems
• Restrict User's Logon Hours and Access to Computers
• How to Make a Network Cable
• VPN and VPN Protocols
• How a Firewall Provides Network Security
• What is DevOps?
• How to Crimp an Ethernet RJ45 Connector
• Structured Network Troubleshooting Methodology Step 6 Verify Full System Functionality and, if Applicable, Implement Preventive Measures