
Getting Started with Blender

Getting to Know the Interface
Probably one of the most daunting aspects of Blender for newcomers and long-time 3D professionals alike has been its unique and somewhat peculiar interface. It's arguably the most controversial feature Blender has. In fact, at one time, merely calling the interface a feature would raise the blood pressure of some of you who tried using Blender in the past, but gave up in frustration when it did not behave as expected.
Although the interface wasn't the primary focus, the interface updates to Blender added in the 2.5 series of release have made great strides toward alleviating that frustration, and the improvements continue through to today. As a small example, when you first launch Blender, the "splash image" provides you with quick links to online documentation, a list of recently opened files, and a choice of interaction presets if you're more familiar with other programs' hotkeys and mouse behavior.
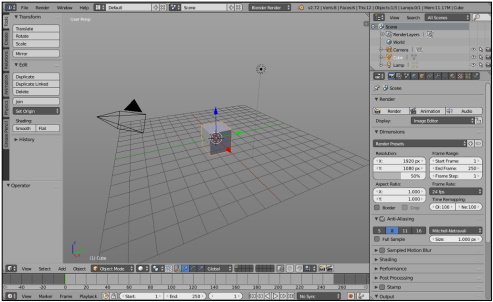
Figure 1-4 The default Blender interface
If you click anywhere other than the links provided by the splash image, the splash image goes away, and you're greeted with Blender's default scene, shown in Figure 1-4. If you're looking at the interface for the first time, you may think it appears pretty daunting. However, the purpose of this book is to help you get the hang of Blender (and its interface) with a minimum of pain.
This book explains some of the design decisions in Blender's interface and ultimately allows you to be productive with it. Who knows, you might even start to like it and wonder why other programs don't work this way!
Working with an interface that stays out of your way
The first thing to understand about Blender's interface is its basic organization. Figure 1-4 displays a single Blender window. Each Blender window can consist of one or more areas that you can split, resize, and join at will. In all cases, an area defines the space of an editor, such as the 3D View, where you actually make changes and modifications to your 3D scene. Each editor can include one or more regions that contain additional features or tools for using that editor. An example of a region that all editors have is a header region at the top or bottom of the editor; the header typically includes menus and buttons to give you access to features in that editor. Figure 1-5 illustrates each of these building blocks of the Blender interface.
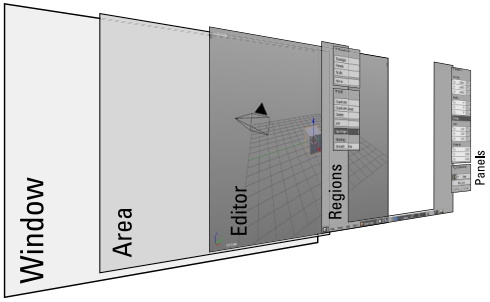
Figure 1-5: A Blender window contains areas populated by editors that include
one or more regions.
Knowing this organizational structure, the next important thing to know is that Blender is designed to be as non-blocking and non-modal as possible. Areas in Blender never overlap one another (non-blocking) and using one feature of Blender typically won't restrict you from using any of the others (non-modal). As an example, in most software, if you want to open a new file or save your project, a file browser dialog pops up. This dialog is an overlapping window that not only blocks things behind it from view, but usually also prevents you from making any changes to your file. This scenario isn't the case with Blender. In Blender, the file browser is an editor just like any other, and it makes perfect sense to be able to make a couple of tweaks to your scene before hitting the Save button. Figure 1-6 shows what it might look like to have a file browser open while you make tweaks.
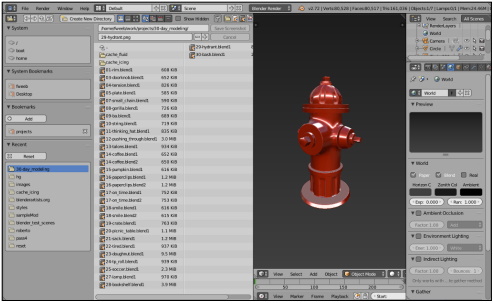
Figure 1-6: Doing those last couple of tweaks before finally saving
At first, working in a non-blocking, non-modal interface may seem to be really restrictive. How do you see different types of editors? Can you see them at the same time? Everything looks like it's nailed in place, so is it even possible to change anything? Fortunately, all these things are possible and you get the benefit of never having your view of one area obstructed by another. Having an unobstructed workspace is a great way to be able to see at a glance what's going on in your file. Furthermore, if you absolutely need multiple windows that can overlap, you can have them. For example, you might have two computer monitors that are different sizes and you'd like a full-sized Blender window in each. I show you how to do this task in this chapter in the "Duplicating an area to a new window" section.
This non-blocking window philosophy, combined with the fact that Blender's entire interface is written in a standardized programming library for graphics called OpenGL, is the precise reason that Blender looks the same, no matter where you run it. Whether you run it from Linux, Windows, a Mac, or even an experimental build for Android devices, Blender looks and behaves like Blender. An additional benefit to being written in a 3D library like OpenGL is that many parts of Blender's interface allow you to zoom in on them. Try it! Hover your mouse cursor over the Properties editor (the editor on the right side) and press Numpad Plus (+) or Numpad Minus (-). You can make the panels in this editor much larger or smaller than they are by default. Pretty cool!

Some of the dramatic visual effects you've seen in top-grossing movies and heralded television series got their start in Blender. This book helps you get your own start in creating three-dimensional characters, scenes, and animations in the popular free and open-source tool.
Author Jason van Gumster shares his insight as an independent animator and digital artist to help Blender newcomers turn their ideas into three-dimensional drawings. From exporting and sharing scenes to becoming a part of the Blender community, this accessible book covers it all!
• Create 3D characters - no experience required
• Build scenes with texture and real lighting features
• Animate your creations and share them with the world
• Avoid common rookie mistakes
Blender For Dummies is the ideal starting place for newcomers to the world of 3D modeling and animation.
About the author
Jason van Gumster writes, animates, and occasionally teaches. He has heavy entrepreneurial tendencies that run nearly as deep as his creative ones... so he has a constant fascination with producing creative content with as much control and independence as possible. Naturally, he's a big proponent of open source software; very nearly everything that he produces is made using Free and open source tools.
Using those open source tools, Jason ran his own small, independent animation studio for eight years. And in the course of that, he had the privilege of managing mid-sized international production teams on ridiculously tight deadlines (4-7 minutes of CG animation in 2 days)... for fun. He's transferred some of that experience in writing to two separate books, Blender For Dummies and GIMP Bible. The rest of that experience he continues blurt out a bit at a time during his weekly[-ish] podcast, the Open Source Creative Podcast.
Currently based just outside of Atlanta, Georgia, Jason spends the majority of his time drinking coffee and trying to be awesome. The former he's pretty much gotten down to a science. The latter... well, every now and again he succeeds at that one and makes it look like it wasn't an accident.

More Graphics Design Tips:
• How to Trace an Image Using Photoshop
• Inkscape Circles, Ellipses, and Arcs Drawing Tutorial
• Inkscape Layers and Z-Order
• MathML Element to Display a Fraction
• SVG Matrix Transform Example Code
• What is Blender? The Software's Origins and Evolution
• Pencil Free Open Source Cartoon Animation Drawing Program
• Introduction to X3D (Extensible 3D)
• Five Surprising Reasons I Use Krita for Photo Editing
• An Insight to Logos