A gradient is a gradual transition form one color to another color. But before we get deeper into gradients, lets briefly describe how colors are defined by computers.
Computers create colors by defining the amount of red, green, and blue the color contains. Because computers are binary, and because the first computers had small data storage capabilities, each color is defined on a scale from 0 to 255. So, for example, the color blue would be encoded as 0,0,255 and the color white would be 255,255,255.
In Inkscape the beginning color and ending color of a gradient are each called a "stop". You can transition from one color to another, and then to a third color. This requires three stops. You can have any number of stops in a gradient.

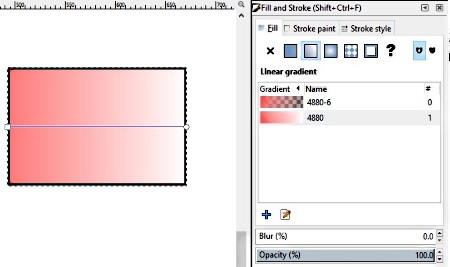
To fill an object with a gradient, right-click with the mouse pointer inside the object, and in the popup menu that appears, select "Fill and Stroke". In the "Fill and Stroke" dialog box that appears, select the "Fill" tab. On the "Fill" tab, click on the "Linear gradient" button. At the top of the "Linear gradient" section that appears you'll see a drop-down list of all the linear gradients that have been defined.
You can click on one of the pre-defined linear gradients to apply it to your object or you can create a new gradient by selecting a pre-defined gradient (there is always one default pre-defined gradient) and clicking on the [Duplicate] button (the blue cross near the bottom of the Fill and Stroke dialog box. Then click on the duplicate gradient to select it, then click on the [Edit Gradient] button (the pencil and tablet near the bottom of the Fill and Stroke dialog box.

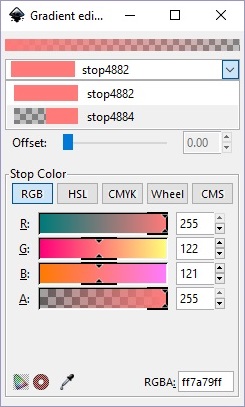
Unfortunately, in some versions of Inkscape, the Gradient editor dialog box has been disabled by default. Double click the Create and edit gradients tool, and in the Preferences dialog box that appears, in the left box, scroll down to Gradient and click on it. In the right box, scroll down to [] Use legacy Gradient Editor and set the check box.

In the Gradient editor dialog box, in the drop-down list, select the duplicate gradient that you created, and adust the color and transparency of the stop using the color and transparency bars, just a s you would for any fill color.

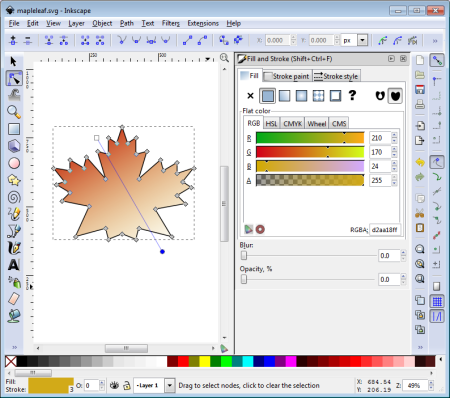
Next, select the "Edit paths by nodes" tool in the left-side tool box and click the object that you applied the gradient to. On the object you'll see the gradient line with a small square at one end and a small circle at the other end. Use your mouse pointer to drag the ends of this gradient line around on the object and the drawing area to see the affects of the gradient.
Clicking on the small square at one end or the small circle at the other end brings up the Fill and Stroke dialog box, where you can also edit the stop. With the tool box Create and edit gradients tool selected, if you double-click on the gradient line, you will add another stop, where you can edit it's colors in the Fill and Stroke dialog box.
Gradients are a very powerful effect you can use to make your drawings look more professional. As you learned from this section, gradients are very easy to use in the amazing, powerful, and free Inkscape vector graphics drawing application.
More Graphics Design Tips:
• Example Code for X3Dom Basic Primitive Shapes: Box, Sphere, Cylinder, Cone, and Torus
• Introduction to Draw SVG Free Online SVG Drawing Application
• SVG Example Code to Skew Elements
• HTML5 Canvas
• Graphics Design for Beginners - Blur Filters
• MathML File Structure
• How to Really Create an Arc in SVG
• Image Scanning - Confused About DPI?
• Beginning GIMP: From Novice to Professional
• SVG Example Code to Rotate Elements

