
Draw Bezier is a very limited SVG (Scalable Vector Graphics) drawing application. Its biggest limitation right now is that you can't open an svg file. You must complete your drawing and save it before closing Draw Bezier. The ability to open SVG files created with Draw Bezier will be my next improvement to the program.
Right now if you need to edit a file created in Draw Bezier, you need to open it a different SVG editor. Since Draw Bezier files are standard SVG code, they can be opened in any standard SVg editor. Or, if you know SVG coding, you can edit the file manually. If you want to learn more about SVG, see my ebook SVG Primer: Draw Beautiful Scalable Vector Graphics Images By Typing Text
Another thing that might be considered a limitation is that you can draw only Bezier curves. A Bezier curve is a line that is defined by four points: its starting point, its ending point, and two control points. The shape of the curve is controlled by moving control points. It is named after French engineer Pierre Bezier.
My thought behind Draw Bezier is that, since a curve can be made into a straight line, you should be able to draw anything with curves. And, most SVG drawing applications are so complex to use that most people avoid them. Draw Bezier is so easy to use, a child could draw with it. The advantage of an SVG drawing application is that you can edit it without erasing, simply select a curve and use its control points to reshape or move it.
To draw a curve, click on the [Add Bezier] button. In the upper-left corner of the drawing area a short line with four tiny boxes with appear. With your mouse pointer over the first tiny box, press the left mouse button and drag the box to another location in the drawing area and release the mouse button. A curve appear.
Similarly, drag the last tiny box to another location and release the mouse button. The remaining tiny boxes control the shape of the curve. Use your mouse to drag each control point in order to shape the curve. It's that easy to draw a curve.
Click the [Add Bezier] button and another short line with four tiny boxes will appear in the upper-left corner of the drawing area. You can drag those four tiny boxes to create a second curve. If you want to move or reshape the first curve, or any curve, double click somewhere inside the curve. This will cause the control vertex boxes to reappear. The object is to use to manipulate multiple curves to draw an object or objects.
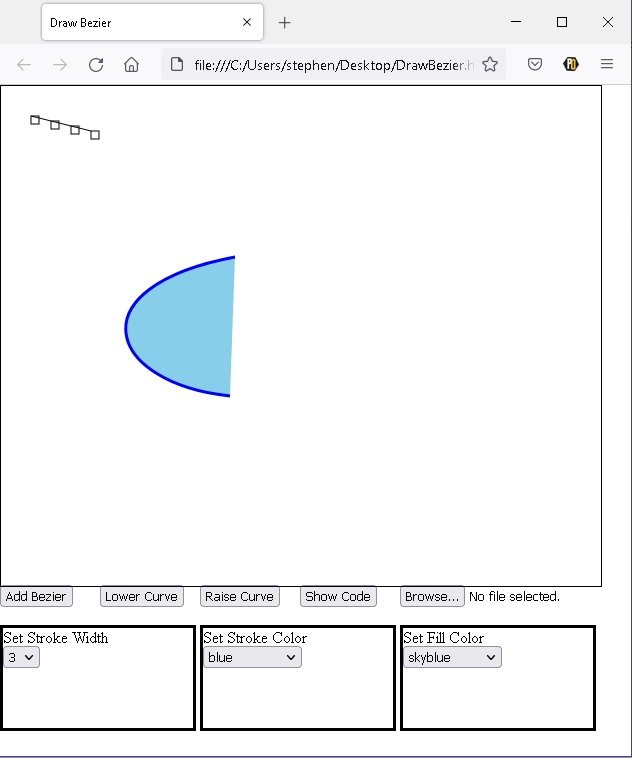
A curve is selected by double-clicking inside its bounding-box, in other words somewhere near the curve. When a curve is selected, its control vertex boxes appear. Under the drawing area you will find three boxes containing drop-down lists. The drop down lists can be used to set the stroke width, stroke color, and fill color of the selected curve.
When a curve has its fill color set, when dragging the curves around the drawing area, you will note that some curves overlap other curves. SVG does not have layers as some drawing applications have. Instead it uses the painter's algorithm to set the depth order of objects. To change the depth of a curve, select the curve, and then click on the [Lower Curve] or [Raise Curve] button.
Finally, when you have completed your drawing, click on the [Show Code] button. A popup window will appear containing the html and svg code for your drawing. Cut and paste this code into a text file and save that file with the .htm extension. When you execute the saved file, your drawing will appear in your web browser.
Under the drawing area you will also find a [Browse...] button. This button can be used to load a .jpg image into the drawing area for the purpose of tracing.
As an example exercise, lets use Draw Bezier to draw a coffee cup. This simple drawing will require only seven curves. Shown above are the first two curves to draw. They will be for the handle of the coffee cup. Draw the bigger curve first. When drawing, draw lines in the painters algorithm order so you don't need to raise or lower them.
Next draw two curves for the body of the coffee cup.
Next draw two curves to represent the coffee in the cup. Use the Set Stroke Color and Set Fill Color drop down lists to make the curve and its fill color brown.
Lastly, draw a curve to represent the top edge of the coffee cup. I noticed that when a filled curve is on top of another curve, it covers the lower curves control vertex boxes. Then you have to set the upper curves fill to none to access the lower curves control boxes. Sometimes you have to actually move an overlying curve out of the way to to access the lower curves control boxes. That why it's easier if you plan ahead and stick to the painters algorithm order when drawing curves.
To save your drawing, click on the [Show Code] button. A popup window will appear (assuming that you have not blocked popups in your web browser) containing the SVG code and a few HTML tags to create a webpage. Cut and paste this code into a text file and save that file with the .htm extension. When you execute the saved file, your drawing will appear in your web browser.

More Graphics Design Tips:
• SVG Example Code to Scale Elements
• Krita Paint plus Vector Drawing Portable Application
• How to Trace an Image Using Photoshop
• Inkscape Exercise: Draw Photorealistic Sphere
• HTML5 Canvas
• Drawing Text with Draw SVG
• MathML mtext Element to Display Plain Text
• The Blender Gamekit
• Free Animated GIF Maker
• SVG Code to Create a Rectangle and Text and Translate as a Group