You can fill a shape with just about any color, texture, or pattern that you desire. In this article we discuss how to fill a shape with a basic color.
In order to fill a shape, it must be selected. To select a shape, click anywhere inside the shape. Double-pointed arrows around the shape's boarder indicate that it is selected.
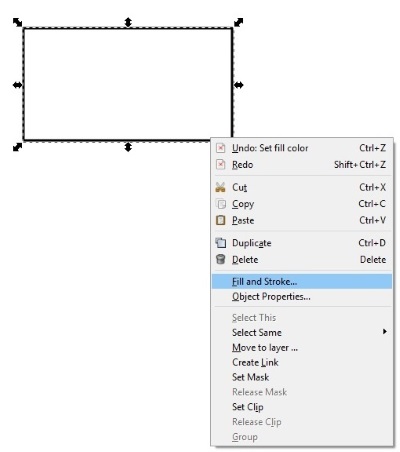
When youm right-click on a shape, a popup menu will appear. If the Fill and Stroke dialog box is not visible, select Fill and Stroke ... in the popup menu.
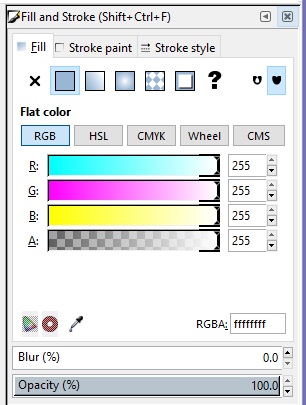
In the Fill and Stroke dialog box, make sure the Fill tab is selected. Note that at the top of the dialog box are buttons to select the type of fill. The first button, with the [X] is for No Paint. Personally, I have never used that button. For now we are interested in only the second button, Flat Fill Color.
Just below the buttons to select the type of fill are five buttons to select the color coding method to be used. The first is the [RGB] coding button. The second is the HSL (Hue, Saturation, Luminosity) coding button. The third is the CMYK (Cyan, Magenta, Yellow, Black) coding button. HSL and CMYK are color coding methods sometimes used by professional artists.
In this article we are primarily concerned with RGB and Wheel. Wheel referrs to the color wheel. The color wheel is the easiest way to select a color.
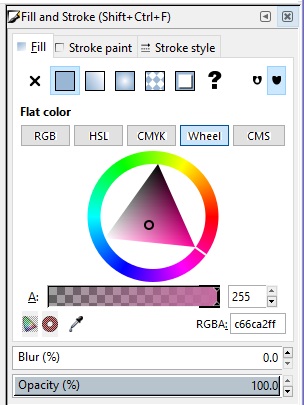
Click on the [Wheel] button to select the color wheel. Noe that the color wheel appears as a rainbow colored circle with a triangle inside. Note the white line emanating from one of the triangle's corners. You can drag this line around the circle with your mouse pointer. As you drag the line, the color just below the line appears in the triangle.
Note that the triangle is filled with a graduation of shades of the selected color. A shade is the color with a certain amount of black or white added. As you drag the white line around the circle, and move the tiny circle within the triangle, the selected color is immediately transferred to the inside of your selected shape. This is the easiest way to select a fill color.
A Breif Introduction to RGB Color Code
Although the color wheel is the easiest way to select a color, it's the most difficult way to exactly specify a color. To exactly specify a color, you have to use an RGB triplet. An RGB triplet specifies a color based upon the amounts of red, green, and blue, on a scale from 0 to 255, required to create the color. For example, to create the color cornflowerblue you need red=100, green=149, and blue=237. Shown below is the RGB triplet for the color cornflowerblue.
6495ED
You are probably wondering what happened to the 100,149,237. Well, graphics programs often specify numbers using the hexadecimal number system. That's because that's how computers store numbers in their memory. One byte of memory (four bits) can store 16 different values. Whereas the decimal numbering system uses the characters 0 through 9 to get 10 different values, the hexadecimal numbering system uses the characters 0 through f to get 16 different values. (After 9 the characters a, b, c, d, e and f are used, as shown below.)
Decimal Hexadecimal Equivalents
| decimal | hexadecimal |
| 0 | 0 |
| 1 | 1 |
| 2 | 2 |
| 3 | 3 |
| 4 | 4 |
| 5 | 5 |
| 6 | 6 |
| 7 | 7 |
| 8 | 8 |
| 9 | 9 |
| 10 | A |
| 11 | B |
| 12 | C |
| 13 | D |
| 14 | E |
| 15 | F |
On first appearance, this looks pretty simple but you need two hexadecimal characters to represent all decimal values from 0 to 255. When you increment decimal 9 by 1, you change the 9 to 0 and put 1 in the ten's place. When you increment hexadecimal F by one, you change the F to 0 and put 1 in the "sixteens" place. Sometimes it's not easy to convert between decimal and hexadecimal in your head.
RGB Triplet for Cornflowerblue
| decimal | hexadecimal | |
| red | 100 | 64 |
| green | 149 | 95 |
| blue | 237 | ED |
We need this breif introduction to RGB color code because when we select to use the RGB color coding method, sometimes the colors will be specified using the decimal number system, and sometimes the colors will be specified using the hexadecimal number system. There is no need to be confused if you know what's going on.
Specifying Colors With the RGB Coding Method
Click on the [RGB] button to select the RGB method of color coding. Note that there are four bars indicating the value of Red, Green, and Blue in the color that you have selected.
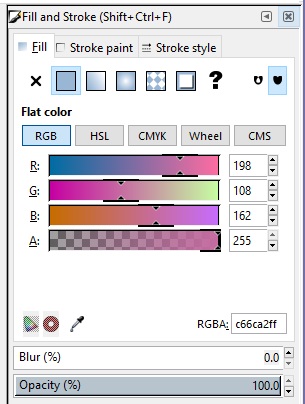
Each color bar has a tracker control that you can drag to adjust the amount of red, green, and blue from 0 to 255. Just below the three color bars is another bar labled A:. A stands for alpha and it is the amount of opacity (or transparency if you prefer) of the color.
You can set the alpha value between 0 (fully transparent) and 255 (fully opaque). Any value less than 255 will allow some of the color of an object below your shape to show through. The color specification with the alpha value included is sometimes called an RGBA quadruplet.
Below the color bars you will note some small buttons that we are not going to discuss right now, and a box containing the exact RGBA code of the color that you have created.
Below that you will see two more bars labeled Blur% and Opacity%. These controls are adjusted using the up-down arrows on their right side, or alternately, you can drag inside the bars. Later we will discuss using the Blur slider bar to create shadows and highlights. The Opacity slider is just another way to set transparency.
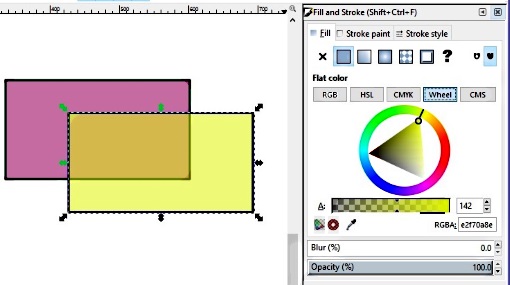
You'll also find an alpha adjustment bar with the wheel color selector. Shown above, tow objects overlap and the alpha for the top object is set to 142, allowing some of the color of the bottom object to show though.
More Graphics Design Tips:
• MathML Element to Display a Fraction
• MathML mtext Element to Display Plain Text
• Pencil Free Open Source Cartoon Animation Drawing Program
• Inkscape Text on Path
• Inkscape Basic Fill
• SVG Example Code to Scale Elements
• MathML mo Element Operators
• The Game Maker's Apprentice
• How to Make a Video Game for your Xbox for Free
• Inkscpe Snap Controls Bar

