The canvas element creates an area on a web page for drawing with a set of JavaScript functions for creating lines, shapes, fills, text, animations, and so on. You could use it to display an illustration, but what gives the canvas element so much potential (and has the web development world so delighted) is that it's all generated with scripting. That means it is dynamic and can draw things on the fly and respond to user input. This makes it a nifty platform for creating animations, games, and even whole applications - all using the native browser behavior and without proprietary plug-ins like Flash.
It is worth noting that the canvas drawing area is raster-based, meaning that it is made up of a grid of pixels. This sets it apart from the other drawing standard, SVG, which uses vector shapes and paths that are defined with points and mathematics.
The good news is that every current browser supports the canvas element as of this writing, with the exception of Internet Explorer 8 and earlier (see Note). It has become so well established that Adobe's Animate software (the replacement for Flash Pro) now exports to canvas format.

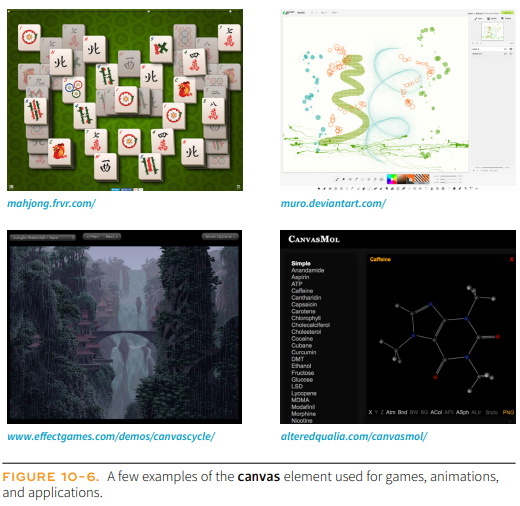
FIGURE 10-6 shows a few examples of the canvas element used to create games, drawing programs, an interactive molecule structure tool, and an asteroid animation.
Mastering the canvas element is more than we can take on here, particularly without any JavaScript experience under our belts, but I will give you a taste of what it is like to draw with JavaScript. That should give you a good idea of how it works, and also a new appreciation for the complexity of some of those examples.
The canvas Element
You add a canvas space to the page with the canvas element and specify the dimensions with the width and height attributes. And that's really all there is to the markup. For browsers that don't support the canvas element, you can provide some fallback content (a message, image, or whatever seems appropriate) inside the tags:
<canvas width="600" height="400" id="my_first_canvas"> Your browser does not support HTML5 canvas. Try using Chrome, Firefox, Safari or MS Edge. </canvas>
The markup just clears a space upon which the drawing will happen. You can affect the drawing space itself with CSS (add a border or a background color, for example), but all of the contents of the canvas are generated by scripting and cannot be selected for styling with CSS.
Drawing with JavaScript
The Canvas API includes functions for creating shapes, such as strokeRect() for drawing a rectangular outline and beginPath() for starting a line drawing. Some functions move things around, such as rotate() and scale(). It also includes attributes for applying styles (for example, lineWidth, font, stroke-Style, and fillStyle).
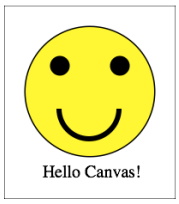
Sanders Kleinfeld created the following code example for his book HTML5 for Publishers (O'Reilly). He was kind enough to allow me to use it in this book. FIGURE 10-7 shows the simple smiley face we'll be creating with the Canvas API.

And here is the script that created it. Don't worry that you don't know any JavaScript yet. Just skim through the script and pay attention to the inline comments. I'll also describe some of the functions in use at the end. I bet you'll get the gist of it just fine.
<script type="text/javascript">
window.addEventListener('load', eventWindowLoaded, false);
function eventWindowLoaded() {
canvasApp();
}
function canvasApp(){
var theCanvas = document.getElementById('my_first_canvas');
var my_canvas = theCanvas.getContext('2d');

 // to start, draw a border around the canvas
my_canvas.strokeRect(0,0,200,225);


//draw face
my_canvas.beginPath();
my_canvas.arc(100, 100, 75, (Math.PI/180)*0, (Math.PI/180)*360, false);

 // circle dimensions
my_canvas.strokeStyle = "black"; // circle outline is black
my_canvas.lineWidth = 3; // outline is three pixels wide
my_canvas.fillStyle = "yellow"; // fill circle with yellow
my_canvas.stroke(); // draw circle
my_canvas.fill(); // fill in circle
my_canvas.closePath();

 // now, draw left eye
my_canvas.fillStyle = "black"; // switch to black for the fill
my_canvas.beginPath();
my_canvas.arc(65, 70, 10, (Math.PI/180)*0, (Math.PI/180)*360, false);

 // circle dimensions
my_canvas.stroke(); // draw circle
my_canvas.fill(); // fill in circle
my_canvas.closePath();

 // now, draw right eye
my_canvas.beginPath();
my_canvas.arc(135, 70, 10, (Math.PI/180)*0, (Math.PI/180)*360, false);

 // circle dimensions
my_canvas.stroke(); // draw circle
my_canvas.fill(); // fill in circle
my_canvas.closePath();

 // draw smile
my_canvas.lineWidth = 6; // switch to six pixels wide for outline
my_canvas.beginPath();
my_canvas.arc(99, 120, 35, (Math.PI/180)*0, (Math.PI/180)*-180, false);

 // semicircle dimensions
my_canvas.stroke();
my_canvas.closePath();

 // Smiley Speaks!
my_canvas.fillStyle = "black"; // switch to black for text fill
my_canvas.font = '20px _sans'; // use 20 pixel sans serif font
my_canvas.fillText ("Hello Canvas!", 45, 200); // write text
}
</script>
Finally, here is a little more information on the Canvas API functions used in the example:
strokeRect(x1, y1, x2, y2) Draws a rectangular outline from the point (x1, y1) to (x2, y2).
By default, the origin of the canvas (0, 0) is the top-left corner, and x and y coordinates are
measured to the right and down.
beginPath() Starts a line drawing.
closePath() Ends a line drawing that was started with beginPath().
arc(x, y, arc_radius, angle_radians_beg, angle_radians_end) Draws an arc where (x,y) is
the center of the circle, arc_radius is the length of the radius of the circle, and angle_radians_beg
and _end indicate the beginning and end of the arc angle.
stroke() Draws the line defined by the path. If you don't include this, the path
won't appear on the canvas.
fill() Fills in the path specified with beginPath() and endPath().
fillText(your_text, x1, y1) Adds text to the canvas starting at the (x,y) coordinate specified.
In addition, the following attributes were used to specify colors and styles:
lineWidth Width of the border of the path.
strokeStyle Color of the border.
fillStyle Color of the fill (interior) of the shape created with the path.
font The font and size of the text.
Of course, the Canvas API includes many more functions and attributes than we've used here. For a complete list, see the W3C's HTML5 Canvas 2D Context specification at www.w3.org/TR/2dcontext. A web search will turn up lots of Canvas tutorials should you be ready to learn more. In addition, I can recommend these resources:
• The book HTML5 Canvas, Second Edition, by Steve Fulton and Jeff Fulton (O'Reilly).
About the Author
Jennifer Niederst Robbins was one of the first designers for the Web. As the designer of O'Reilly's Global Network Navigator (GNN), the first commercial web site, she has been designing for the Web since 1993. She is the author of the bestselling Web Design in a Nutshell (O'Reilly), and has taught web design at the Massachusetts College of Art in Boston and Johnson and Wales University in Providence. She has spoken at major design and Internet events including SXSW Interactive, Seybold Seminars, the GRAFILL conference (Geilo, Norway), and one of the first W3C International Expos.
Do you want to build web pages but have no prior experience? This friendly guide is the perfect place to start. You'll begin at square one, learning how the web and web pages work, and then steadily build from there. By the end of the book, you'll have the skills to create a simple site with multicolumn pages that adapt for mobile devices.
Each chapter provides exercises to help you learn various techniques and short quizzes to make sure you understand key concepts.
This thoroughly revised edition is ideal for students and professionals of all backgrounds and skill levels. It is simple and clear enough for beginners, yet thorough enough to be a useful reference for experienced developers keeping their skills up to date.
• Build HTML pages with text, links, images, tables, and forms
• Use style sheets (CSS) for colors, backgrounds, formatting text, page layout, and even simple animation effects
• Learn how JavaScript works and why the language is so important in web design
• Create and optimize web images so they'll download as quickly as possible
• New! Use CSS Flexbox and Grid for sophisticated and flexible page layout
• New! Learn the ins and outs of Responsive Web Design to make web pages look great on all devices
• New! Become familiar with the command line, Git, and other tools in the modern web developer's toolkit
• New! Get to know the super-powers of SVG graphics.
Reader Robert V. says, "The HTML and CSS content in this book is great. It really contains almost everything that you'll use if you're building the HTML and CSS of a website from scratch. And if it doesn't have it, the provided resources will give you some hints as to where to go. Where I think this book really shines is in its emphasis of HTML as a purely semantic language. In other words, you really shouldn't be using HTML to get things to look a certain way. That is the job of CSS, and you can use CSS to achieve the look you want. (And this book will show you how.) I still see so many online tutorials that say things like "let's add an h1 tag around this text to make it look a little bigger." In addition to making your website code harder to follow, this mentality really messes with the accessibility of your site. For example, surveys report that up to 70% of screen reader users use headings as their primary way of finding information on a website. That means that they press the h key to listen to each heading to find the section they want to listen to. If you're not ensuring that each heading is used to describe the information that follows, and you're simply using a heading tag to make something look big, then you're making your site really difficult to navigate for people with visual impairments."
Learning Web Design: A Beginner's Guide to HTML, CSS, JavaScript, and Web Graphics
More Graphics Design Tips:
• XDdom 3D Axis and Coordinate System
• Tips For Hand Coding MathML
• Example Code for X3Dom Basic Primitive Shapes: Box, Sphere, Cylinder, Cone, and Torus
• Inscape Text in a Shape
• Building an Image with a Logo
• SVG For Responsive Web Design
• How to Use Draw Bezier
• CSS Button Designer
• Krita Paint plus Vector Drawing Portable Application
• Inkscape Basics


