
Everyone has seen those cute gif animations on the Web. In this article, you'll learn how to create your own gif animations using the free GIMP image editing program. There are two main types of animation, spite animation and frame animation. Sprite animation involves moving a small image around in front of a background. Frame animation involves displaying a sequence of images, each image with a little "difference" that, when the fames are displayed rapidly in sequence, appears as movement.
In this example we'll be creating a frame animation. To create a frame animation, you first need to create the sequence of images that become the animation frames. To create a gif animation, you need a series of gif images that do NOT have transparent backgrounds. For this example, I provide you with the set of images shown below.
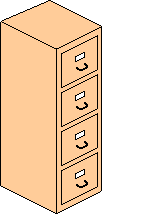
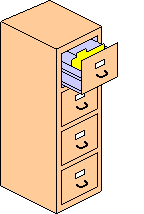
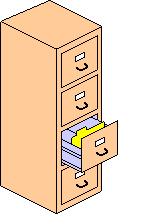
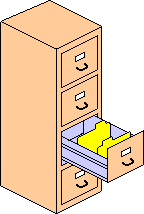
Note: the images are shown here 1/2 actual size.
To use these images, right-click on each image, and in the popup menu that appears, select "Save Picture As...". In the "Save Picture" dialog box that appears, navigate to a folder where you want to save your animation, then click on the [save] button."
To follow this example, you'll need the GIMP image editing program installed on your computer. GIMP is a comprehensive image editing program on the level of Photoshop, in fact it looks and works pretty much the same as Photoshop, with one major exception; Photoshop costs about $800.00 while GIMP is totally free! If you don't have GIMP installed on your computer, go to the GIMP.org Web site and download the proper version for your machine.
GIMP stands for "GNU Image Manipulation Program", GNU standing for GNU General Public License. The GNU General Public License is a long-winded document that gives you permission to use and redistribute the software for free. GIMP can be used to perform a wide range of image processing tasks including convert, merge, blend, align layers, and create an infinite number of interesting effects. In this example, we'll use it to create a gif animation.
Assuming that you've downloaded and installed GIMP on your computer, the next thing we need to do is plan our animation sequence. We'll create an animation of a file cabinet with several drawers opening and closing. Although there are four images used, the animation will consist of six frames, this is accomplished by repeating two of the images. The animation sequence is shown below.
To visualize the animation, just glance at each image from left-to-right, looping around to the first image when you come to the end. As you can see, in the animation a file drawer opens half way and closes. Then a second file drawer opens all the way, in two frames, and then closes in two frames.
When you open GIMP, you may see a number of dialog boxes. Close all the dialog boxes except the main toolbar and the Layers dialog box. If the Layers dialog box is not open, in the main toolbar menu select File | Dialogs | Layers. Then follow the steps below to create the gif animation.
1. Open the first image in the animation sequence. In the main toolbar menu select File | Open. In the Open Image dialog box, navigate to the first image (00000103.gif) and then click on the [Open] button.

2. Open the second image in the animation sequence (00000104.gif). This will create a second edit window. In the menu of the second edit window, select Edit | Copy. Then close the second edit window. In the menu of the first edit window, select Edit | Paste.

In the Layers dialog box, you'll note that a new layer named "Floating Selection" is in the list. Click on the [New Layer...] button (far left button at the bottom of the dialog box) to make this a new layer.

3. Repeat step 2 (open, copy, exit, paste, new layer) for each image in the rest of the sequence (00000103.gif, 00000105.gif, 00000106.gif, 00000105.gif) to create the remaining animation frames.
4. In the Layers dialog box, right-click on a layer, and in the popup menu that appears, select "Edit Layer Attributes...". In the Edit Layer Attributes dialog box that appears, enter a new layer name (e.g. layer1, layer2, ...). Click on the [OK] button.
• Note that if you want to view a layer in the edit window, in the Layers dialog box, click on a layer to select it, then click on the Raise Layer button until the layer you want to view moves to the top.

5. In the edit window menu select File | Save as... . In the Save Image dialog box that appears, give the file a name and click on [x] to select the File Type "GIF image". Then click on the [Save] button. The Export file dialog box will appear.

6. In the Export file dialog box set the "Save as Animation" radio button, then click on the [Export] button. The Save as GIF dialog box will appear.

7. In the Save as GIF dialog box set the "Delay between frames" to 400 milliseconds (the default is 100 milliseconds). Then click on the [OK] button.
If you've done everything correctly, you should find a gif file with the name you provided in step 5, this is your animation. Open a file in Window's Notepad and type in the following text, replacing "filename.gif" with the name of your animation file.
<img src="filename.gif">
Save the text file with a name with the extension .htm, e.g. "test.htm" in the same folder as your animation file. When you double-click on this htm file, it should open in your Web browser and display your animation.

If you where NOT successful in creating a gif animation, you may have made a mistake in step 3, where I say repeat step 2 for each image in the rest of the animation sequence. In any case, start over and try it again. Once you understand the basic steps you'll find it's incredibly easy to create animated gifs with GIMP.

More Graphics Design Tips:
• Find Free Stock Photos You'll Actually Want to Use For Your Website or Blog
• What is the Pantone Color System?
• Graphics Design for Beginners - Blur Filters
• What is Blender? The Software's Origins and Evolution
• How to Make a Simple Animated Banner in Flash CS3
• SVG Code to Create a Rectangle and Text and Translate as a Group
• MathML File Structure
• Where To Find Free Stock Photography, Clip Art, And Other Graphics For Your Web Site
• How to Trace an Image Using Photoshop
• Inkscape - Free Vector Graphics Illustration Package