This article will tell you step by step how to switch from Windows to Ubuntu. Ubuntu is a free alternative to Windows and Mac which aims at being fast, easy to use and productive. You may want to switch to Ubuntu because of its robust security, speed, freedom, ease of use, low maintenance, and no price. Whichever reasons you may have for switching to Ubuntu, this article will show you how.
1. Verify that the computer tasks and⁄or software you want to run will either work with Ubuntu, or has alternative software to replace it. Even if your existing software will not run natively in Ubuntu, a compatibility layer known as Wine may be able to run it.
2. Back-up your data. Use an external hard drive to copy over files or create a copy of your partitions. Alternatively, use a flashdrive, DVDs, or CDs to copy over files.
3. Go to ubuntu.com and download the CD image. Do this by clicking on the Download Ubuntu button; here you can choose between the 32 and 64 bit versions, and will find instructions on how to burn them to a CD.
o The CD image is about 700 MB. If you have a slow, spotty internet connection, or low bandwidth limits, you can instead have an official, professional CD sent to you.
4. Boot your PC from the Ubuntu CD. This may involve either manually selecting the optical drive or changing the boot order in your BIOS, if simply inserting the CD and rebooting doesn't work. You can find detailed instructions on the Ubuntu Download Page.
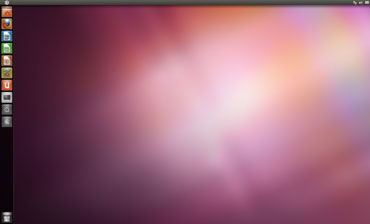
After a minute or two, you should see a windows that asks whether you want to try or install Ubuntu. Choose the "Try Ubuntu" option, and in another minute, you should see the basic Ubuntu desktop. You should have access to most of your hardware, including network, sound, and graphics.
Some older video cards and wifi cards may have compatibility issues; in this case you might want to check the LinuxQuestions Hardware Compatibility List or the Ubuntu HCL, as well as asking about your hardware on the Ubuntu Forums.
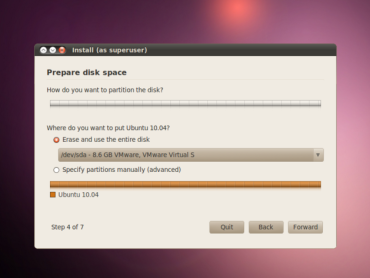
5. Install it. Assuming you booted into the live desktop properly, this is as simple as double-clicking the Install icon on the desktop. The install program will prompt you for your language, location, and keyboard layout before you get to the hard-disk partitioning section. When Ubuntu asks for a timezone, and you do not see your city simply click on a city that is near⁄in your timezone (e.g Vancouver, Canada instead of Seattle, United States).

Partitioning your hard disk is the only step of the install process that has the potential to do serious harm. If you install to the wrong partition, you could accidentally nuke your Windows drive and all of its contents. That's why it is recommended to run a full backup before you start the install process. The safest way to install is to add a new hard drive or create free space on the existing drive. This is not always an option; you can resize your partitions to free space using the sliders.
6. Bring over some of your data from your Windows partition. If you wish, Ubuntu can bring over your Firefox bookmarks, music, photos, and documents from your Windows partition (if you are keeping the Windows Partition).
7. Confirm your installer's settings and press Install to finish the process. You'll need to wait 20–40 minutes while the install completes and then finish by rebooting your PC and selecting the Ubuntu entry from the boot manager that was installed.
Tips
o Getting your machine on the network is simple with Ubuntu, whether you use a wired connection or Wi-Fi. When you first boot, the only icon in your system tray at the top of the screen should be for networking. Simply click it, enter your SSID and WPA or WEP key (if necessary), and you'll be on the network.
o To install software, use either the Ubuntu Software Center or Synaptic Package Manger. The Ubuntu Software Center provides a nice front end GUI, giving you access to thousands to free programs which are guaranteed to be free of viruses. From music players to games, to emulators and web browsers, you have great options through this handy tool. Synaptic is basically the same thing but it has a user interface geared towards advanced users.
o Search for the 'ubuntu-restricted-extras' package in the Software Center or Synaptic; this package will install support for many kinds of media, all at once.
o Installing closed-source drivers is easier than ever with Lucid Lynx; Simply go to System | Administration | Hardware Drivers.
Warnings
o Be careful when partioning; you wouldn't want to unwittingly break Windows! (Not yet, anyway.) For a more in-depth guide to partitioning, you can read here: Dual Boot Windows 7 and Ubuntu 10.04 Lucid Lynx.
o Linux is not Windows! Trust me, there will be a hump to get over as you transition from Windows to Ubuntu, that's why we recommend you start out by dual-booting. Take the time to get used to and appreciate the Ubuntu way, and we promise you'll end up very happy with it.
Article source: wikiHow. wikiHow is a group effort to create a great resource: the world's largest free how to manual. wikiHow articles help people solve their everyday problems. wikiHow licenses all content under a Creative Commons License. The license allows wikiHow content to be used freely for noncommercial purposes. The Creative Commons License also allows for the creation of derivative works.
More Windows Administration Information:
• The Death of Windows
• The Fedora 3 Linux File Structure
• The Linux Directory Structure
• 7 Steps to Securing Your Linux Server
• An introduction to the Linux Boot and Startup Processes
• Linux Security Basics: How to Encrypt and Sign Files with GnuPG
• How to Partition a Drive for Linux and Microsoft Windows
• Levels and Layers of Abstraction in a Linux System
• Ubuntu for Non-Geeks: A Pain-Free, Get-Things-Done Guide
• Check Used Disk Space on Linux With du Command
