After Hyper-V is installed, there are many different things that you can configure or change from what you set during installation. Getting to the Hyper-V console is similar to the other roles that you install on Windows Server 2019. From Server Manager, choose Tools | Hyper-V Manager.
When Hyper-V Manager opens, you see the name of the server on which you just installed the role. Click that server, and you see the menus change to reflect some of the things that you can do with the host. If you right-click the host, you see a menu similar to the one show. This menu allows you to configure your Hyper-V host the way that you want to.
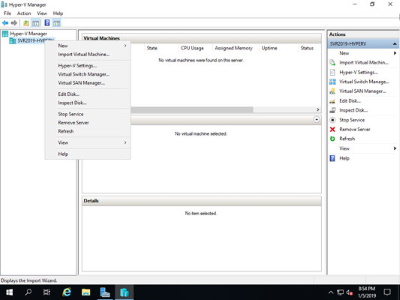
The menu for the host in Hyper-V Manager presents you with your configuration options for that host.
To start configuring the host, click Hyper-V Settings in the menu that you got from right-clicking the server's name.
Virtual Hard Disks and Virtual Machines
The first two configuration options - Virtual Hard Disks and Virtual Machines - allow you to change the storage location of the virtual hard disks that are used for the VMs and the location of the VM's configuration files.
NUMA Spanning
The third option, Non-Uniform Memory Access (NUMA) Spanning, shown in the following figure, allows you to set the host to act as a NUMA node. This allows VMs to use resources from the server they're on as well as other servers that are configured to be NUMA nodes. This means that a virtual machine can have more CPU or RAM than what is on the one physical host, if another host which is also a NUMA node is sharing that resource. This has an impact on performance so I wouldn't recommend it unless you're using it in a lab or development environment. Avoid using this in production environments.
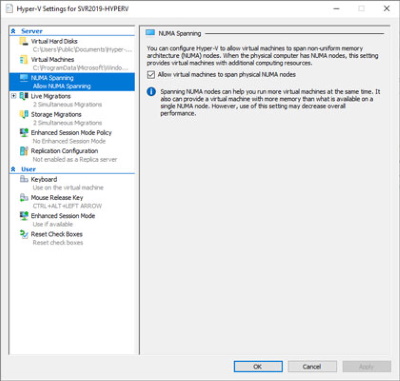
NUMA Spanning can be helpful in lab and development environments where you may not have the same
resources that you do in production because it allows you to share resources across NUMA nodes.
Live Migrations
Assuming you followed along in the installation of Hyper-V, your Live Migrations section should have a check mark in the Enable Incoming and Outgoing Live Migrations check box. On this screen, you can specify how many live migrations can happen at any given time. The default here is two, as shown here. You can also specify a particular IP address if you want Live Migration to happen over a different interface than the rest of the traffic.
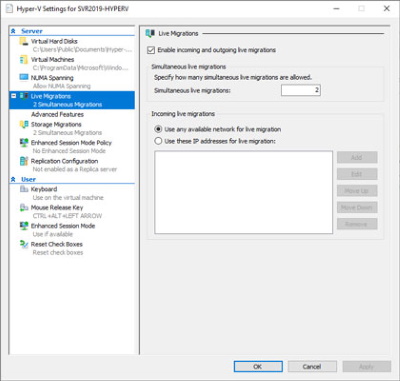
Live Migration allows virtual machines to move between hosts with no downtime, and you can specify
how many migrations can happen at the same time.
There is a plus sign next to Live Migrations. If you click that, you get the option for Advanced Features. Advanced Features is where you can change what kind of authentication you want to use for migrations. This is set to CredSSP right now (if you followed the installation instructions), and this is where you can choose Kerberos if you would like.
You can also choose performance options from here. Your choices are TCP/IP, Compression, or SMB. I recommend leaving this on Compression.
Storage Migrations
Storage Migrations allows you to move VM storage with no downtime to the virtual machine. It's very helpful when moving to a new storage array, or when getting ready to perform maintenance on a storage array because you can move the storage with the virtual machine still powered on. In this section, you can decide how many storage migrations you want to allow to happen at the same time. The default setting for this screen is two.
Enhanced Session Mode Policy
Enhanced Session Mode Policy allows your Hyper-V host to connect to your VMs over Remote Desktop Protocol (RDP). You may be wondering why you would want to allow that. When you use RDP to connect, you can pass local devices to your VMs like disk drives, flash drives, and other peripherals. You also gain a shared clipboard that allows you to copy and paste, and it improves support for viewing the VMs on a higher-resolution monitor. This setting is disabled by default on Windows Server 2019 so you need to enable it if you want to use this feature.
Replication Configuration
You can set up your Hyper-V host to act as a Hyper-V Replica. When a Hyper-V host is configured as a replica, VMs are copied to it from the primary Hyper-V servers. If the primary Hyper-V server ever experienced a major malfunction, the replica server can bring up the VMs that are kept in a powered-off state.
You can specify whether you want replication traffic to be sent plaintext or encrypted. I always recommend using encryption when it's available. And you can also select whether you want to allow replication from any server that can authenticate, or if you want to limit replication to specific servers. This screen is shown here.
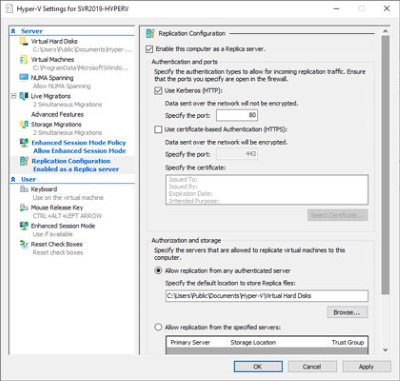
Configuring a Hyper-V Replica server is a great addition to your organization's disaster recovery strategy.
Keyboard
The Keyboard screen is one of the user settings. You can specify whether key combinations like Alt+Tab, for example, will apply to the physical computer the keyboard is attached to, the VM, or on the VM but only if the VM is full screen.
Enhanced Session Mode
Enhanced Session Mode is enabled for the user by default. It allows you to use a remote desktop connection to pass through drives, printers, and so on, and to use the shared clipboard.
Reset Check Boxes
All this setting does is reset check boxes that are used to hide pages or messages when they're checked. It doesn't reset anything else.
Virtual Switch Manager
When you right-click your Hyper-V host, you may notice an option for Virtual Switch Manager. This selection allows you to create virtual switches that your VMs can use to communicate on the network. There are three types of switches that you can use within Hyper-V:
• External: Allows you to connect to a physical network
• Internal: Allows the virtual machines to communicate with other virtual machines on the same switch and with the host
• Private: Only allows virtual machines to communicate with other virtual machines on the same switch
Having the right type of switch to support your use case is critical if you want your Hyper-V deployments to succeed. The screen is shown in the following figure.
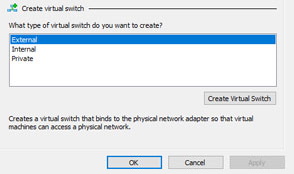
The Virtual Switch Manager allows you to configure virtual network switches for your Hyper-V environment.
Virtual SAN Manager
Also in the menu for your Hyper-V host is the Virtual SAN Manager. This allows you to connect your Hyper-V host to a Fibre Channel SAN. This is especially helpful for large organizations that have invested in Fibre Channel technology. You can see in the following figure that you can define the World Wide Node Name (WWNN) for the Fibre Channel port that is on the Hyper-V host.
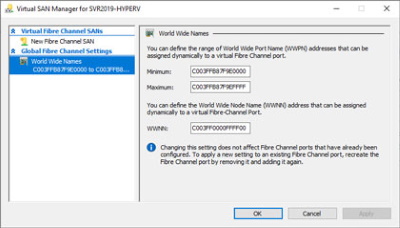
Hyper-V offers support for Fibre Channel SANs (Storage Area Networks), which is a huge benefit
to larger organizations that have invested in Fibre Channel technology.
Fibre Channel SANs utilize special switching equipment to support high-speed, low-latency storage networks. Systems that use Fibre Channel need special storage network adapters installed, which are referred to as host bus adapters (HBAs).
This is an excerpt from:
Your one-stop reference for Windows Server 2019 and PowerShell know-how
Windows Server 2019 & PowerShell All-in-One For Dummies offers a single reference to help you build and expand your knowledge of all things Windows Server, including the all-important PowerShell framework. Written by an information security pro and professor who trains aspiring system administrators, this book covers the broad range of topics a system administrator needs to know to run Windows Server 2019, including how to install, configure, and secure a system. This book includes coverage of:
• Installing & Setting Up Windows Server
• Configuring Windows Server 2019
• Administering Windows Server 2019
• Configuring Networking
• Managing Security
• Working with Windows PowerShell
• Installing and Administering Hyper-V
• Installing, Configuring, and Using Containers
If you're a budding or experienced system administrator looking to build or expand your knowledge of Windows Server, this book has you covered. Click here for more information.
More Windows Administration Information:
• The Different Types of Virtualization
• Disable Automatic Wireless Configuration in Windows 7
• How to Check Your PCs TPM
• PC Technician's Software Copyright Responsibilities
• The Fastest Way to Move PC to PC
• What is Hyper-V in Windows Server 2019?
• How to Audit Security Permissions and Access Rights in Active Directory
• Use the HOSTS File to Block Web Sites
• Installing a Local Printer on Windows Vista
• Disable Cutesy Effects to Speed Up Windows 10


