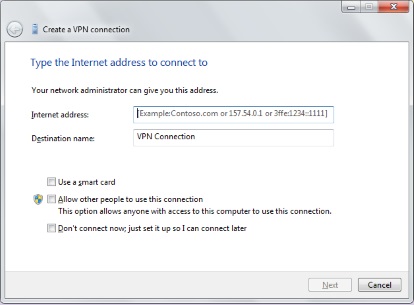
A Virtual Private Network (VPN) is a connection you can set up between two computers that establishes a secure path between a computer with public Internet access and a computer that is connected to a private network; such as the network at your place of business.
To set up a VPN, you will need to gather specific criteria for each computer; such as each computer's Internet Protocol (IP) address or domain name, a username and password, and any other applicable authentication settings. You will then enter this information into the VPN configuration settings menu of your computer. This guide provides you with instructions for setting up a VPN in Windows 7 computers.
1. Access the VPN menu on the remote computer.
This computer will be the computer with public Internet access; not the computer functioning as the server.
• Click on the "Start" button, or Windows logo, from your Windows 7 desktop.
• Type "VPN" into the search box located at the bottom of the floating menu that appears on your screen.
• Select "Set up a virtual private network (VPN) connection" after it appears in the search results,
which by default should be located within the Control Panel. This will launch the VPN wizard.
2. Configure the outgoing VPN connection.

• Enter the domain name or IP address of the computer or server you want
to connect to within the field for "Internet address." If you do not have this
information, consult with the Information Technology (IT) administrator (admin) who manages the network.
• Enter the username and password that allows you to access the network, then click the "Connect" button.
3. Initiate the outgoing VPN connection.
Click directly on the Windows logo located on the bottom-right of the VPN window, then click on "Connect" below the section entitled "VPN Connection." You will now be required to finish setting up VPN on the other computer.
4. Access adapter settings on the incoming computer.
The computer with the incoming connection will be the other computer functioning as the server.
• Click on the "Start" menu of the second computer, then type "Network and Sharing" into the search bar.
• Select "Network and Sharing Center" from the options provided, then click on
"Change adapter settings" to manage your connections.
5. Indicate the name of the computer you want given VPN access.
• Click on "File" from within the new menu that appears (hit ALT+F if no "File" menu is visible),
then select "New Incoming Connection." A wizard will then appear on your screen that
will ask you to choose the users that you want to give VPN access to.
• Choose the users, or name of the computer on which you established the
outgoing VPN settings, then click on the "Next" button.
6. Establish the incoming VPN connection.
• Select the option that indicates you want all users connecting to this network through the Internet, then click again on "Next."
• Indicate the type of IP you want to use for this connection. In most cases, the option commonly chosen by users is "TCP/IPv4."
• Click on the "Allow Access" button. The outgoing computer will now be able to access the private network through VPN.
Article source: wikiHow is a group effort to create a great resource: the world's largest free how to manual. wikiHow articles help people solve their everyday problems. wikiHow licenses all content under a Creative Commons License. The license allows wikiHow content to be used freely for noncommercial purposes. The Creative Commons License also allows for the creation of derivative works.
More Windows Administration Information:
• Disable Unnecessary Background Apps
• Create a Windows 7 Disk Image Backup
• The Fastest Way to Move PC to PC
• Search for Text in Text Files
• What is Windows Aero and Mouse Gestures?
• What is Hyper-V in Windows Server 2019?
• Environment variables in PowerShell
• Command Line to Get Computer's Numner of CPU Cores
• Guide To Setting Up Dual Monitors
• How to Change Process Priorities in Windows Task Manager

