One of the main advantages of a network is the ability to share files. This article shows you how to configure Windows to share files and folders on a network.
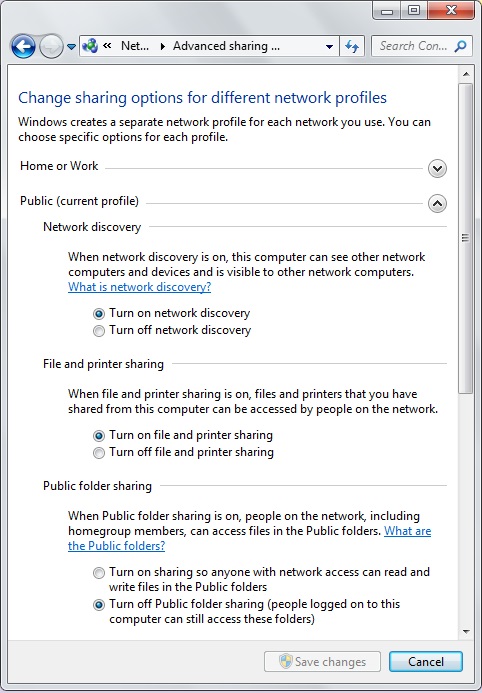
Windows has a folder named Public specifically set up to make it convenient to share files and folders on your computer. Any file or folder that you drop into the Public folder is automatically shared with other people on the network. However to use the Public folder, sharing must be turned on on your computer. To make sure sharing is turned on;
1. Click on the "Network and Sharing Center" icon in Control Panel. (you can view the icons in Control Panel by selecting "Large icons" in the drop-down-list located in the upper-right corner of the Control Panel window.
2. In the "Network and Sharing Center" window, in the left panel, click on "Change advanced sharing settings".

3. In the Advanced sharing settings window, next to "Public", click on the down button to expand the setting options.
4. In the Public sharing options list, under "Public folder sharing", set the radio button next to "Turn on sharing so anyone with network access can read and write files to the Public folders".
5. Click on the [Save changes] button.
To locate the Public folder, in Windows Explorer navigate to c:⁄Users⁄Public⁄. You should find the following subfolders:
Public Documents
Public Downloads
Public Music
Public Pictures
Public Recorded TV
Public Videos
Now to share a file or folder all you need to do is drop it into one of these Public subfolders.
Share Any Folder
Although dropping a folder into the Public folder makes sharing convenient, many times you need to share a specific folder with a specific person or persons on the network. Here's how to share any folder:

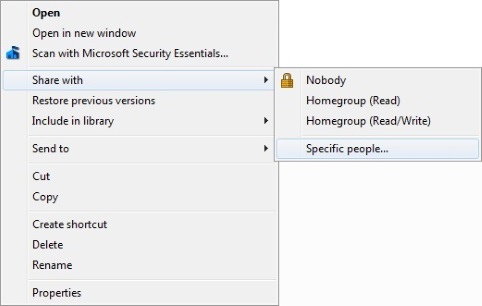
1. In Windows Explorer right-click on the folder you want to share, and in the popup menu that appears, select "Share with > Specific people...".
2. In the File Sharing dialog box that appears, choose a person's name. If the person's name that you want to share with does not appear in the list, you'll need to create an account on your computer for that person. Then click on the [Add] button.
3. Click on the name in the list to highlight it, then click on the "Permission Level" drop-down button and set a check mark next to the level of permission you want to grant that individual. Then click on the [Share] button.
4. After a short delay a dialog box appears with the message "Your folder is shared" and displays the network address of the folder you shared. You will also see a link: "You may email these links to notify people that you have shared these files, or copy the links onto the Windows clipboard, where you can paste them into any program you choose."
The person you shared the folder with will need this network address to access the shared folder. If you don't use Microsoft's email program, you can click on "copy" to copy the link to the clipboard and paste it into another program.
5. When you're finished, click on the [Done] button.
Now to share any folder with a specific person or persons you want to share it with, just drop it into the folder that you shared.
More Windows Administration Information:
• How to Block Unwanted Websites with Your Netgear Router
• Disable Annoying 'Get Windows 10' Message
• Computer Data Backups - Test Now or Cry Later
• Configure Windows Indexing Service for Performance
• Msconfig - Microsoft's Secret Weapon to Increase Your Computer's Speed
• Microsoft Licensing Explained
• Use PowerShell and WMI to Get CPU Information
• View a Brief List of Windows 10's Recent Problems
• Turn Off Windows XP Service Pack 2 Firewall
• How to Map a Network Folder in Windows 7

