Hard Disk Thrashing is when your computer's hard disk activity light stays on, and you hear your disk spinning most of the time, even when you're not doing anything on your computer. When you do try to do something on your computer, it responds very slowly. Something is working your hard disk real hard, and it's not you.
Indexing Service
When you perform a search on Windows Vista, you can actually search the "contents" of files. Searching files is a very slow process, but Windows can produce the results in seconds. How is this possible? It's possible because Windows keeps a database, called an "index", of all the files on your computer. It's great to get results quickly, but there's a price to pay.
The service that creates the index, called the "Indexing Service", has to continuously monitor the files on your computer for changes and update it's database when changes or new files are found. This uses processor time and can take up more than a megabyte of ram. You may notice when just you're sitting in front of your computer, not executing programs or saving files that the hard drive starts working very hard. That might be the Indexing Service working to update it's database.
If you commonly search only ceratin folders, you can reduce the amount of work performed by the Indexing Service by configuring the indexing options. Select Control Panel | System and Maintenance | Indexing Options and in the "Indexing Options" dialog box remove any folders that you rarely search from the index.
If you rarely use Windows Search feature, and you find it anoying to hear your hard drive working very hard when you're not performing any drive intensive tasks, you can disable the Indexing Service. To disable Indexing Service, Select Control Panel | System and Maintenance | Administrative Tools | Services.
If the User Account Control dialog box appears, click on the [Continue] button.

In the Services window that appears, scroll down to, and right-click on Windows Search. In the popu-up menu that appears, select Properties.
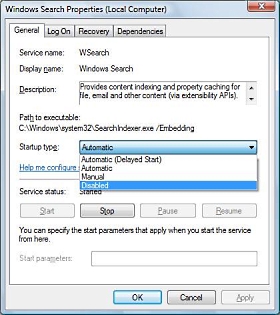
In the Windows Search Propeties dialog box that appears, in the Startup type: dropdown list, select Disabled. Then under Service status, click on the [Stop] button. When the Service status indicates Stopped, click on the [OK] button to close the dialog box.
With the Indexing Service stopped, you can still search just the same as always, except Windows Search has to build an index, in real time, of the folder(s) you select to search, so receiving results may take longer than if the Indexing Service had been running.
Virus or Spyware
The first culprit to suspect is a virus or spyware. Make sure your antivirus program's definition files are up-to-date and run your antivirus program. If you don't have an antivirus program installed on your computer, you can use Trend Micro's free online virus scanner.
Similarly, make sure your anti-spyware program's definition files are up-to-date and run your anti-spyware program. If you don't have an anti-spyware program installed on your computer, you can use Trend Micro's free online spyware scanner, or download Lavasoft's free Ad-Aware Personal edition spyware remover.
Fragmentation or Bad Areas
You can visualize your computers hard drive as a disk with data stored as tiny magnetic fields. Data is stored in concentric circles called "tracks" that are divided into pie shaped sections called "sectors". Data is stored in a number of adjacent sectors defined as an "allocation unit". A read/write head hovers above the spinning disk. To store a file, the read/write head will place parts of the file in "free" allocation units. Unfortunately, except for on a brand new disk, the parts of the file will NOT be stored in adjacent allocation units.
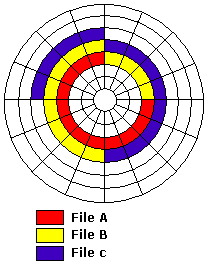
Disk before fragmentation
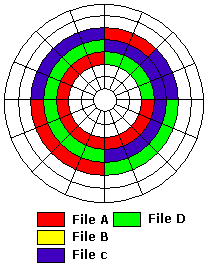
After file B is deleted and file D added, file D is fragmented
As you add and delete programs and data from your hard disk, non-adjacent allocation units become free. Parts of files are stored in any free allocation units, not necessarily adjacent, that the read/write head finds. This results in parts of files being scattered all over the disk. This is called "fragmentation". Having a fragmented disk means when you load a program or data, the hard drive must search all over the disk for parts of the file. If a disk is badly fragmented, the result is disk thrashing.
It may surprise you to learn that few, if any, hard disks are perfect as they come off the production line. They all have bad areas. When the manufacturer low-level formats the disk, the bad areas are cordoned off by demarking them with special code. Even after a disk is put into service, an area of the disk may go bad. Modern operating systems can detect when an area of the disk is becoming unreliable and will automatically relocate the data stored there, and cordon off the bad area. If a disk has too many bad areas, the result is disk thrashing.
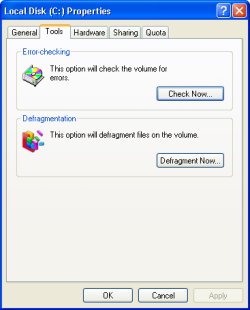
The Windows operating system provides the chkdsk utility which reports any bad areas on your hard disk. To run chkdsk, right-click on the disk's icon in Explorer and select "Properties" in the popup menu. In the "Disk properties" dialog box that appears, , select the Tools tab. On the Tools tab, click on the Check Now... button.
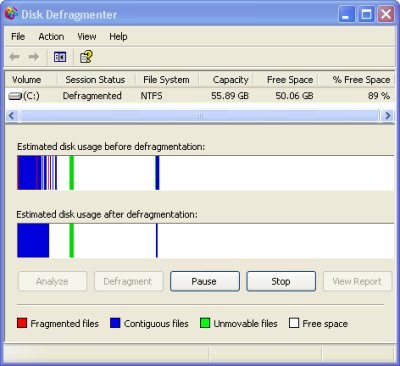
Windows also provides the disk defragmenter to rewrite the contents of your hard disk with all the parts of all files arranged in adjacent allocation units. To run defragmenter select Start | All Programs | Accessories | System Tools | Disk Defragmenter.
Background Programs
Your computer may have too many programs running at the same time. The programs that you started, as displayed on the taskbar, are NOT the only programs running on your computer. Many programs are started automatically when you start Windows. Icons for some of these programs are displayed in the Notification Area on the right side of the Task Bar.
Not all of programs started by Windows display icons in the Notification Area. Right-click on a blank area in the Notification Area and select properties in the popup menu. The Taskbar and Start Menu Properties dialog box will appear. On the Taskbar tab in this dialog box, note the checkbox that provides the option to "Hide inactive icons".
Even if you uncheck "Hide inactive icons", icons will not be displayed for all programs started by Windows. Right-click on a blank area on the Task Bar and select "Task Manager" in the popup menu. The Task Manager dialog box will appear. In Task Manager, the Processes tab displays a list of about 50 programs running on your computer. This, again is only a partial list.
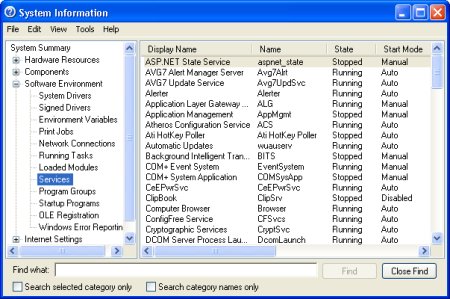
Select Start | All Programs | Accessories | System Tools | System Information to open the System Information utility. In the left panel of the System Information window, open the "Software Environment" branch and select "Loaded Modules" to see a list of hundreds of programs running on your computer. Select "Services" to see a list of background programs running on your computer. Select "Startup Programs" to see a list of programs can be configured to run when Windows starts, including the location or registry key that calls them.
When you install an application, many times the application's creator thinks their program is the next best thing after mother, America, and apple pie. You for sure will want to use their program every day, so the installation program configures their program to start automatically when you start Windows. You may not want to use their program every day, but it will be using system resources and slowing your computer down every day.
There are several places where programs can be configured to run when Windows starts. The most obvious one is the Startup folder \Documents and Settings\[username]\Start Menu\Startup. This folder contains shortcuts for programs that will load every time windows starts. To prevent unwanted applications from starting automatically, delete their shortcuts from this folder.
Programs can also be started by the registry key
HKEY_CURRENT_USER\
  SOFTWARE\Microsoft\Windows\CurrentVersion\Run
or HKEY_LOCAL_MACHINE\
  SOFTWARE\Microsoft\Windows\CurrentVersion\Run
To prevent a service from starting automatically every time you start Windows, select Start | Run and type services.msc to open the Microsoft Services Console. This utility displays all available services. Services with the Startup Type Automatic start when Windows starts. use the Stop button on the toolbar to stop a service.
Keep in mind that some of the services are required for Windows to function. Make sure you understand the function of a service before you stop it. The Extended tab provides a brief description of each service. If you don't understand the function of a service check ProcessLibrary.com
Virtual Memory Management
Another possible cause of hard disk thrashing is virtual memory management. When you, or the operating system, starts a program, the program's executable and possibly several support modules are loaded into main memory (called RAM for Random Access memory). Today's applications are memory hogs and obviously no computer has an infinite amount of memory.
Windows memory management system creates a file on the hard disk named "pagefile.sys" to use as virtual or "pretend" RAM. When an application needs more RAM, the operating system can open space in RAM by moving a program module already in RAM to the pagefile.
If an application requests a module that was moved to the pagefile, the operating system will move a different module from RAM to the pagefile, and move the requested module back to RAM. Data is swapped back and forth between RAM and virtual RAM in unit sizes called "pages", thus the name "pagefile". (The pagefile is sometimes called the swapfile).
If you're running several applications at the same time, and your computer has only a small amount of installed RAM, or your hard disk has only a small amount of free space, hard disk thrashing can result.
To check the amount of free space on your hard disk, right-click on the disk's icon in Explorer and select Properties in the popup menu. In the Disk properties dialog box that appears, select the General tab. Exactly what the minimum amount of free space should be depends upon how you use your system and the amount of RAM installed, but I would recommend a minimum of several hundred MB (MegaBytes).
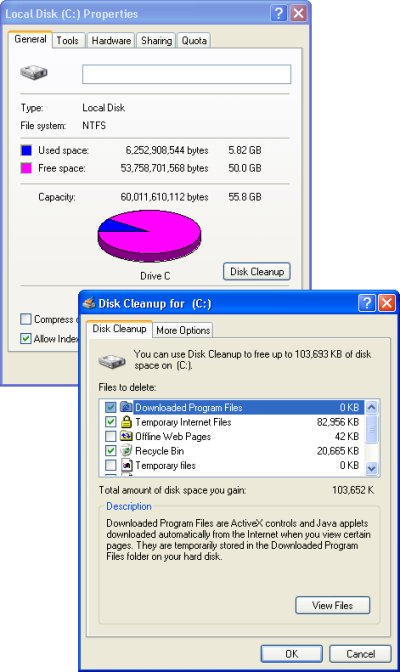
If the amount of free space is less than several hundred MB, then on the General tab of the Disk properties dialog box, click on the Disk cleanup button to find and delete unnecessary junk files. Unless you also reduce the size of the Recycle Bin and the Browser Cache, This will be only a temporary fix.
If you have less than several hundred MB of free space, the easiest solution is to install a second hard drive and move some of your data to the second drive. If your second hard drive is higher performance than your first drive, you may want to move your pagefile to the new drive.
If your computer has only a small amount of installed RAM, installing more RAM will reduce hard disk thrashing. Because today's applications are memory hogs, having 512 MB of RAM installed would NOT be excessive. If your computer has a sufficient amount of installed RAM and a sufficient amount free hard disk space, thrashing may be caused by the pagefile being too small.
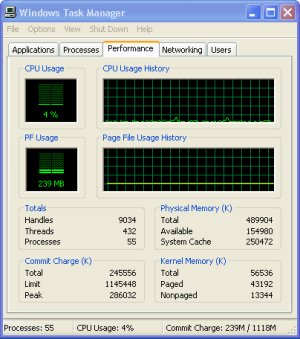
To determine if the pagefile is large enough, open all the programs and data files you might run at the same time, then right-click on the task bar and in the popup window that appears, select Task Manager. In Task Manager, on the Performance tab, if Commit Charge (the amount of memory in use) is larger than the Total Physical Memory, you'll need to make the pagefile large enough to make up the difference.
To increase the size of your pagefile, in the Control Panel's System utility, select the Advanced tab. In the Performance section click on the Settings button to open the Performance Options dialog box. In the Performance Options dialog box select the Advanced tab. In the Virtual memory section click on the Change button to open the Virtual Memory dialog box.
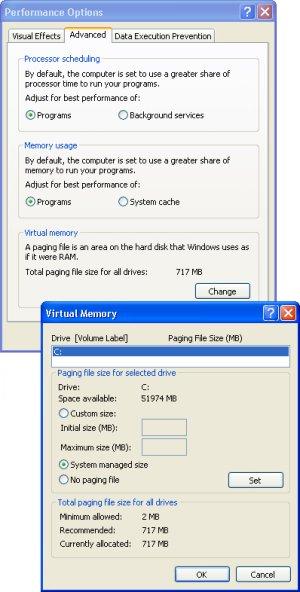
Set the radio button next to "Custom size" and enter an Initial size and a Maximum size. For example, an Initial size might be 720 MB and a Maximum size might be 1440 (MB). Make sure your hard disk has more than enough free space to allocate the Maximum size. The Virtual Memory dialog box is also the place where you can select an alternate drive for the pagefile. Click on the Set button. You will be required to restart the computer for the change to take effect.
If you find a "Custom size" has already been configured for virtual memory, consider setting the radio button next to "System managed size". When a service technician can't figure out what's wrong with a system, just to look like they're doing something, they'll often set a Custom size for virtual memory. But Windows XP memory management is pretty smart, so their tinkering rarely improves the system's performance.
Hard disk thrashing can be caused by a virus, spyware, fragmented hard disk, too many programs running at the same time, or insufficient virtual memory. But 99 percent of the time, installing additional physical memory and letting the system manage virtual memory will solve the problem.
More Windows Troubleshooting Articles:
• How to Fix Advapi32 Error
• Fix 0Xc0000076 Error in Windows 10
• Troubleshooting Computer Freeze (Lockup) Problems
• Computer Repair with Diagnostic Flowcharts
• How To Fix Peer Name Resolution Protocol Service Errors
• How To Fix AppHelp DLL Errors On Your PC
• A lot of Beepen and Tooten But No Booten?
• Use chkdsk to Find and Repair Disk Errors in Windows 7
• Understanding the boot.ini File
• Free Tool to Recover Files From Damaged Disc

