

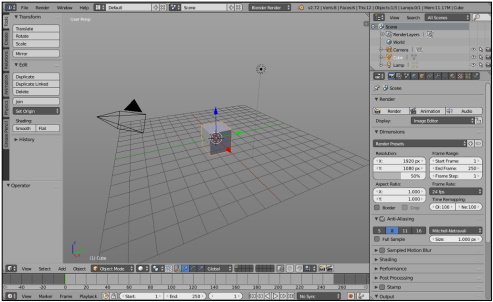
Figure 1-4 The default Blender interface
The first thing to understand about Blender's interface is its basic organization. Figure 1-4 displays a single Blender window. Each Blender window can consist of one or more areas that you can split, resize, and join at will. In all cases, an area defines the space of an editor, such as the 3D View, where you actually make changes and modifications to your 3D scene. Each editor can include one or more regions that contain additional features or tools for using that editor. An example of a region that all editors have is a header region at the top or bottom of the editor; the header typically includes menus and buttons to give you access to features in that editor. Figure 1-5 illustrates each of these building blocks of the Blender interface.
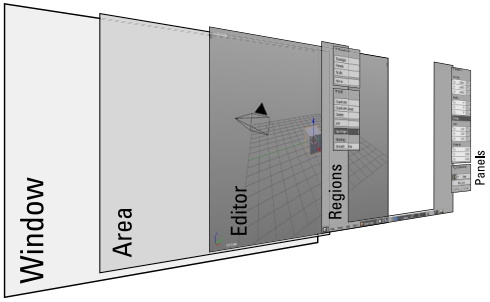
Figure 1-5: A Blender window contains areas populated by editors that include
one or more regions.
Resizing Areas
Regardless of the type of editor that's contained in an area, you modify and change all areas in a Blender window the same way. To change the size of an area, left-click the border between two areas and drag it to a new position. This method increases the size of one area while reducing the size of those that adjoin it. If you have only one area in your Blender window, it's exactly the same size as that window. To resize it, you need to either adjust the size of its parent Blender window or split a new area into that space, as covered in the next section.
Splitting and Removing Areas
While working in Blender, it's pretty common that the default layout isn't quite what you need to work efficiently. Sometimes you may need an additional 3D View or you may want to see the UV/Image Editor in addition to the 3D View.
To create either of these layout changes, you need to split an existing area into two. You can split or join areas by right-clicking the border between two areas and choosing either Split Area or Join Area from the menu that pops up. However, there's a faster way. Look at the corners in the bottom left and top right of any area. These corner widgets are marked as a triangular region indicated by diagonal lines. To split any area into two, use the following steps:
1. Left-click one of the corner widgets and drag your mouse cursor away from the area's border.
2. Drag your mouse cursor left or right to split the area vertically. Dragging it up or down splits the area horizontally.
As you drag your mouse, the areas update in real time so that you can see the result of the split while you're working.
If you decide that you actually don't want to split the area, you can cancel the operation by right-clicking or pressing Esc.
If you want to remove an area, the process is similar. Rather than splitting an area in two, you're joining two areas together. So instead of left-clicking the corner widget and dragging your mouse cursor away from the area border, drag it towards the border of the area you want to join with. This action darkens the area your mouse is in and draws an arrow to indicate which area you want to remove.
Figure 1-7 shows the process of splitting an area and then removing that area. When I work in Blender, I find myself constantly changing the screen layout by splitting and joining new areas as I need them.
Duplicating an Area to a New Window
In addition to the new way of splitting and joining areas, you can use these corner widgets to duplicate any area into a new Blender window of its own. You can move that window to a separate monitor (if you have one), or it can overlap your original Blender window. And within this new Blender window, you can split the duplicated area into additional ones as you like. This area duplication feature is a slight violation of Blender's non-overlapping principles, but the benefits it provides for users with multiple computer screens make it very worthwhile.
To take advantage of this feature, follow these steps:
1. Shift+left-click one of the corner widgets in an area and drag your mouse cursor away from it in any direction.
This step duplicates the area you clicked in and creates a new Blender window to contain it. You can also achieve this effect from the header menu of some editors by choosing View &rarr Duplicate Area into New Window.
2. Close the additional Blender window by clicking the close button that your operating system adds to the border of the window.
Customizing Headers
All editors in Blender have a horizontal region called the header running along either the top or bottom of the editor. The header usually features specialized menus or buttons that are specific to the editor you're using. Here are some ways you can customize the header:
✔ Resize the header. Like any region, you can resize the header by left-clicking the seam between the header and the main work space of the editor and dragging it up or down.
✔ Hide the header. If you drag the seam all the way to the area border, then the header becomes hidden, leaving only a small plus icon (+) in the corner of the editor. If the header is at the bottom of the editor, the plus icon appears at the bottom right. If the header appears at the top, it's at the top left. Left-click this icon and the header reappears.
✔ Change the location of the header. You can also change the location of the header to either the top or bottom of the editor it belongs to. To do so, right-click the header and choose Flip to Top (or Bottom, depending on where your header currently is).
Maximizing an Area
When working in Blender, you also occasionally need to maximize an area. Maximizing an area is particularly useful when you're working on a model or scene and you just want to get all the other areas out of your way so you can use as much screen space as possible to focus your attention on the task at hand.
To maximize any area, hover your mouse cursor over it and press Shift+Spacebar. You can toggle back to the tiled screen layout by either pressing Shift+Spacebar again or clicking the Back to Previous button at the top of the window. These options are available in the header menus of nearly all editor types by choosing View &rarr Toggle Full Screen. You can also right- click the header and choose Maximize Area from the menu that appears. If the area is already maximized, then the menu item will say Tile Area.
You may notice that the hot keys next to these menu items are Ctrl+Up Arrow for maximizing and Ctrl+Down Arrow for tiling, rather than Shift+Spacebar. Those hotkeys also work, but I find that I don't have to move my left hand as much to hit Shift+Spacebar, so that's much more convenient for me.

Some of the dramatic visual effects you've seen in top-grossing movies and heralded television series got their start in Blender. This book helps you get your own start in creating three-dimensional characters, scenes, and animations in the popular free and open-source tool.
Author Jason van Gumster shares his insight as an independent animator and digital artist to help Blender newcomers turn their ideas into three-dimensional drawings. From exporting and sharing scenes to becoming a part of the Blender community, this accessible book covers it all!
• Create 3D characters - no experience required
• Build scenes with texture and real lighting features
• Animate your creations and share them with the world
• Avoid common rookie mistakes
Blender For Dummies is the ideal starting place for newcomers to the world of 3D modeling and animation.
About the author
Jason van Gumster writes, animates, and occasionally teaches. He has heavy entrepreneurial tendencies that run nearly as deep as his creative ones... so he has a constant fascination with producing creative content with as much control and independence as possible. Naturally, he's a big proponent of open source software; very nearly everything that he produces is made using Free and open source tools.
Using those open source tools, Jason ran his own small, independent animation studio for eight years. And in the course of that, he had the privilege of managing mid-sized international production teams on ridiculously tight deadlines (4-7 minutes of CG animation in 2 days)... for fun. He's transferred some of that experience in writing to two separate books, Blender For Dummies and GIMP Bible. The rest of that experience he continues blurt out a bit at a time during his weekly[-ish] podcast, the Open Source Creative Podcast.
Currently based just outside of Atlanta, Georgia, Jason spends the majority of his time drinking coffee and trying to be awesome. The former he's pretty much gotten down to a science. The latter... well, every now and again he succeeds at that one and makes it look like it wasn't an accident.

More Graphics Design Tips:
• HTML5 Canvas
• SVG Image Clipping
• MathML mtext Element to Display Plain Text
• SVG Image Masking
• Image Scanning - Confused About DPI?
• Inkscape Rectangles and Squares Drawing Tutorial
• Draw Bezier SVG Drawing Application
• Inkscape Basic Fill
• MathML Elements to Display Subscripts and Superscripts
• Inkscape Shadows and Highlights