
To put an image on the web you need to consider the dimensions, file size, and download speed of the image. Digital camera pictures can be many megabytes in file size and require lengthy download times. Many times this is the result of displaying extra space around the subject that you don't need.
In this article I'll show you how to crop an image to retain only the area you want and how to scale an image so that it fits neatly into your webpage's layout without the user having to download an oversized image that needs to be resized by their browser.
For this example, I'll use the GIMP image editing program. GIMP stands for "GNU Image Manipulation Program", GNU standing for GNU General Public License. GIMP is an image editing program on the level of Photoshop but without the $800.00 price tag, in fact it's totally free. GIMP was originally created for Linux, but is now available for Windows.
Download GIMP for Windows from:
gimp-win.sourceforge.net.
Similar to most open-source software, you can't just install GIMP by executing a single setup program, you need to download three files and install them separately.
- GIMP for Windows (7.8 MB)
- GTK+ 2 Runtime Environment (3.7 MB)
- GIMP Help (22 MB)
Extract the three zip files into a new folder under Program Files (for example named "GIMP"), then double-click each setup file, starting with the GTK (GIMP Tool Kit), then GIMP, and then Help. This is the order in which the components look for each other as you install and use them.
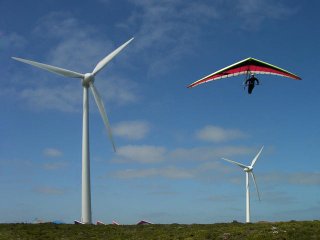
Lets say we wanted to crop the image shown above to remove space around the hang glider. In the Gimp toolbox, click on the Crop or Resize tool (scalpel icon). Place the mouse pointer in the image window near the upper-right corner of the area you want to crop, press and hold the left mouse button, the Crop & Resize dialog box appears. While holding down the left mouse button, drag the mouse pointer to the lower-right corner of the area you want to crop. Then release the mouse button.

The shape of the rectangle you drag does not need to be exact because drag handles will appear at the corners of the crop area. Click on a drag handle and drag it to reshape the crop area as you desire. In the Crop & Resize dialog box, click on the [Crop] button.

The image will be cropped with the parts of the image outside the crop box being discarded. don't worry, you don’t make any changes to the original image unless you save the new image with the same file name. Also, if you don't like the result, you can always Undo by selecting Edit | Undo, in the main menu or by typing Ctrl-Z.

In the Gimp Toolbox, click on the Zoom in or out tool (magnifying glass icon. Use the mouse to drag a box around part of the image as shown above.

When you release the mouse button, the image window will display the magnified portion of the image. Note the distorted area's visible in the image shown above. These are artifacts caused when the image's author, or someone along the way applied too much compression to the image. Note the drop up box on the bottom border of the image window. Here you can select a magnification factor. Click on 100% to restore the image to normal size.

Select Image | Scale Image in the main menu. This will open the Scale Image dialog box where you can enter new dimensions to scale the image.

Note the chain icon next to the Width and Height input boxes. With the chain linked as shown above, you need only to enter a width OR a height. The other dimension will automatically be calculated to preserve the aspect ratio of the image. Clicking on the chain icon causes it to toggle between unlinked and linked. When it's in the unlinked state you can choose separate width and height dimensions to change the aspect ratio of the image.
Why didn't we just use the Crop & Resize dialog box earlier to resize the image? Because Resize changes the image's size by simply throwing away pixels or inserting duplicate pixels. Rescale changes the image's size by pixel interpolation and antialiasing. Without getting into a complicated explanation, lets just say you get a much higher quality result when you Rescale rather than Resize.
Why wouldn't you always choose to Rescale rather than Resize? Because some images, for example images in the GIF file format, use a palette that can't hold enough color information to perform useful pixel interpolation and antialiasing.

Once you have the image cropped and rescaled the way you want it, select File | Save or File | Save as..., in the main menu to open the Save Image dialog box where you can enter a new file name to save your image.
Using the methods described in this article you can crop an image to retain only the area you desire and you can scale an image so that it fits neatly into your webpage's layout without the user having to download an oversized image that needs to be resized by the user browser.

More Graphics Design Tips:
• Create Animated Glistening Gold Text With SVG
• Krita Paint plus Vector Drawing Portable Application
• How to Trace an Image Using Inkscape
• Find Free Stock Photos You'll Actually Want to Use For Your Website or Blog
• Draw Bezier SVG Drawing Application
• How to Make a Meme
• Use GIMP to Scale (Resize) an Image
• Inkscape Exercise: Draw Photorealistic Sphere
• Inkscape - How to Join Two Segments at Endnodes
• Inkscpe Snap Controls Bar