
Unlike a paint program, a vector drawing program allows you to create and edit drawings by using your mouse to select and drag points on geometric objects in the image. Another advantage of vector graphics is that you can resize the image over a wide range without the loss of quality experienced when you try to resize a bitmaped image.
Inkscape is a free Open Source vector graphics illustration application. It supports features like shapes, paths, text, text-on-path, flowed text, transforms, layers, gradients, gaussian blur, alpha blending, bitmap tracing, and much more. Inkscape saves the file in the W3C standard Scalable Vector Graphics (SVG) file format, and can import and export several other formats (EPS, PNG).
Inkscape comes in versions for Microsoft Windows, Linux, Mac OS X, and other operating systems. It can be downloaded for free from the Inkscape website. In this article you'll learn how to use Inkscape's vector drawing tools. We'll focus on the bezier curve tool and use it to create a simple drawing of a cartoon cat.
Drawing Tools
Inkscape provides tools for drawing standard shapes like rectangles and squares, circles ellipses and arcs, and stars and polygons. In this article, we'll focus on the tools for drawing paths. A path is basically a straight or curved line, or line containing a combination of straight and curved parts. The path drawing tools are the Freehand tool, the Calligraphic tool, and the Bezier tool.
![]()
The Freehand tool is selected by clicking on the toolbar's "pencil" icon. To start a freehand path, press the mouse button in the drawing area to start your path, while holding down the mouse button drag the mouse to create the desired shape, double click to end the path. While the path is still selected, select the toolbar's Node tool.
![]()
Clicking on the Node tool will cause the path's nodes to become visible. Click on one of the nodes and that node's control handles will become visible.
Use the mouse to drag a node, or to move a control handle to reshape the path.
![]()
The Calligraphic tool is selected by clicking on the toolbar's "fountain pen" icon. To start a calligraphic path, press the mouse button in the drawing area to start your path, while holding down the mouse button drag the mouse to create the desired shape, double click to end the path.
![]()
To select a path, click on the toolbar's Select" tool. With the path selected, clicking on the node tool will make the calligraphic path's nodes visible.
Note that a calligraphic path consists of two paths with a fill area between them. The basic method of shaping a calligraphic path is the same as with a freehand path. Click on one of the nodes and that nodes control handles will become visible. Then use the mouse to drag a node, or to move a control handle to reshape the path.
As interesting as the freehand tool and the calligraphic tool are, they have only limited use. You could create an entire drawing, or a large part of a drawing, with one large freehand path. But then you would be spending a long time moving nodes and adjusting control handles to make the drawing look smooth.
The calligraphic tool, of course, would only be used for calligraphy. To make nice neat drawings you'll find the Bezier Curve tool to be the most useful. For that reason, in this article I'll focus on creating vector drawings with the Bezier Curve Tool.
The Bezier Curve Tool
A "bezier curve" is a curved line whose shape is based on a mathematical formula. Bezier curves are great for drawing because they create nice smooth curves. fortunately, to use bezier curves in Inkscape, we don't need to know anything about mathematics. We control the formula's variables visually by using the mouse to drag the paths nodes and control handle.
![]()
Select the bezier tool by clicking on the toolbar's "pen" icon. To start a bezier curve, press the left mouse button in the drawing area, while holding down the mouse button drag the mouse to create a short line, release the mouse button to end the line, then move the mouse a bit to the side and double-click to end the bezier curve.
• If you single-click to end the bezier curve, Inkscape will start a new bezier curve beginning at the end of the previous curve. This is fine if you are an experienced vector artist, but this article is for beginners.
While the path is still selected, select the toolbar's node tool. Note: if a path loses the selection, you can always click on the toolbar's select tool and drag a box around the path to select it. With the node tool selected to make the paths nodes and control handle visible, use the mouse to drag a node, or to move a control handle to reshape the path.
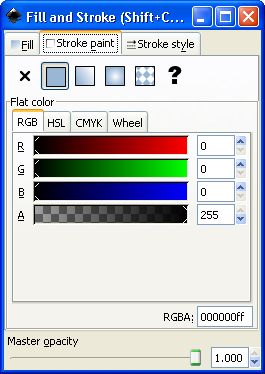
Note that the bezier curve shown above is filled with the color black. We can understand the bezier curve better if we remove the fill. To remove the fill, while the path is selected, choose Object | Fill and stroke... in the main menu. In the Fill and Stroke dialog box that appears, select the Fill tab, and set R, G, and B to 255. Set A to 00.
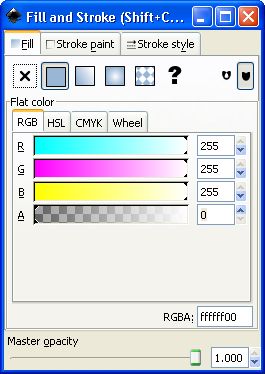
While the Fill and Stroke dialog box is open, select the Stroke paint tab, and make sure the R, G, and B controls are set to 0, and Master opacity is set to 1.000. Then click on the red [x] button to close the dialog box.
Now, with the fill color gone, you can use the mouse to drag a node, or to move a control handle to see how to control the shape of a bezier curve. The path shown above is the same bezier curve as before. By moving a node and the control handle, I have made it into an entirely different curve.
Drawing Method
Inkscape is not bloated with complexity like most vector drawing applications on the market. Yet there is still a virtually infinite number of ways you can configure it an use it. Every artist has their own special skills and talents, and their own way of doing things. Here I show you a basic method a beginner can use to get started.
You don't have to be an artist to create art with Inkscape. You can use Inkscape's "Trace Bitmap" feature, to trace an imported bitmap. Then you can modify the drawing's trace to create your own custom drawing. One possible problem with a trace is that it has so many nodes that it's very difficult to modify. To reduce the number of nodes and place the remaining nodes more evenly, with the trace selected, in the main menu, select Path | Simplify.
Path | Simplify is a feature you can also use on your own freehand drawing to clean it up and make it easier to work with. You can repeat Path | Simplify as many times as desired.
If you don't like how the trace bitmap feature works, you can add a layer to your drawing, import a bitmap to that layer, trace the bitmap by hand, then delete the layer with the bitmap. Some artists just can't be creative while facing a computer, so they draw a picture on paper first, scan it, import it, and then trace it. Some artists draw a picture on paper first, and then trace it into Inkscape using a graphics tablet.
Note: You don't have to be an artist to make tons of money in art. There are thousands of "artists" making crude child-like drawings and passing them off as "Abstract" and "trendy".
The method I'm showing you here is this: create a drawing by simply creating bezier curves, dragging them into the desired position and adjusting their nodes and control handles.
Drawing with Inkscape will be difficult if you aren't familiar with zooming and panning the drawing area. To do detail work, you may need to zoom in on an area of the drawing. Inkscape provides many ways to zoom. The method that you'll probably use most is the Toolbox's Zoom tool.
To zoom in, select the Zoom tool and drag a rectangle around the area you want to zoom in on. To zoom out, with the Zoom tool selected, hold the keyboard [shift] key while you click mouse button.

Let's draw this cartoon cat.
![]()
To start, click on the toolbar's zoom tool.

Then in the Control bar just below the main menu, click on the Zoom to fit page width in window button (the last button shown above). Then draw a bezier curve.
Remember, to draw a bezier curve, select the toolbar's pen icon, then press the mouse button in the drawing area to start a line, while holding down the mouse button drag the mouse to create a short line, release the mouse button to end the line, then move the mouse a bit to the side and double-click to end the bezier curve.
While the path is still selected, select the toolbar's node tool. With the node tool selected, drag nodes and move the control handle to reshape the path to form the top of the cats nose, as shown below.

Next draw the bottom of the cats nose, as shown below.

Now click on the toolbar's select tool, draw a box around the bottom of the cats nose and drag it to put the top and bottom of the nose together, as shown below.
Note: When you draw a selection box around an area, drag arrows appear on the sides of the selection box and a cross icon (not shown) appears when the mouse pointer is inside the selection box. Drag the cross icon with the mouse to move the selected area.
Next draw and position a bezier curve as shown below to create one cheek. Note that I used the Fill and Stroke dialog box to remove the fill color from the cheek line.
You can use the same method to draw the other cheek, but if you want a nice symmetrical drawing, use a copy of the first cheek. Select the cheek line, then in the main menu, select Edit | Copy, Edit | Paste, and Object | Flip Horizontal, then move the other cheek line into position.
I'm not going to explain line-by-line how to draw the entire cartoon cat. To complete the drawing use the same methods we've used so far. Use the Bezier tool to create bezier curves, or make copies of curves that you've already created. use the Select tool to select curves and areas to move. Use the Node tool to select and move nodes and control handles to reshape bezier curves. Use Copy, Paste, and Flip to create copies of groups of lines.
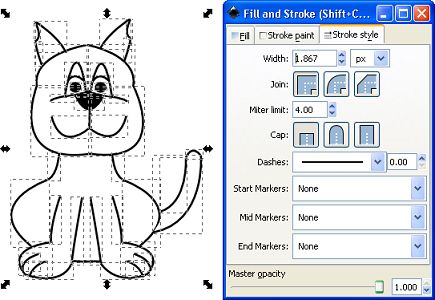
I selected the entire drawing, opened the Fill and Stroke dialog box, selected the Stroke style tab, and set the width of all of the lines to a uniform thickness.
This article does not explain every detail of how to use Inkscape. Every artist has their own special skills and talents, and their own way of doing things. Inkscape provides a virtually infinite number of ways you can do things. Here I show you a basic method a beginner can use to get started.

More Graphics Design Tips:
• MathML Element to Display a Radical
• Basic Inkscape Vector Drawing
• SVG Image Masking
• How to Make a Meme
• How to Install the Free, Open-Source, Blender 3D Animation Application
• Drawing Text with Draw SVG
• SVG Code to Translate a Rectangle and Text
• How to Remove PNG and JPEG EXIF Metadata
• Animation Software - The Amazing 3D World
• Paint.Net Ink Sketch, Oil Painting, and Pencil Sketch Artistic Effects