You will of all heard of the phrase Anti-Aliasing when talking about computer games or graphics cards. You are told about what level of anti-aliasing your card can achieve but do you really know what anti-aliasing does or do you just accept it as a good thing and go for the best one? In this article we will show you what Anti-Aliasing actually does and show you why its important to graphics in images text and games. We will also go into details about what side effects anti-aliasing has in games and why you have to strike a compromise between a high level of anti-aliasing and the performance of your computer.
What is Anti-Aliasing?
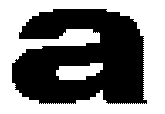
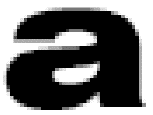
The letter on the left is a blown up letter a with no anti-aliasing. The letter on the right has had anti-aliasing applied to it. In this blown up form it looks like its simply blurred but if we reduce the size down to a more standard size you may see the difference.
![]()
![]()
Now look closely at the two letters. You can still tell that the letter of the left is jagged but the letter on the right looks a lot smoother and less blurry than the example above. Remember I have only shrunk the image down back to normal size and have not altered anything else to the image at all. So as you can see, Anti-Aliasing bring a much more pleasing image to the eye. Something like what come out of a high class printer rather than what you can be used to seeing when on a computer screen.
Why do we get jagged edges on our graphics?
Jagged edges are cause by limitations in a computer screen, whether that be a CRT or TFT/LCD screen its all the same. Monitors are capable or producing nearly perfect straight lines either horizontally or vertically, but when it comes to diagonal lines of any angle your monitor is not capable of producing a line without some jagged edge. This is because your screen is made up of pixels in a grid formation. When you draw a diagonal line on a computer screen it has to cross several grid lines, because pixels create blocks of colour diagonal lines displace these blocks slightly causing jagged edges, Check out the following example to see what happens on your screen.
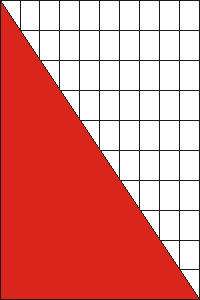

To the left is a graphic on a grid of how we would draw a diagonal line on a grid. As you can to get a straight line we have to cross over the grid lines. To the right is a graphic of how a computer would draw the same line. As you can see the line is jagged. This is because the grid squares are pixels and half a pixel cannot be one colour and half the other. The pixel is red or white in this case.
Newer monitors are combating the problem themselves by decreasing the dot pitch. Dot pitch is the space between pixels. The closer the pixels the less jagged to lines appear. However while this can decrease the effects it can't solve them.
How does anti-aliasing fool the eye?
The clever system that anti-aliasing uses to fool your eyes into thinking that a line is not jagged is to use subtle changes in colour around the curved or diagonal area. These slight changes in colour make the image blend around curves and giving the impression that the line in true. The colour changes are on such a small scale that your eyes cannot detect them under normal circumstances.


Going back to the first example with the letters above, have a closer look at the second letter and you can see in this zoomed in image the changes in greys around the curve.
![]()
![]()
When reduced in size its very difficult to now see the greys but the second image looks a lot smoother than than the first. This is how anti-aliasing manages to trick your eyes into thinking the curves are a single colour and are smooth. You may notice a slight blur is you really study it, but while playing games or reading text without starring your eyes cannot pick up that detail.
Why does Anti-Aliasing slow down frame rates?
This is really an easy one. Anti-Aliasing is done by specific calculations to determine which pixels are drawn extra and in what shade to achieve the desired result. The graphics card usually takes charge of this task. As a result of these extra calculations the graphics card has to give some of its processing power to completing these calculations. This affects the amount of processing power left to render the scene.
Usually the frame rates are affected by the amount of pixels per second your graphics card can render, providing the CPU and other components can keep up. When you are using anti-aliasing the amount of pixels that your graphics card can render will lower by a degree and therefore cut your frame rates in games down.
What is FSAA?
FSAA stands for Full Scene Anti Aliasing and is used as the most common term for Anti-Aliasing in the gaming world. FSAA refers to a technique of Anti-Aliasing that affects the entire screen not just a certain image. When playing a game with FSAA turned on the graphics card will run an Anti-Aliasing algorithm on every frame from top to bottom removing jagged edges from the entire scene. This can have a large hit on performance in games and has only been overcome recently by having much more powerful graphics cards on the market.
Types of Anti Aliasing
There are two main types of Anti-Aliasing techniques, Multisampling and Supersampling. There are varieties of each as graphics card manufacturers find improved ways of getting the same result. Finding ways to limit the performance hit is the main priority. Here we will look at the overall picture of the two techniques. First we will concentrate on Supersampling.
Supersampling
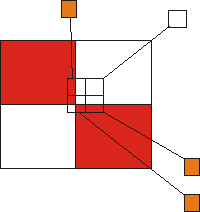
Supersampling is a method of Anti-Aliasing by taking the corners of each pixel and creating what would be the average colour. This is then the displayed pixel on the screen. By doing this you are effectively smudging the image and averaging out the colour along a curve.
This very basic graphic shows you what would happen when Supersampling is used in the four squares in the centre of this image. 3 of the 4 squares are in both red and white area's and so will be displayed as a shade of orange. One of the squares is fully in the white zone and so that pixel will be displayed as a pure white pixel. If one of the samples was taken from a area that was full in the red zone then that pixel would be displayed as fully red.
Obviously samples are much more complex than this, having many more colours to average out, however the principles remain the same. A mathematical calculation is done to determine the average colour for each pixel. Effectively Supersampling renders the scene 4 times larger than the true scene and is then scaled down once the calculations are complete. This system has a massive performance hit but does give the best results.
Multisampling
Multisampling is a more efficient but slightly less pretty form of Anti-Aliasing. Multisampling takes multiple samples for each pixel. In a fairly standard example the quincunx system takes 4 samples in the corners and 1 sample in the middle. Each of these samples is given a weight the corners are given a weight of 1/8 each and the centre sample is given a weight of 1/2. the colour of the pixel is then determined by similar calculations to Supersampling.
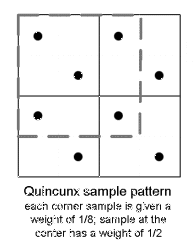
With multisampling each cell on has two samples in it. Looking at the diagram below you can see that the other 3 samples are taken from neighbouring cells. So multisampling takes into account the colours around the pixel in question. This is how you get a blend of colour to achieve the desired result. It is important to note that Multisampling only happens when a cell is covered my more than one colour, otherwise a single colour is chosen and does not need to be calculated.
Levels of Anti-Aliasing
This refers to the amount of samples taken to determine the colour of the pixel. The higher the sample rate the better the quality of picture but the slower the image will be rendered. FSAA will be referred to as FSAA 2x or FSAA 4x, 6x and 8x are available but have too great a performance hit to be truly useful.
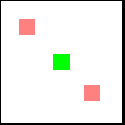
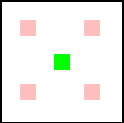
The image on the left shows samples taken from a graphics card using FSAA 2x, two samples are taken in two corners and used to produce the pixels colour. With FSAA 4x on the right you simple double the amount of samples taken for each pixel from FSAA 2x. when this is done on every pixel along an edge, the blending is much smoother and even less noticeable. As always though the trick is to balance quality and performance for your individual machine.
Pro's and Cons - The Summery
There are pro's and cons for using anti-aliasing in both games and applications. We have been through them but here is a quick summery to help you make up your mind if using AA or FSAA is right for you and your PC.
Pro's
• Smoothes out screen fonts
• Rounded edges look to have smooth curves
• Type can be easier to read due to better quality fonts
• Games look a lot prettier and more realistic
Cons
• Small text can be too blurred to read
• already sharp edges can be made fuzzier
• You cant print out Anti-Aliased text as it blurs
• Static image sizes are larger
• Games are affected by lower frame rates
Stephen Orgill Editor - www.pantherproducts.co.uk At PantherProducts we try to bring you useful information about your PC. Computer related articles and reviews that give you a better understanding about the way PC's work and to help you along with Day to Day problems.
More Graphics Design Tips:
• Getting Started with Blender
• Inkscape - How to Add a New Node
• Draw Bezier SVG Drawing Application
• Inkscape Exercise: Draw Photorealistic Sphere
• SVG Code for Outlined Letters Text
• Inkscape - How to Join Two Segments at Endnodes
• SVG Image Clipping
• Inkscape Basic Fill
• How to Remove PNG and JPEG EXIF Metadata
• How to Make a Simple Video

