How to do Silk Screen Printing
By Stephen Bucaro
Before the development of heat transfer paper, printing on materials other than paper
was accomplished with screen printing. Even today many poster size prints and prints
on fabric are done by silk screen printing. Screen printing can be done on many
different materials including paper, plastic, fabric, wood, metal, and glass.
The heat transfer method has the advantage of printing with high detail and in an
almost unlimited number of colors. If you need high detail, for example a
photographic image, you must use the heat transfer method. Silk screen printing has
the advantage of being much lower in cost than heat transfer printing.
The silk screen printing method is fairly easy. It evolved from simple stenciling.
For example if you want to stencil a circle, you could cut a circle out of the center
of a piece of paper and then paint over the paper. But what if you wanted to stencil
an "O". How would you keep the center block out in place?
One method would be to glue the stencil to a screen. The center of the "O" would be
held in place by the screen mesh, while ink would still get through the screen to
create the image. This is the basis of silk screen printing.
Another way to make a stencil is to cut out parts of a drawing and glue them into
position on the screen. Then ink over the screen with a blocking substance. After the
blocking substance dries, remove the parts of the drawing and the glue holding them
in place. This leaves openings for the ink to pass through.
Originally, stencils were made of silk fabric, hence the name silk screen printing.
Today screens are made of polyester and the process is referred to as screen printing.
The screen is stretched onto a wood frame and held in place with staples. First the
fabric is pulled tight and stapled at the centers of opposite sides. Then its stapled
from the centers outward as you pull the fabric tight. Metal frames use a grove and
cord system to hold the screen in place similar to window screens.
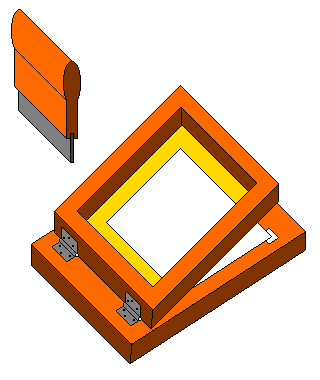
The Screen printer
You don't usually use a brush with screening printing. Instead you pour ink on one
side of the stencil and use a squeegee to draw the ink across the stencil. The screen
should be four inches larger on all four sides than the image that you want to print.
This provides a working margin around the image to put the ink and place the squeegee.
The margin is blocked out by sealing it with polyurethane coating or tape.

The screen is attached to a backboard with hinges. The material to be printed on is
placed on the backboard. The hinges are designed to permit easy replacement of the
stencil. The hinge permits raising one side of the screen while placing ink in the
lower margin area.
| 
