I've written about Linux in Maximum PC quite a bit over the last three years. You see, I'm intrigued by the prospect of a free, open operating system, one that's available for everyone to use and modify to suit their own purposes. Rather than a monolithic operating system vendor telling me that I'm not allowed to do something, there's an entire community of developers who are working to make whatever features I want possible! To me, that's the essence of what computing should be about - enabling choice.
Which brings me to the biggest problem with Linux: the paralyzing number of choices every user must make. There are literally tens of thousands of apps for Linux, ranging from vital software that every end user needs - web browsers, word processors, and Wi-Fi drivers - to the very trivial. Frequently, you'll find 15 applications that do exactly the same thing, so you'll need to experiment and discover which is best suited for you.
Writing a comprehensive Linux guide is a daunting process - and largely unnecessary. The Linux community does a great job of documenting most of its software, whether it's the developers actually writing docs or the end users figuring things out and sharing the acquired info with their pals. All the information you need to get running is out there, if you know what to search for on Google, that is.
And that's where I come in. Books have been written with solutions for all the potential pitfalls the Linux-switcher faces. However, those books are outdated the moment a new version of Linux is released. Instead of just telling you what to do, I'm going to tell you how to do things and explain why you're doing them. I'm going to focus on the things that are truly a challenge (and poorly documented), but still give you a head start on the easy stuff.
Before you get started, you need to be prepared to be your own support system. While you can usually get help with Linux problems on different message boards on the web, before you do that, you need to make the effort to solve your own problems. Linux DIYers don't have much sympathy for people who don't make an effort to help themselves.
Getting Started
With modern tools, getting Linux on your hard drive is simple - at least compared to the bad old days. If you're like me, you've probably installed Linux a few times, mucked around with it for an hour or two, changed the theme, and maybe browsed the web a little. Then, when it was time to work, you jumped back to Windows, and all was right with the world.
Things are much easier now than they were in the early days of Debian, Slackware, and Red Hat. Modern distros such as Ubuntu and SUSE LED install with crucial applications (web browser, photo editor, email client, word processor, etc.) and support for most hardware out of the box. With Ubuntu, you can boot off the CD to determine whether or not your rig will work with the OS before you make a single change to the hard drive. You can tell if you're going to have a problem before you hose your system, which is always a good thing.
Before we get started installing Ubuntu, feisty fawn, you'll need to download the appropriate ISO file from the Ubuntu downloads page and burn it to disc. For neophytes, we generally recommend starting with the x86 versions, even if your CPU supports AMD64 extensions. The proper file name for most people will be ubuntu-7.04-desktop-i386.iso.
To burn the disc, you can use commercial burning software (like Nero) or download and install the free ISO Recorder software. It's also a good idea to run a backup before you get started (or anytime you muck around with your partitions, for that matter).
There are two ways to make space for your Linux install: You can delete an unused partition or let the Linux installer resize an existing partition. If you have an unused partition on your hard drive that you want to use for Linux, it's a good idea to remove that partition before you start the install process, since Linux can't install to an NTFS partition.
We recommend dedicating at least 20GB of space for your Linux install. To get rid of the partition, open the Computer Management tool in Windows and delete that partition. In Linux, you'll have a tough time telling which partition is which, so to avoid heartbreak, do your deleting in Windows. If you don't have an unused partition, we'll talk about resizing your existing partition during the Linux install portion of this story.
The First Boot
Once you've burned the ISO, you'll need to boot your PC from the Ubuntu CD, which will involve either manually selecting the optical drive or changing the boot order in your BIOS. After several minutes, you should see the basic Ubuntu desktop. You should have access to most of your hardware, including network, sound, and graphics. Some typical gaming components simply don't have good Linux support-notably the X-Fi series of soundcards and GeForce 8800 family videocards. We'll talk about them in a bit.
Install
Assuming you booted into the live desktop properly, starting the install process is as simple as double-clicking the Install icon on the desktop. The install program will prompt you for your language, location, and keyboard layout before you get to the hard-disk partitioning section.
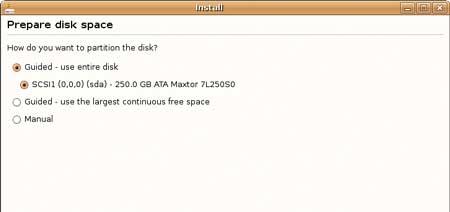
Choose the manual option when it comes time to partition your hard drive.
Partitioning your hard disk is the only step of the install process that has the potential to do serious harm. If you install to the wrong partition, you could accidentally nuke your Windows drive and all of its contents (that's why we recommend running a full backup before you start the install process). The safest way to install is to add a new hard drive or just create free space on the disk - however, that's not always an option.
If you want to resize your existing partition, select the Manual option. Select the partition you want to resize and click Edit Partition. Then input the new size for the partition in megabytes (leave the other settings alone) and press OK. Next, you'll need to create a swap partition. Highlight the newly created free space, click New Partition, set the size to 2,000MB, and choose Swap. Click your free space once again, then New Partition, and change the mount point to /. Leave the other settings alone and press Next.
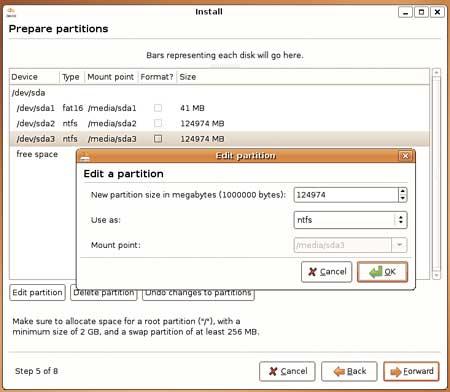
If you choose to resize an existing NTFS partition, make sure you give your Linux
install enough room. We used 120GB.
Now you'll be prompted to import data from your Windows partition. The Ubuntu installer will pull your Gaim settings, Firefox bookmarks, music, photos, and documents over from your Windows install if you select these options. I had mixed results with this tool in the early build of Feisty - it crashed the installer on a few Vista machines we tested - but your mileage may vary. After you import files, you'll be prompted to create a user account. You're almost done!
The final step is to confirm your installer's settings and press Install to finish the process. You'll need to wait 20 - 40 minutes while the install completes and then finish by rebooting your PC and selecting the Ubuntu entry from the boot manager that was installed.
Using the Alternate Installer
If your machine won't boot from the graphical install CD, either because you have a new videocard that's not properly supported (GeForce 8800 series or newer) or you have an older unsupported chipset (notably the i915 integrated graphics), you'll need to use the nongraphical installer, which is called the alternate installer, for your architecture. Download the correct alternate CD for your CPU (again from Ubuntu's download page) and follow the prompts.
Connect to the Network
Getting your machine on the network is simple with Ubuntu, whether you use a wired connection or Wi-Fi. When you first boot, the only icon in your system tray at the top of the screen should be for networking. Simply click it, enter your SSID and WPA or WEP key (if necessary), and you'll be on the network.
Finding and Installing Software
There are two ways to install programs on your new Ubuntu machine. The simplest is to use the Add/Remove panel, which lets you see all the software available to you from Ubuntu software repositories on the Internet. Most apps include a useful description, so if you search for Photo Manager, you're sure to find some worthy candidates.
Sometimes you'll need to fire up the more powerful Synaptic Package Manager, which you'll find in System > Administration. After entering your password, click the Reload button to make sure the list of available apps is up to date. Synaptic provides a powerful search and easy filters that will help you find all the details of the applications installed on your system. You can see what apps are installed and which have updates available. If you want to update a single program to the latest available version, Synaptic is the easiest way to do that - just search for the software package, right-click it, and select "Mark for upgrade."
You'll occasionally need to add a new repository to your Linux install. A repository is just a server that contains software that's configured and ready to run on your machine. If you want to install apps that aren't included by default with Ubuntu, you'll need to enable other respositories. To add a respository, you'll need its apt line, which gives the software manager all the info it needs to access the repository (we'll include some throughout this article). Open Synaptic and click Settings > Repositories. Go to the Third- Party tab and click Add; then type the apt line, exactly as it appears, in the window. Click Add Source, then click Close.
3D-Accelerated Videocard Drivers
There's a lot of controversy surrounding the use of closed-source drivers for graphics hardware, but they're the only option for 3D acceleration in Linux right now. The procedure for Nvidia and ATI hardware is a little different.
Install Nvidia GPU Drivers:
Installing Nvidia's closed-source 3D-accelerated drivers is easy with Feisty. Go
to System > Administration > Synaptic Package Manager and search for the
nvidia-glx package. Right-click the selection and select "Mark for installation."
You'll be prompted with a list of dependencies, which you'll need to approve for
the application to work. Click Apply to download and install the app. Then
open a new terminal (Applications > Accessories > Terminal) and run this
command: sudo nvidia-xconfig -add-argb-glx-visuals;
follow the prompts and reboot.
Install ATI GPU Drivers:
Installing ATI drivers is a little more complex. First, you'll need to disable
the Composite option in your xorg.conf. Open a terminal and type
sudo gedit /etc/X11/xorg.conf.
In the gedit window, scroll to the section labeled Extensions and change the
Option "Composite" line from "Enabled" to "Disabled". Then in your already
opened terminal window, type the following six commands:
sudo apt-get update
sudo apt-get install linux-restricted-modules-$(uname -r)
sudo apt-get install xorg-driver-fglrx
sudo depmod -a
sudo aticonfig -initial
sudo aticonfig -overlay-type=Xv
You'll need to reboot your system to enable the driver.
Install Restricted Software
This one's pretty simple: All you have to do is open the Applications menu, click Add/Remove, then change the Show: dropdown to read "All available applications." Search for "Restricted" and check the box next to the package that comes up. This will install support for Flash, Java, some closed audio and video codecs, and TrueType fonts. On previous versions of Linux, installing this stuff was an absolute nightmare that could take several hours, and you weren't guaranteed success even after you spent that time!
Using Linux
If you're like me, you've probably spent more time installing Linux than actually using it. Here's what you need to know to get started on a permanent switch to the penguin
The good news about Linux is that there's an unbelievable amount of information available on the Internet to help you learn to use the open-source operating system. The bad news is that it can be crushingly difficult to find said information. There are a multitude of reasons for the search problems, but most of the time the problem is that you're not searching for the right thing. A normal person wouldn't know that you need to edit the fstab to mount new drives or edit xorg.conf to adjust your resolution. Here's the info you'll need to get started.
Install and Configure Beryl
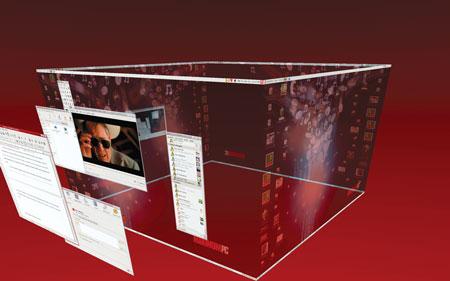
Beryl lets you map your virtual desktops to the outside of a cube, it's the
next best thing to multiple monitor.
Beryl is a desktop compositing engine that works much like the one included in Windows Vista and Apple's OS X. It uses your 3D accelerator to draw your desktop, which gives better performance and a better-looking desktop - assuming you've managed to install your 3D accelerated drivers.
To install Beryl, you'll first want to add the following line to your repository list: deb http://ubuntu.beryl-project.org feisty main Before clicking reload, open a new terminal (Applications > Accessories >Terminal) and type wget http://ubuntu.beryl-project.org/root@lupine.me.uk.gpg -O- | sudo apt-key add - (that's a capital O, not the numeral).
These two commands tell your Linux install where to find the Beryl software and exchange a cryptographic key so that your machine can verify that the Beryl Project server is the machine it claims to be. Once you've done that, you can go back to Synaptic and install the beryl, beryl-manager, and emerald-themes packages. Next, type beryl-manager in a new terminal window, and your desktop will be 3D. If you have problems with the installation, check the Beryl Wiki.
Of course, installing the app is only the first step. You'll want to spend some time futzing around with the options. The Beryl GUI is infinitely more configurable than the Vista or OS X equivalents. Using the Beryl Settings Manager (right-click the red gem icon in your system tray), you can adjust everything from the window open-and-close animation to the amount your windows wobble when you drag them across the screen. The other panel of interest to Beryl users is the Emerald Themes Manager (it's also accessible by right-clicking the Beryl gem). This tool lets you change the window fixtures common to all apps: the window borders, control icons, and title bars. Feel free to play around with these settings all you want, nothing you adjust here can do permanent damage.
Beryl is still early software, so while we had good luck running it on some hardware, your experience might differ. For now, it's a preview of the future- and not something that's suitable for most people to use on a day-to-day basis.
Managing Your Photos
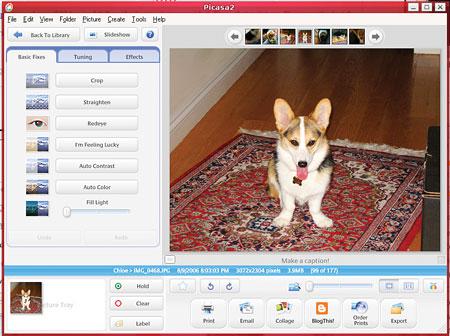
Google's Picasa is available for Linux users now, so you can share and edit your photos with ease.
The best photo manager for Linux is the beta version of Google's Picasa. Download it here, and then install it using the instructions provided. From that point on, Picasa works just the same as it does in Windows-it's the same application!
Managing Your Music
Rhythmbox is Ubuntu's default music jukebox. It includes much of the same functionality as iTunes or Windows Media Player. It will even mount and manage music on most MP3 players-including the iPod. If you're familiar with any jukebox-style software, you won't have any problems playing music once you've finished the initial import. While there are other, more advanced MP3 playback utilities available-we especially like the advanced library management features that Amarok delivers-Rhythmbox is the easiest to use and most reliable.
As part of the install process, Ubuntu should have mounted your NTFS partitions. You'll find them in the Places menu, listed by the partition's label in Windows. To import your music into Rhythmbox, just find it in your Windows partition. Click Music > Import Folder > and then browse to Documents and Settings/<your username>/My Documents/My Music. After the import is complete, you'll be able to search and play at will.
If you plan to rip music in Linux, you'll want to make sure the MP3 codecs are installed. If you installed the restricted-extras package earlier (see Install Restricted Software, page 48), you should be good to go. To rip your CDs, you'll use the Sound Juicer app. If you want to rip in MP3 instead of Ogg, you need to click Edit > Preferences > Library > and change Preferred Format to "CD Quality, (MP3 audio)." Then drop an audio CD into your optical drive and click the Extract button in Sound Juicer. If you set Sound Juicer's preferences to save your music to the same folder that Rhythmbox is using for the library, Rhythmbox will automatically see new music that appears when you rip it.
Bring Your Email Over
Getting your email to Linux seems like a tricky proposition, but it's actually not that hard. First, you'll need an IMAP email account-if you don't have one already, you can sign up for a free one at www.aim.com. While you're still in Windows, you need to configure your existing email client to use the IMAP account (for AIM, just point the IMTP server setting to imap.aol.com), then copy your mail to folders on that account. Once you've installed Linux, open Thunderbird (you'll need to install it via Applications, then Add/Remove) and point it to the same IMAP account (see image below)-all your mail will be there waiting for you. You can drag the mail back down to the desktop and reconfigure your client to use your normal servers.
Playing Video on Linux
The default app for playing video on Ubuntu is Totem. However, like Windows Media Player, it's just a front end that relies on external codecs to play properly. Remember those restricted packages you installed earlier? They included a whole bunch of codecs designed to work with Totem; you should have good support for most MPEG-4-based codecs, including Xvid and Divx. If you plan to watch movies encoded with AC3 audio, you'll also need to install the ffmpeg gstreamer plugin; search Synaptic for it. And since Totem won't play DVDs, you should search Synaptic for Gstreamer0.8-DVD and Gstreamer0.8-MPEG2dec for that purpose.
About Printing
We're firm believers in the paperless office. Not because we particularly love the environment, but because we really, strongly dislike printers. They're always running out of ink at the most inopportune times, and most of them (at least the consumer-friendly inkjets that everyone uses) don't work very well in Linux. We could easily double the size of this article by listing all the printers that are incompatible with Linux, but instead of doing that, we'll point you to the Linux Foundation's guide to printing on Linux.
Keeping OpenOffice.org Compatible
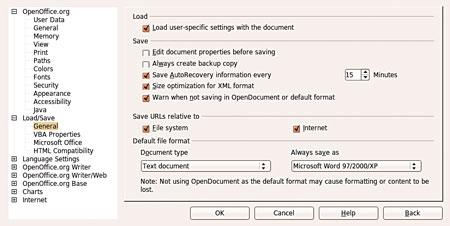
The secret to keeping OpenOffice and Word working happily together is for OpenOffice
to always save documents using the Microsoft formats.
There's a trick to using OpenOffice.org, and that is to use the proper default file format. If you use OO.o's native file format, whether it's for a text document, a spreadsheet, or anything else, Microsoft Office users will be unable to open it. You need to go into the options for each OO.o program you use and under Load/Save, in the General section, set the default file format to the most recent Microsoft option (for the word processor, it's Microsoft Word 97/2000/XP; for the spreadsheet it's Microsoft Excel 97/2000/XP).
When Linux Apps Don't Cut It
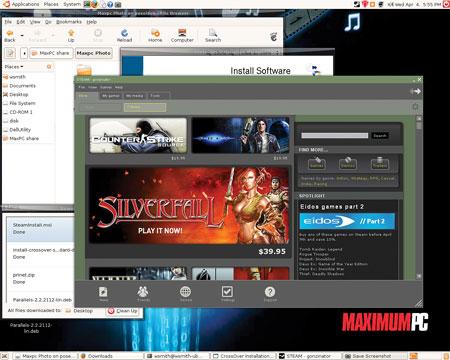
Using CrossOver Linux, we were able to get Steam running. Only a few games
worked, but Steam, man... Steam!
Sometimes, there just isn't a Linux alternative to the Windows application that you need. When you need to fire up InDesign or Microsoft Project, you've got two options-you can try to trick your app into running in Linux using WINE or CrossOver Linux, or you can install a fully functional version of Windows inside a virtual machine by using Parallels.
WINE (free, www.winehq.com), which stands for WINE Is Not an Emulator, serves as a wrapper for typical Windows function calls. When a Windows app makes a call, WINE converts that request into a Linux-compatible format. It works reasonably well for apps it supports, but if your app isn't fully supported, you could have problems. CrossOver Linux ($40, www.codeweavers.com) is a supercharged version of WINE with support for more apps. Still, it has its own problems with many common apps, and it costs money.
Parallels ($50, www.parallels.com) certainly isn't free either, but there's a substantial difference. Parallels lets you run Windows (and any apps you need) inside a virtual machine. You don't even have to reboot to run Windows applications. The hitch is that you'll need a licensed version of Windows to keep things nice and legal - if you switch all your rigs to Linux, you'll have plenty of licenses to spare! Parallels delivers full compatibility with virtually every Windows app, but it does require managing a full Windows install inside the VM.
What about Games?
Games have always been and still are the Achilles heel of Linux. There are two ways to play games on Linux: Play a limited number of native Linux games or emulate Windows using Transgaming's Cedega subscription service, which supports high-profile titles like World of Warcraft and Battlefield 2 but lacks support for many newer titles. For the games it supports, it works. However, we noticed significant performance hits as well as serious image-quality degradation. For our money, it makes more sense to boot back to Windows to play games. We didn't shell out big bucks for a GeForce 8800 GTX to get our game on at 1280x1024 in DirectX 8 mode in Linux.
Configuring the Boot Menu
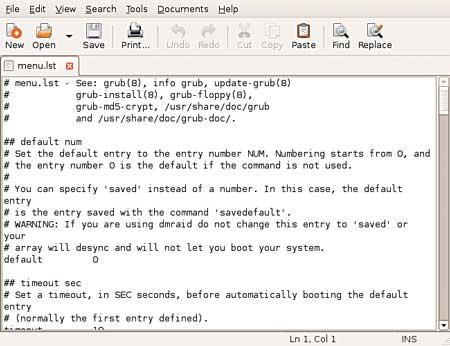
In order to change the default OS your machine boots, you'll need to edit a text
file. Be careful though, any missteps here could render your PC unbootable!
You've installed Ubuntu, but you don't want it to be the default option in the boot loader. That's not unusual. To set your Windows install as the default, open a terminal and type sudo gedit /boot/grub/menu.lst. Look for the default entry-it should read 0. To determine what the new default should be, count the number of title lines from the start of the file to the title line for Windows, starting with zero. Title lines that begin with a # don't count! If your Windows install is on the fourth title line, you'll set the default to 3. Save the file, and the next time you reboot, your machine will automatically start Windows.
What About Antivirus and Antispyware Applications?
It would be foolish to claim that any operating system is completely secure against spyware and viruses (we're looking at you, Apple), but it is actually safe to run an Ubuntu install without any kind of malware-fighting utilities running in the background. However, you do need to pay attention to the updates. It's a good idea to get in the habit of updating whenever Ubuntu prompts you to install any kind of security update. As a general rule, it takes just a second or two, and it will save you a huge hassle in the long term.
Where to Go Next?
By now, you should have a pretty good idea how to get started using Linux. When you encounter technical problems, start with Google. Type the exact text of the error message you receive, along with the version of Linux you're using (in your case, Feisty should be enough). Usually, you'll find your answer on the first page or two of results. If you don't, check the Ubuntu forums and don't hesitate to politely request help if your searches are fruitless. They also have a great Linux board filled with knowledgeable, helpful people at the Maximum PC Forums.
Be prepared for an occasional disaster, but also be prepared to learn and have a lot of fun. Becoming an expert at a new operating system isn't an overnight process, but if you take the time to master the penguin, you will be rewarded!
Aricle source: [maximumpc.com/linux?page=0%2C0 redirected]. This article is free to share under the Creative Commons attrib-sharealike License. Attribution requires you to attribute the work in the manner specified by the author or licensor (but not in any way that suggests that they endorse you or your use of the work). The best way to do this is with a link to this web page. Share Alike requires that if you alter, transform, or build upon this work, you distribute the resulting work only under the same, similar or a compatible license.
More Windows Administration Information:
• Linux Process Management
• What You Need to Know to Set Up a Simple Firewall in Linux
• Linux Installation CDs vs. Linux "Live" CDs
• CFS: Completely Fair Process Scheduling in Linux
• Know linux
• Linux su vs sudo: What's the Difference?
• Levels and Layers of Abstraction in a Linux System
• Linux Memory User Space
• What is Bash?
• You Can Switch to Linux!

