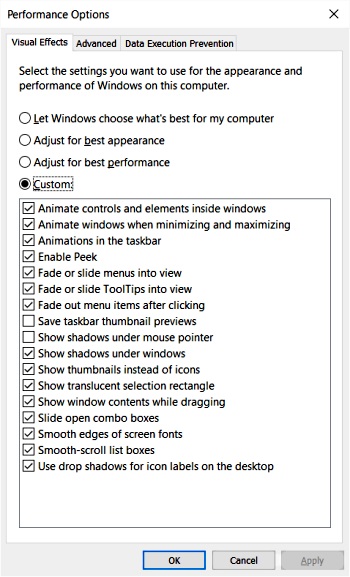
Are you a computer use who just uses windows for playing playing music, videos, and visiting social sites? Then maybe you're impressed with, and have time for Windows cutesy effects. Or do you have someone on your butt to be more productive, or you rely on your productivity to earn a living? Then to increase your computer's performance (and thereby your performance) you need to get rid of all the cutesy animations, fades, shadows, and slides that Windows performs.

To disable the cutesy effects you'll need to click on the [Settings...] button in the System Properties dialog box under "Advanced System Settings" in the Control Panel System application. That's the standard way. Unfortunately Microsoft changes the Control Panel configuration frequently, and there are usually multiple ways to come to the same dialog box, so I prefer the direct method explained below.
Right-click on a blank space on your desktop and, in the menu that appears, select New > Text Document. This will create a text document. Copy and paste the text shown below into that document, and save the file with the name sysprops.hta. Now click on the .hta file, and in the window that appears, click on the [System Properties] button.
<html>
<head>
<title>Windows 10 Configurator</title>

<HTA:APPLICATION ID="myApp"
application="Windows 10 Configurator"
border="thick"
borderstyle="normal"
caption="no"
showintaskbar="yes"
singleinstance="yes"
sysmenu="no"
scroll="no"
windowstate="normal">

<script type="text/javascript" language="javascript">

window.resizeTo(300,140);
WshShell = new ActiveXObject("WScript.Shell");

function RunFile()
{
   WshShell = new ActiveXObject("WScript.Shell");
   WshShell.Run("c:/windows/system32/SystemPropertiesAdvanced.exe", 1, false);
}

function CloseShell()
{
   WshShell.SendKeys("%{F4}");
}

</script>

</head>
<body>

<input type="button" value="System Properties" onclick="RunFile();"/>

<input type="button" value="Close This Shell" onclick="CloseShell();"/>

</body>
</html>
In the System Properties dialog box that appears, in the Performance section, click on the [Settings...] button. The Performance Options dialog box will appear. In the Performance Options dialog box, make sure the [Visual Effects] tab is selected, then set the radio button (o) by "Custom:". Then select what visual effects you would like to disable, and click on the [Apply][OK] buttons.
Normally an html file cannot execute any applications on your computer. It's just to dangerous security wise. But an hta file is an html application. An html application is safe because it runs in its own window without a browser. It is possible to make an hta a security risk by placing an iframe element in it that access the web and setting your browser's security zones to their lowest setting. Don't do that.
However, it's a good idea to keep this hta because it allows you to easily access the Visual Effects Performance Options to disable or enable them one at a time to get them just the way you want. Basically by disabling all of them except the ones that you feel you just can live without.
Disclaimer: I take no responsibility for the use of this code. By using this material, the user assumes complete responsibility for any and all damages resulting from that use. It's not that I don't trust the code, I just don't trust all users to not edit the code or do crazy things their computers. Besides, I never take responsibility for anything.
More Windows Administration Information:
• A Brief Introduction to 3D Printing
• Security Risks and Ways to Decrease Vulnerabilities in a 802.11b Wireless Environment
• How to Disable Windows 10 OneDrive
• How to Erase a Hard Disk Drive Permanently
• Three Important Techniques for Securing a Wireless Network
• What is Hyper-V in Windows Server 2019?
• How to Share a Folder in Windows 7
• Script to Display the Processes Running on a Computer
• Computer Technician's Guide to Electronics Disposal and Recycling
• How to Create a Bootable USB Drive

