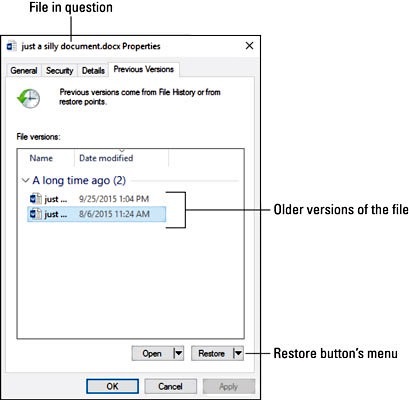
The File History utility in Windows gets its name from its capability to recover older versions of a file. This feature is part of all backup programs, though it's often called Restore. The idea is the same: From the backup archive, you pluck an older version of a file. The File History feature makes it easy.
To pluck an older version of a file from the backup drive, follow these steps:
1. Right-click the file. You can also right-click a folder to recover all its contents.
2. Choose Restore Previous Versions from the shortcut menu. The file or folder's Properties dialog box appears, with the Previous Versions tab upfront, as shown here.That's it. You're done: Go to Step 4. Otherwise, you see a list of older copies of the file.
3. Choose a previous version from the list. Ideally, you should select the most recent version, though if you're after an ancient version of the file or folder, you can pluck it from the list instead.Your next step depends on what you want to do with the older version of the file:
• To replace the current version: Choose Restore, and then choose Replace the File in the Destination. The current file is replaced with the backup.
• To keep both the current version and restored backup: Click the Restore button's menu and choose Restore To. Select a destination folder for the recovered file.
• To preview the archived copy: Click the Open button. The file isn't restored, but you can peruse its contents to see whether it contains the information you need.
• Close the file or folder's Properties dialog box when you're done.

When no previous versions exist, you see the message There Are No Previous Versions Available after Step 2. This means the file is new and hasn't been backed up, that the file hasn't changed, or that a backup copy doesn't exist.
• The File History utility isn't a substitute for recovering a file from the Recycle Bin; if you delete a file, you need to recover it from the Recycle Bin.
• File History works only on files in folders you've selected when configuring the utility.
This is an excerpt from:
Need a PC problem fixed in a pinch? Presto! Troubleshooting and Maintaining Your PC All-in-One For Dummies offers 5 books in 1 and takes the pain out of wading through those incomprehensible manuals, or waiting for a high-priced geek to show up days or weeks after you need them. Arming you with everything you need to get that pesky PC working for you ASAP, this handy guide walks you through all the steps to restoring whatever's making your PC go rogue - so you can get back to making it work for you.
There's nothing worse than firing up your PC only to discover it's inexplicably unresponsive. With this guide, you'll gain all the skills and insight you need to need to bring it back to life —and to prevent it from ever leaving you in the lurch again.
• Find out what's behind common PC problems
• Solve email and web woes, both big and small
• Perform regular maintenance and get serious about backups
• Troubleshoot to find solutions to your issues and learn proper maintenance to head off future headaches!
Your PC problems aren't as big as you think! Take matters into your own hands with the helpful instruction provided inside this book! Click here for more information.
More Windows Administration Information:
• SMART Disk Drives Warn You Before They Fail
• Firewall Rules
• Installing a Network Printer on Windows XP and Vista
• Video - Microsoft Remote Desktop - Part One
• Basic Functions of Microsoft Active Directory
• Put HyperTerminal on Windows 7
• How to Configure the msdos.sys file
• How to Harden a Server
• How to Disable Windows Firewall in Windows 7
• DOS Switches and Wild Cards


