Installing a local printer, especially a USB printer, is a non-issue on Windows Vista. You connect it, turn it on, and Vista automatically installs it. This is because the Vista Operating System includes hundreds of drivers for common printers.
But if you have a less common printer, an older printer, or if you've previously removed the printer and want to add it again, you may need to use the Printer Wizard. To use the Printer Wizard, open Control Panel, and in the Hardware and Sound group, click on Printers.
In the Printers Windows that appears, click on Add a printer. In the Add Printer Wizard window that appears, select Add a local printer.

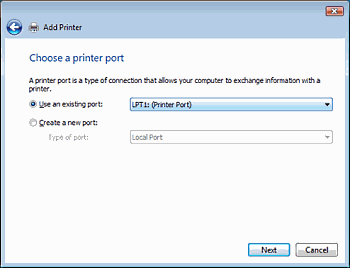
On the Choose a printer port page, make sure that the Use an existing port option button and the recommended printer port are selected, and then click on the [Next] button.
On the Install the printer driver page, select the printer manufacturer and model, and then click on the [Next] button. If your printer is not listed but you have the manufacturer's installation CD, click Have disk, and then in the Install From Disk window, browse to the folder where the printer driver is stored.
If you don't have the installation CD, click Windows Update, and then wait while Windows checks for available drivers.
After the proper printer driver is installed, the Type a printer name text box will appear. You can use the name provided or enter a new name. Below the Type a printer name text box, make sure the [] Set as the default printer checkbox is set if you want this to be your default printer.
• If the "User Account Control" warning box appears, click on the [Continue] button.
• If the "Windows Security" warning box appears, click on "Install this driver software anyway", assuming you don't care if you're using an unsigned driver.
After a short progress bar displays, the final Add Printer dialog box will appear. It's a good idea to click on the [Print a test page] button to check if the printer is working correctly. Then click on the [Finish] button.
More Windows Administration Information:
• Command Line to Get Computer's Numner of CPU Cores
• Disable Annoying 'Get Windows 10' Message
• Windows 10 Diagnostic Data Send to Microsoft
• Configure Windows 10 to Search Windows Only
• Video Tutorial 3 - The Windows 7 Backup and Restore Utility
• Basic Functions of Microsoft Active Directory
• Installing a Local Printer on Windows Vista
• For Quick Information About System - DOS Systeminfo Command
• Create a Windows 7 Disk Image Backup
• Planning a Backup and Restoration of Files for Disaster Recovery


