This article explains in detail how to set up a small network at home so you can share your Internet connection between two computers running Windows XP.
Sharing the Internet connection between two computers running Windows XP
Connect the first one of your computers (the server) to the Internet and test the connection to make sure that it is working properly. Then click Start > Control Panel > double click Network Connections > right click the Internet connection and select Properties. Click the Advanced tab and check the Allow other network users to connect trough this computer's Internet connection.
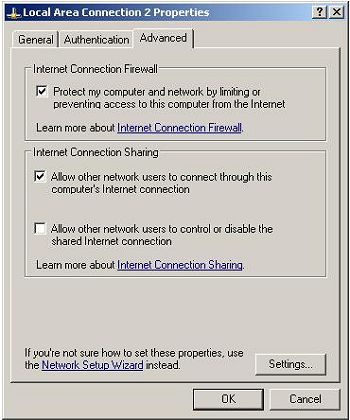
Leave the option Allow other users to control or disable the shared Internet connection unchecked or checked depending on your preferences. Click OK.

In order to share your Internet connection you need to network your main computer (the server) with your other computer (the client) - this can be done with cross-over cable connecting the two PCs network cards.
Configuring the client - on your second PC open Control Panel > double click Network Setup Wizard > click Next > Next again and on the following screen select This computer connects to the Internet trough another computer on my network or trough a residential getaway.
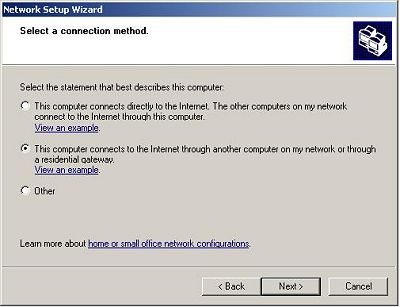
If your computer has more than one connection select Let me choose the connections to my network, click Next then select the connection you want to configure (this is the connection between your two PCs) and then finish the Wizard (when prompted enter a computer description and computer name, and the name of your workgroup - this should be the same on both computers - MSHOME by default).
After you're done with the wizard right click on the Connection and choose Properties > select Internet Protocol (TCP/IP) and click the "Properties" button > make sure that Obtain an IP address automatically and the Obtain DNS server address automatically check boxes are selected.
Reboot both computers.
Troubleshooting. If you have followed the instructions and still can not share your connection do the following.
On the client computer click the Start button > Run > type cmd and press OK. In the Command Prompt type: ping 192.168.0.1 and press Enter.
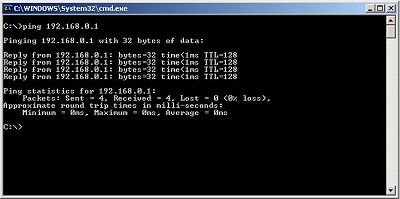
You should see something similar to the screen above which means that your two computers are connected properly. If you receive Ping request could not find host... or similar message that means that your two computers are not connected - in case of wired connection make sure that the cables that are connecting them are plugged in properly and that you're using the right cables (cross-over cables).
On your main PC (the server) open Control Panel > double click Network Connections > right click your network connection (the one connecting the two PCs) and select Properties > select Internet Protocol (TCP/IP) and click the "Properties" button. Click Use the following IP address and enter IP address: 192.168.0.1 Subnet mask: 255.255.255.0, leave default getaway blank. Select Use the following DNS server addresses but leave blank.
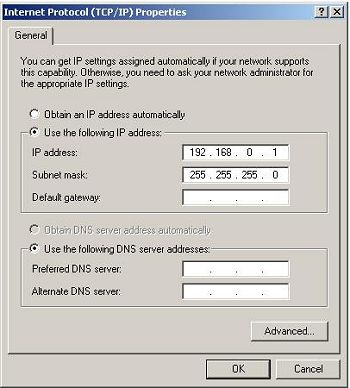
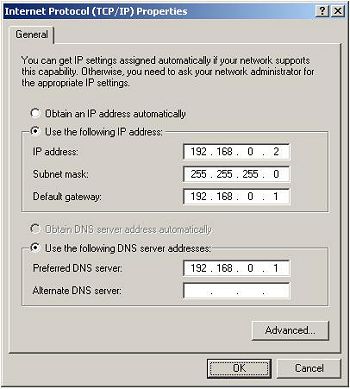
On your second PC (the client) open Control Panel > double click Network Connections > right click your network connection (the one connecting the two PCs) and select Properties > select Internet Protocol (TCP/IP) and click the "Properties" button. Click Use the following IP address and enter IP address: 192.168.0.2 Subnet mask: 255.255.255.0, default getaway 192.168.0.1 select Use the following DNS server addresses and enter 192.168.0.1 for the first one and leave the second one blank.
Reboot both your computers.
Antonio Fabrique holds a BCom degree in Business Management, Economics, and Information Systems. Visit his site at: lotsageeks.com Computer Repair (This site can't be reached).
More Windows Administration Information:
• Disable Indexing to Speed Up Your Computer
• Use Free Autoruns Utility to Disable Unnecessary Startup Programs
• Windows Server 2003 Active Directory and Network Infrastructure
• Create a Shortcut to Windows 10 Services Management Console
• Environment variables in PowerShell
• PC Technician's Guide to Providing Telephone Support
• How to Block Unwanted Websites with Your Netgear Router
• NTFS Permissions
• Hard Disk Management
• Hands-On Microsoft Windows Server 2008 Administration


