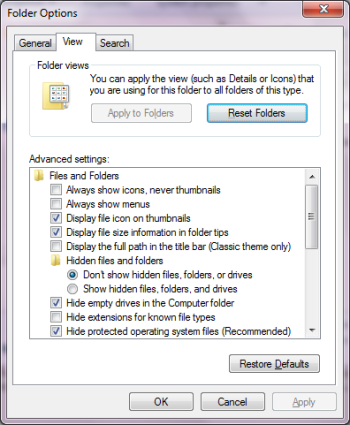
If you have files on your Windows 7 PC that you don't want anyone to see, you can easily hide them. You simply set the files hidden attribute. But first make sure your PC's Folder Options is set to "Don't show hidden files, folders, or drives".

Open Windows Explorer by selecting Computer in the Start menu (or just open Windows Explorer directly). On the left side Windows Explorer menu, click Organize. In the popup menu that appears, select "Folder and search options".

In the Folder Options dialog box that appears, on the View tab, in the "Advanced settings:" list, under "Hidden files and folders" make sure the "Don't show hidden files, folders, or drives" radio button is set. The click on the [Apply] and [OK] buttons.

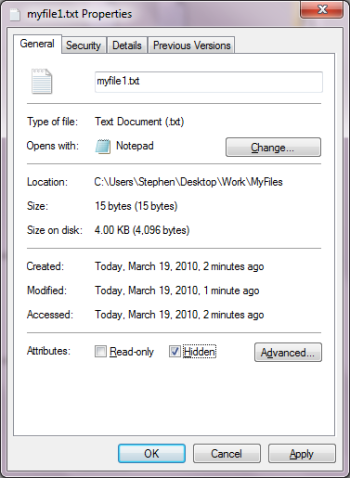
To hide the file that you don't want anyone to see, navigate to the file in Windows Explorer and right-click on the file's name. In the file's Properties dialog box that appears, on the General tab, at the bottom next to Attributes: set the []Hidden check box, The click on the [Apply] and [OK] buttons.
The file is no longer visible. You can hide as many files as you like, you can even hide folders or drives by similarly setting their []Hidden attribute. However, you won't be able to see, use, or unhide the hidden files yourself until you go back to the Folder Options dialog box and set the "Show hidden files, folders, and drives" radio button.
More Windows Tips:
• Windows 7 - Five Ways to Move or Copy Files or Folders
• Disable Windows 7 Automatic Resizing and Docking
• Disable Taskbar Button Grouping
• Windows Desktop Themes
• How to Fix a Scratched CD
• How to Disable Windows Explorer's Annoying Tooltips Popups
• How to Transfer a File From PC to Kindle
• How to Create a Microsoft Excel Database
• Steps to Fix a Wet Laptop
• Google Apps vs Microsoft Office 365: Which is Best for Your Business?

