
Sometimes when you install a storage device on your PC, Windows seems to assign it an arbitrary drive letter, as shown below when I plugged in my USB flash drive. To make matters worse, Windows assigns a different drive letter for each PC that I plug the flash drive into. This plays havoc with applications that run directly from the flash drive. Fortunately it's very easy to change a drive letter.

1. Select Start | Conrol Panel.
2. In Control Panel, double-click on Administrative Tools.
3. Under Administrative Tools double-click on Computer Management.
4. In the Computer Management window that appears, under the Storage branch,
click on Disk Management.
5. In the Computer Management window, in the top section of the right panel, right-click on the letter you want to change.
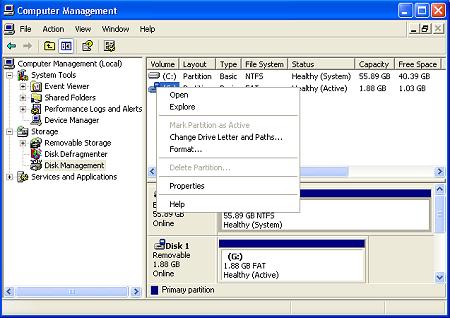
6. In the popup menu that appears, select "Change Drive Letter and Paths..."

7. In the "Change Drive Letter and Paths" dialog box that appears, click on the [Change...] button.
8. In the "Change Drive Letter or Path" dialog box that appears, select a letter from the drop-down list.
• I would recommend to NOT use the letters A or B because these letters are reserved for legacy floppy drives.
9. Click on the [OK] button. A message box will appear with the message "Changing the drive letter of a volume might cause programs to no longer run. Are you sure you want to change this drive letter?" Click on the [Yes] button.

As shown above, the drive letter for the USB flash drive changed from G: to a more logical E:. Now I can use applications that run directly from the flash drive without performing major reconfiguration.

More Windows Tips:
• Put a Shut Down Button on Your Desktop
• How to Cancel a Print Job in Windows 10
• Put a Shortcut to Create a Restore Point on Your Desktop
• Introducing Screensavers
• How to Change Your Computer's Name
• Disable Cutesy Effects to Speed Up Windows XP
• Create a Desktop Shortcut to Control Panel
• Move an Off Screen Window Back into View
• Increase Windows 7 Notifiction Display Time
• Display Multiple Clocks in Windows 7 Taskbar