When you start your computer in the morning you are greeted with the Windows default startup music. In this article, I show you how easy it is to replace the default startup sound with your own personal greeting. This is something you might do to start your day on a more cheerful basis, or something you might setup for a special friend or relative.
1. Locate the microphone that came with your computer. Plug the microphone into the mic jack on the back of the computer. It's the small round connector next to the green connector into which your speaker is plugged.
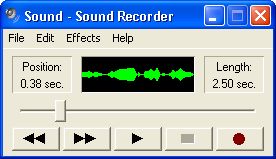
2. Select Start > Programs > Accessories > Entertainment > Sound Recorder to open Windows Sound Recorder utility. Before recording your greeting take note of the following warnings:
• Sound Recorder uses the .wav file format which, unlike MP3, is not a compressed format. Sound Recorder consumes memory rapidly, so start your message quickly, make it short, and stop recording immediately after the end of your message.
• The sound of your computer's fan will be in the background of your recording. To minimize background noise, move the microphone a short distance from the computer.
• If you configure your greeting as the startup sound, Windows will be required to load the sound file during startup - another reason to keep your message short.
• You can configure any .wav sound file as the Start Windows sound, but if you configure a corrupted file as the startup sound, your computer will stall during startup. If this happens, start the computer in Safe mode and configure a different startup sound file.

3. In Sound Recorder, click on the button with the red circle to begin recording. Speak your message into the microphone. Click on the button with the black square to stop recording.
4. Click on the button with the right-pointing arrow to play your recording. Click on the button with the double left-pointing arrows to rewind your recording.
• Check the Edit and Effects items in Sound Recorder's menu. Sound Recorder is a very old utility, dating back to Windows version 3.0, but you'll be surprised at what this simple utility can do.
5. Select File > Save As... in Sound Recorder's menu and save your .wav file in the c:\Windows\Media folder. You can actually save your file anywhere, but this where Windows saves all its events sounds, making it easier for you to configure it in the next step.

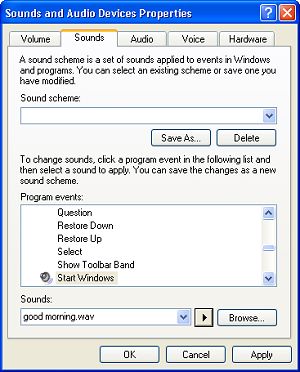
6. Select Start > Settings > Control Panel > Sound and Audio Devices to open the Sound and Audio Devices Properties dialog box. In this dialog box, select the Sounds tab. On the Sounds page, in the Program events: list, select "Start Windows". Click on the [Apply] and [OK] buttons.
7. Test your message by causing the event, i.e. restart Windows.
Configuring your own Windows events sounds is fun and easy. You don't need to record your own sound, you can use any short .wav format file and you can apply it to any Windows event. How about applying a "breaking glass" sound to the Program error event?
More Windows Tips:
• Access Useful Laptop Settings in the Windows Mobility Center
• Turn Off Windows 7 Taskbar Preview Thumbnails
• Diable Windows CD/DVD AutoPlay
• Steps to Fix a Wet Laptop
• Desktop Shortcuts Give Quick Access to Applications and Folders
• Put a Shortcut to Create a Restore Point on Your Desktop
• Make the Insertion Point Cursor More Visible
• Create Your Own Custom Taskbar Toolbar
• Record Your Own Windows Startup Greeting
• Delete Windows App Usage History

