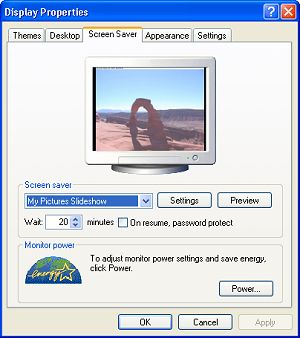
In the early days of computers, when you left a static image on the screen, it would burn permanently into the screen. That's why they invented screen savers. Modern CRT and LCD displays don't have that problem, but people still use screen savers because they're fun - especially when you can use Windows built-in Slideshow screen saver to display your own personal photographs.
1. Create a new folder named i.e. My Slideshow and copy the photos you want to display into that folder.
• Note: For best results, your pictures should be the same size as your computer screen screen. You can configure the screen saver to stretch the pictures, but they won't be sharp.
2. Right–click on an empty area on your desktop and, in the popup menu that appears, click on Properties.
3. In the Display Properties dialog box that appears, select the Screen Saver tab.
4. In the Screen saver drop-down list, select My Pictures Slideshow, then click on the [Settings] button.
5. In the My Pictures Screen Saver Options dialog box that appears, click on the [Browse] button and, in the Browse for folder directory list that appears, select the folder that you created. Click on the [OK] button.

6. In the My Pictures Screen Saver Options dialog box, set the options for your screen saver, for example how often the pictures should change, what size they should be (100 percent of the screen is best), and set the checkbox if you want transition effects between pictures. Then click on the [OK] button.
7. In the Display Properties dialog box, set the up-down Wait: control to the number of minutes you want to the computer to wait while it's idle before activating the screen saver. Then click on the [Apply] and [OK] buttons. You might want to temporarily set this to 1 minute so you can view your photos with the interesting transition effects.
Now, after your computer sits idle for the configured amount of time, your custom screen saver will activate and randomly display your photos with interesting transition effects.
More Windows Tips:
• Disable Cutesy Effects to Speed Up Windows XP
• The Secret to Passing the Microsoft Office Specialist Exams
• Create a Desktop Shortcut to Control Panel
• Vista - Restore Deleted Recycle Bin
• How to Configure Windows 7 Autoplay
• How to Fully Customize your Desktop
• What is Airplane Mode?
• Stop Desktop Icons from Randomly Refreshing
• Configure Recycle Bin to Immediately Delete Files
• Move an Off Screen Window Back into View

