
Designing your own t-shirt can be a fun, creative activity, and may even bring you some money if you decide to sell your designs. Whether you intend to print the shirt yourself or send it off to a professional printer, you can still come up with the design for your shirt right at home.
Planning Your Design
Think about what your design is going to represent
Maybe you are advertising your cleaning company, your rock band, or your favorite sports team. Maybe you're using a personal illustration. The purpose of the design will determine the design.
If you are advertising a company, band, sporting team, or brand, you will likely need to focus on logo. The Nike swoosh logo, for example, is a very simple but effective design. A design for a sporting team might feature the team colors or the team's mascot. A design for your band might focus on an image of the band or a graphic that represents the band's style or sound.
If you are making a t-shirt to showcase a personal illustration or drawing, you will need to focus on how it will look on a t-shirt. Think about how original the illustration is and how the colors are working in the illustration.
Consider using a photo in your design. Use your own photo. You may use a picture made by someone else, but only if you have acquired the legal rights to use that image. You can also buy a stock image.
Pick a color scheme
When designing a t-shirt, its important to think about color contrast. This means how certain ink colors in the design will appear against a lighter colored shirt or a darker colored shirt. Certain ink colors look more vibrant on a lighter or darker shirt on the computer screen than they actually do when printed.
When using lighter shirts, avoid pastel colors like yellow, light blue, or light pink. These colors will be visible on the shirts but may not be legible at a distance. And if you are designing a shirt with a logo, you want to make sure that logo is legible from far away!
If you decide to use pastel colors, add an outline of a darker color to the lighter color to highlight the text and make it easier to read.
Darker colored shirts look good with lighter ink colors, such as pastels. But be careful when using darker ink colors on darker colored shirts like cardinal (dark blue), maroon, or forest green. These colors may look great on the computer or in a drawing, but when they print, the shirt color sometimes distorts the ink color. As a result, they can appear more brown or dull.
Add dimension to the design
Once you've added your colors to the design, it may look good but still a bit flat or one dimensional. To create more depth to a certain area of the design, add a color that is the shade of the color beneath it. This will brighten up the design and give it some dimension.
If you plan to use software with a high capacity for manipulation (such as Gimp or Inkscape), you can use a standard image and radically transform it to fit your needs.
Creating a vector outline on Inkscape is an especially effective way to resize a photo if necessary.
b>Balance your design
This means combining all the parts or elements to form a whole. How you do this depends on the composition of your design. Maybe your design has a lot of smaller elements, like stars, plants or animals. Or may it is one large design with one main figure or image.
Think about how you can make the design look cohesive, so that all the parts or elements fit well together. A balanced image will immediately draw the eye in rather than away from an image.
Determine the placement of the design on the t-shirt
Would your design work better as a centered image, an image on the top left of the t-shirt or as a wraparound image? If you are designing a t shirt for a brand or company, a simple design in the center of the shirt may be the most effective.
Don't forget you can also use the back of the t-shirt to include a branding slogan ("Just Do It"). Or a song lyric from a song by the band you are designing the shirt for.
Complete a final mock up of the design
It's best to sketch your ideas out before putting them on your t-shirt. Try out several different designs and color combinations. Keep in mind color contrast and dimension. Make sure the image is balanced and cohesive. When in doubt, get a second opinion. Ask friends, family, or coworkers what design and color scheme they like best.
Make a Digital Image of the Design
Use Gimp or Inkscape to touch up your paper sketches.
If your paper sketches are not high quality or drawn with clear lines, this option may not work. If your sketch is high quality:
• Scan the sketches to your computer. Then, retouch them in Photoshop.
• Clean up the lines. Play with the filters, colors, brightness, contrast, saturation,
or any other effects at your disposal.
• Add lines, flourishes, splatter effects, and other embellishments that might make the design more dynamic and balanced (where appropriate).
Make sure that the entire layout is internally consistent by keeping proportions reasonable, styles consistent, and colors cohesive.
Use computer software to create the design
If you aren't happy with the quality of your paper sketches, use computer software to draw line art on Inkscape.
If you have a computer drawing tablet, you can color and draw straight onto Inkscape or a similar program.
Add text to the design, if desire
Look for a font that complements your overall design, rather than overwhelm it. The font should work with the image(s) in your design to create a balanced design.
Think about the fonts on some of the more well known logos or designs. The font should relate back to the company or brand's overall style. Nike's Just Do It's slogan, for example, is in a bold and simple font, just like their bold and simple swoosh logo. In contrast, the font used for a sports team or a garage rock band may be more elaborate or ornate.
Make sure any filters you are using on the design are also applied to the font. If you are working with layers on Photoshop, you will need to drag your font layers below the photo effects layers.
Create a prototype
The easiest way to do this is to print the design and iron it onto a plain shirt. However, if you want to test the quality of your design, you can hire a printing company to create a professional prototype.
Produce the shirt(s)
For a small-scale operation, you can iron on the design. If you'd like to make shirts at a larger scale, however, you can pay a printing company to make them for you.
Digital printing is the cheapest option as far as only need to get a print on a small quantity of t-shirts. Screen printing gives better design results that lasts longer over time, but it also comes with a higher one-time print cost.
Screen-Printing Your Design
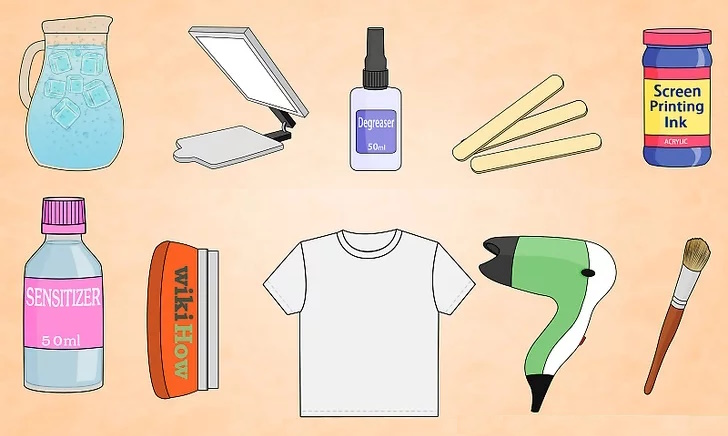
Gather your supplies. To screen-print your design at home, you will need:
A plain t-shirt
50 ml bottle of degreaser (available at your local art store)
1 liter cold water
A large brush
500 ml of emulsion
A small bottle of sensitizer
A bottle of screen printing ink
A squeegee or a coating tray
A small wooden stick
A hair dryer
A transparency
A printing screen
You can purchase a printing screen at your local art store. Or make your own by buying a mesh screen and a canvas stretcher frame. Stretch the mesh across the frame and staple the edges down so that the mesh is taut. For standard designs on a light shirt, a 110-195 mesh works best. For fine designs with multiple colors, use a 156-230 mesh.
Prepare the printing screen
Mix the degreaser and the cold water together. Place the brush in the mixture and then brush the mixture on to the screen. Make sure you brush both sides of the screen. You just want to give the screen a light brush so don't worry about putting too much of the mixture on the screen. Let the screen dry.
Mix the emulsion and the sensitizer together
Take 20 milliliters (0.68 fl oz) of water and pour it into the bottle of sensitizer. Mix the sensitizer well by shaking for an about a minute. Add the sensitizer into the emulsion. Use the small wooden stick to mix the sensitizer and the emulsion together.
The color of the emulsion should change from blue to green. There should also be small bubbles forming in the emulsion.
Place the lid loosely back on the emulsion and place it in a dark area or room for an hour. After an hour, check that all the small bubbles in the emulsion have disappeared. If they do not disappear after an hour, leave the emulsion to sit for another hour until the bubbles are gone.
Apply the emulsion on the screen
In a very dim room or with a low red light, drip a line of photo emulsion across the screen and use a squeegee to spread it around. The emulsion will leak through the screen, so be sure to squeegee both sides of the screen.
You can also use a coating tray to apply the emulsion to the screen. Do this by placing the screen on a clean towel and tilting it away from you slightly. Place the coating tray at the bottom of the screen and carefully pour the emulsion on the screen as you move the tray up the screen.
Leave the emulsion to dry in a completely black room for about twenty minutes. Use a fan to help the screen dry.
Place the transparency down backward on the screen
Now you're ready to burn your image into the emulsion. Do this by placing the screen flat, placing the transparency down backward, and placing a piece of glass over the transparency to ensure that it doesn't move.
Burn the design into the emulsion
A 500-watt lightbulb will burn the transparency image into the emulsion in roughly fifteen minutes.
The exact times for this process depend on the light and emulsion you use. Specific directions for the light needed should be on the packaging of the purchased emulsion.

Rinse the screen
Let the screen soak in a thin layer of water for about two minutes. Then rinse any excess emulsion off with a hose or in the shower.
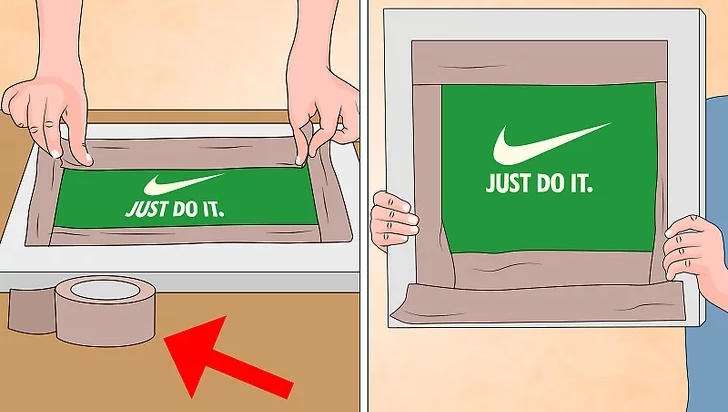
Place waterproof tape around the edges of the underside of the screen.
The flat side of the screen will go facedown on the shirt, and the side with the frame is where you will use the ink. To make sure no ink ends up leaking around the frame, use waterproof tape to secure around the edges where the screen stretches over the frame.
Lay your t-shirt on a flat surface
Make sure there are no wrinkles. Place the screen on top of the t-shirt, where you would like your design to be. Place the screen on top, making sure that the screen and design are aligned.
Clip your shirt down to a firm piece of cardboard. Doing this will ensure your t-shirt remains flat and unwrinkled. It will also make it easier to move your t-shirt to a safe spot later to dry. If possible, have a friend hold the screen down tight while you spread the ink.
Spread a tablespoon of screen printing ink on the top of the screen.
Using your squeegee, coat the screen by spreading the line of ink from top to bottom.
The mesh is actually quite thick, so this step is more of a primer.
Use very light pressure so you don't push any ink through the screen.
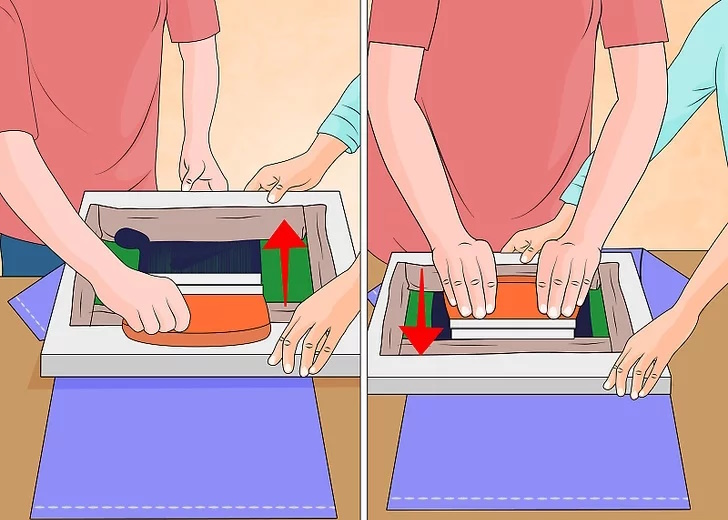
Squeegee the screen
With the screen flooded, you're ready to transfer the design to the shirt.
Use the squeegee at a 45 degree angle in both hands to evenly distribute the pressure. If possible, ask a friend to hold the screen in place.
Drag the ink back up across the flooded screen over the design.
Cure the ink
Using a hairdryer, apply even heat to the design for several minutes.
Cure the ink before using the next screen to add additional layers of the graphic in different colors.
If you use the proper screen-printing technique and cure it, your t-shirt will be washing machine safe.
Wash your screen once you are done making your shirts.
Use cold water and scrub it with a sponge to get the ink out. Let the screen air dry.
Article source: wikiHow wikiHow is a group effort to create a great resource: the world's largest free how to manual. wikiHow articles help people solve their everyday problems. wikiHow licenses all content under a Creative Commons License. The license allows wikiHow content to be used freely for noncommercial purposes. The Creative Commons License also allows for the creation of derivative works.

More Specific Home Business Ideas:
• How to Start Your Own Makeup Line, Even on a Limited Budget
• Starting a Part-time Food Business
• Start Your Own Museum
• Pricing Your Woodworking Product for Maximum Return
• How To Start a Bookkeeping Business
• Considerations For Setting Up a Hotspot Business
• How to Start a Gift Basket Business
• House Cleaning - The Professional Business
• Five Tips to Having Excellent Communication in Your Daycare
• Make Concrete Blocks - Your Road to Solid Profits