Overview
Assuming and hoping that your laptop's memory has not yet been maxed out, you can
quite easily install a laptop RAM module that will appreciatively give you more
speed and improved performance. You could get it done by a professional, but why?
This is an extremely simple job that takes no time at all which does not justify the
exorbitant expense. Believe me, if I can do it so can you.
Let's now look at the step-by-step instructions for installing laptop memory.
1. What Do You Need?
All you need is a screwdriver that will fit the screws on your laptop cover and a
compatible laptop SODIMM memory module. An anti static wrist strap is not mandatory
but may be helpful.
2. Memory Module
Purchase a compatible memory module from your nearby electronics retailer, from an
on-line store or directly from your laptop manufacturer. I would advise the latter
but that is not always necessary as long as you ensure compatibility.
3. Power Off
Turn off your laptop, disconnect it from its adaptor and the power source.
4. Finding the memory compartment
The memory compartment on most (but certainly not all) laptops is located on their
underside. I suggest that you brows through your laptop's manual to verify.

5. Removing the Cover
Using a screwdriver that fits, unfasten the holding screw or screws and carefully lift the cover off.
6. Viewing the Memory Slots
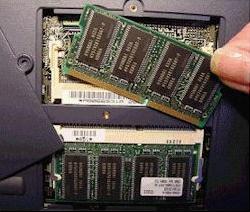
You are now looking at your laptop's memory slot or slots. Depending on your laptop
model and its configuration, you may have one, two or three memory slots. One is,
of course, occupied with the existing memory module already installed. If your laptop
features only one memory slot, you will need to removed and replace it with the new
higher RAM module. If your laptop, on the other hand, has one or two empty slot or
slots available to you then that is where you will install the new memory module.
7. Removing the Existing Memory Module
To remove the existing memory module for replacement with the new one, release the
ejector clips on either side of the module by pulling on both of them simultaneously.
The module should pop up enough to enable you to grab a hold of its edges. Lift it
off carefully and stored in an anti static bag for a possible although unlikely
need to reinstall it.
8. Installing the New Memory Module
Hold the new module by its corners edges, line up the slot key notch of the module
with the slot key of the port and insert into position. Pushing on it lightly will
automatically lock the ejector clips and the module should be firmly in place.
9. Replacing The Cover
Replace your laptop's memory compartment cover that you removed just a few minutes
ago and secure its screw or screws.
10. Turn Your Laptop On
Turn your laptop back on and connect it to its power source if necessary. The added
memory you have just installed will be recognized automatically.
Conclusion
Congratulations! You have just performed a technical task that could have cost you
anywhere from $50 to $100 but didn't. And the best part of it is that you now have
a laptop that will serve you just as beautifully as it had done in the beginning.
Gary Hendricks runs a website about laptops. Visit his website at [best-laptop-guide.com parked domain] to learn more about selecting the best laptops and accessories to suit your needs.
More Maintain and Upgrade Your PC Articles:
• Decrapify Your PC
• Laptop Batteries 101 - A Buyer's Guide
• How to Protect Your Electronics from Electrical Surge Events
• Tuning-up Windows XP Computer
• FREE Ebook - How to Speed Up a Slow Windows Computer for Free
• Turn Off Windows XP Service Pack 2 Firewall
• How to Add or Replace a Graphics Card
• Be the Master of Your Printer
• Installing A Power Supply
• Using Your PC as a Home Theater

