Installing a new hard drive remains one of the most popular upgrade projects for PC users. And it's easy to see why. Today's drives are bigger than ever and bargain priced, and they offer a performance boost, as well. You need that extra space for the increasingly roomy OS installs and gigabyte-eating applications that are the norm these days. And don't forget graphics, audio and video files.
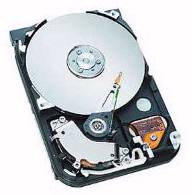
Seagate 200GB HD The Barracuda 7200.7 200GB hard disc drive delivers 7,200 RPM access speed and an Ultra ATA-100 interface for high-performance desktop applications.
While the 5400 rpm drives are slightly less expensive than the 7200 rpm models, the latter deliver a genuine performance boost in the form of quicker access times and improved data transfers. Still, if you want the best performance out of your new drive. Your PC must have onboard Ultra DMA/100 support.

Seagate 40GB The Seagate 40GB hard drive handles the common uses of today's PCs, such as games, photo and video editing, advanced applications & MP3s.

|
It's interesting how they always show the inside of hard drives. The disc or platter you see in the picture above is actually sealed in an air tight container. Your hard drive will not come sawed open like this! |
Because your new hard drive will be bigger and faster than the one your PC currently uses, plan on making the new drive your primary drive the new home for your operating system and applications. You can attach your old drive as a secondary hard disk and use it for archives and less frequently accessed data.
System and hard drive configurations may vary. These instructions are provided for reference only, please refer to the manufacturer's manual or web site for instructions on their specific drives.
Modern computers have two IDE channels, Primary and Secondary. Each channel can support a Master device and a Slave device. The hard disk should be installed on the Primary channel as the Master device.

In the instructions that came with your hard disk, locate the information about jumper settings. The hard disk should have a jumper on the rear next to the IDE cable connector that sets the drives Master or Slave configuration.
1. Set the jumper setting on the hard drive to primary or master drive (default setting). If it is not, simply move the jumper over to master. If you are using the drive as secondary hard drive move it to the "slave" jumper setting. Refer to the documentation for proper placement of jumper settings.
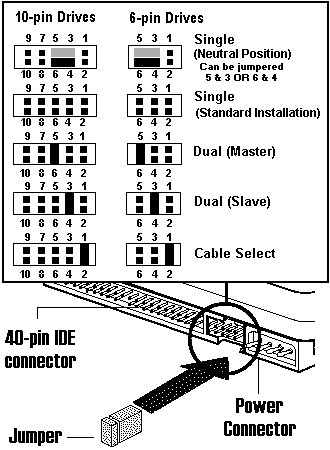
Newer motherboards have a "cable select" feature that, when used with a special cable, automatically sets the hard disk’s Master or Slave configuration. The jumper on newer hard disks may be set to "cable select" by default. If you don’t know if your motherboard supports cable select, move the jumper to the position for Single drive (this is the only drive on the cable).
2. Install the hard drive into an open 3.5 drive bay.

To install the hard disk, use an internal 3.5 inch internal drive bay if your computer has one. An internal bay does not have a removable cover and you don’t need to uncover the hard disk because you will not physical access to the hard disk after the case is closed.
Slide the hard disk into the drive bay with the circuit board facing down and secure it to the side rails with two screws on each side.
Modern computers have two IDE channels, Primary and Secondary. Each channel can support a Master device and a Slave device. The hard disk should be installed on the Primary channel as the Master device.

|
The terms IDE, EIDE, and ATA are commonly used interchangeably, although technically they can mean different things. |
An ATA/33 IDE cable has 40 conductors and 40 pins. If your motherboard and hard disk are compatible with the ATA/66 or ATA/100 interface, make sure your IDE cable has 80 conductors and 40 pins.

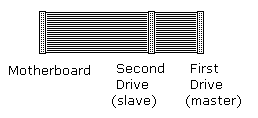
3. Install a 40-pin connector IDE cable from the hard disk to the Primary IDE channel connector on the motherboard. An IDE cable has three connectors. The middle connector is usually closer to the end of the cable that connects to the hard disk. Make sure that you correctly position the connectors pin 1 at both ends of the cable.
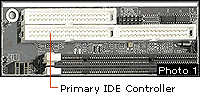
Locate the primary IDE controller (or IDE 1) on your motherboard.
Pin 1 is identified by a red line on the ribbon cable. The red line usually goes towards the inside of the hard disk. Identify pin 1 on the motherboard IDE connector by a label on the motherboard or from the motherboard diagram.
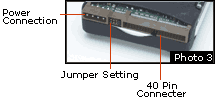
4. Plug a power cable into the hard disk power connector.

You are now ready to install your operating system.

Seagate’s ultra-fast 60GB hard disc drive delivers 7,200 RPM access speed and an Ultra ATA/100 interface for mainstream and high-performance desktop applications. This drive features superior performance, quiet acoustics, and Seagate’s comprehensive 3D Defense System, for the highest security of your data.
The Seagate 60GB hard drive handles the common uses of today's PC users, such as games, photo and video editing, advanced applications, MP3's and the usual Internet downloads. And with the 8.9ms access time, these functions will be performed swiftly!

Besides delivering a massive 80GB of storage space and 7200 rpm speed, along with ATA/100 interface, this Seagate U Series drive includes Seagate's breakthrough SoftSonic FDB motor for the quietest operation of any 7200 rpm drive made. And Seagate protects your data like no other drive with 350 Gs nonoperating shock and a 3D Defense System that's proven # 1 in reliability testing. A huge 2MB Cache Buffer means fast data rate transfers and the DiscWizard software makes Seagate drives the industry''s easiest to install.
Free Seagate Utilities
Packaged with your new hard drive (also available for free download) are special utilities to simplifies installation and help achieve the full capacity of the drive by overcoming legacy BIOS limitations.
DiskWizard and Disk Manager
DiscWizard and Disk Manager Seagate simplifies installation of your new Medalist and Medalist Pro drives with its exclusive Windows-based disc drive installation program. This software overcomes certain system BIOS and operating system limitations that can complicate the installation of higher-capacity ATA (IDE)-interface drives. DiscWizard also includes Disk Manager, a DOS based program, to help achieve the full capacity of your drive by overcoming legacy BIOS limitations.
Ultra ATA/100 Configuration Utility
Ultra ATA/100 Configuration Utility Seagate Ultra ATA/33/66/100 drives can be configured for Ultra ATA modes up to and including the maximum the drive is capable of. Use this utility to select or to verify a compatible Ultra ATA mode for your drive and system. CAUTION: This is a powerful utility. Improper use could render your drive inoperable, read the UATA100 FAQ before using.
More Maintain and Upgrade Your PC Articles:
• Create Your Own Super Control Panel
• Configure Windows Defender on Windows 10
• Recognize And Understand Home Networking Components
• How Power Surges Can Smoke Your PC
• Fixing Stuck Windows 10 Update
• Uninterrupted Power Supply (UPS) - Backbone of Your Small Business
• Hacking Windows Vista
• Working With the Registry
• Free TweakUI User Interface Configuration Utility
• Installing an Internal Hard Drive
