I purchased a non-proprietary PC recently, and the technician who set it up gave it the name "happycustomerPC", a big presumption, and a poor name for a PC. In this article, I show you how to can change your computer's name.
First of all, what is a computer name and why do you need one? Computers identify each other on a network using numbers called IP (Internet Protocol) addresses like 169.254.180.108. But 169.254.180.108 doesn't mean much to humans, so a computer also needs a name like "JOES-COMPUTER" so that humans can identify it on a network.
Before the Internet and Internet Protocol was invented, the original PC's could be connected in small networks using an IBM protocol called NetBIOS. With NetBIOS, each computer on the network was identified by a unique 15 character name. Windows computers still use NetBIOS names through a service called WINS (Windows Internet Naming Service) which resolves NetBIOS names to IP addresses.
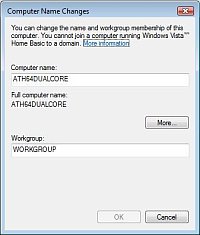
In Windows XP changing the computer name is very easy. Open the "System" utility in Control Panel and on the "Computer name" tab, click on the [Change...] button. In the "Computer Name Changes" dialog box which appears, enter a new computer name and click on the [OK] button.
Note: A computer name can have a maximum of 15 characters. The only legal characters are a-z and 0-9, and the hyphen ( - ), no spaces.
In Windows Vista, Open the "System" utility in Control Panel (System and Maintenance section). In the left panel of the System screen, click on "Advanced System Settings". In the "User Account Control" dialog box that appears, click on the [Continue...] button.

In the "System Properties" dialog box that appears, on the [Computer Name] tab, click on the [Change...] button. In the "Computer Name Changes" dialog box, enter a new computer name and click on the [OK] button.
In the dialog box that appears informing you that you must restart your computer, click on the [OK] button. In the "System properties" dialog box, click on the [Restart Now] button.
More Windows Tips:
• Remove Windows Components You Don't Need
• How to change a Folder's Icon
• Delete Does Not Erase a File
• Restore a File's Previous Version
• Use ReadyBoost to Improve PC performance
• Headphones: earbuds, on-ear, over-ear. What's the Difference?
• Why My Office Files Do Not Open
• Configure Windows 7 File Contents Searching
• Stop Desktop Icons from Randomly Refreshing
• How to Deal With a Windows Firewall Alert

