
SVG stands for Scalable Vector Graphics, a form of computer drawing that describes an image by the coordinate locations of points or nodes that define the image. It is much easier to edit an SVG drawing than a drawing made with a paint program.
Draw SVG is a free SVG drawing tool licensed under LGPL-3.0. Its code is written in HTML5, CSS, and Node.js, so it is fully web browser compatible. The code is available on github and may be downloaded to run on your desktop or may be integrated into your website. An online working application is available at DrawSVG.
1. On the left side of the application's window, open the Elements menu. In the Elements menu, near the top of the menu, in the "Text" section, click on the "t" icon. Note that icon becomes framed by a dotted rectangle to indicate that it is activated.
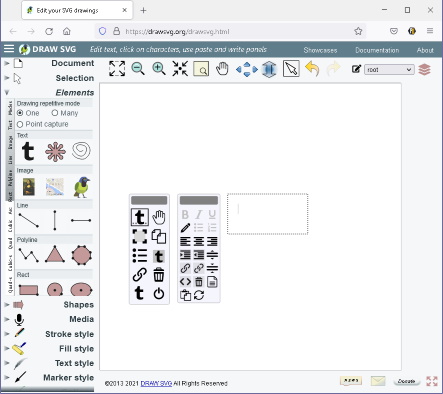
2. Move the mouse pointer to a location in the drawing area where you want the text to appear, click the left mouse button. Two popup menus appear and a dotted rectangle containing a blinking cursor appear. In the rectangle, type your text.
• You can move the menus to a more convenient location by dragging them with the mouse.
3. In the popup meu displaying the [t] icon, click on the Proprties... icon (three dots and dashes). The text properties dialog box appears.

In the text properties dialog box, click on the Text style tab. On the Text style tab, in the "Family" drop down list, you can pick the desired font. An example of the font will be displayed in the text box just below the "Family" drop down list.
On the Text style tab, in the "Size" text box, you can choose the size font that you desire. Note the drop-down list just to the right of the "Size" text box where you can select a unit. px (pixels) is great for images that you will display on a device screen, mm (millimeters) or in (inches) is good for images that you will display in print.
Another tab in the text properties dialog box is the Stoke style tab. In the Stroke style tab, the "Color" text box will indicate the color used to outline the letters of the text (the Stroke Style). Click on the colored ball to the right of the "Color" text box to open the Select color dialog box. Here you can select a different stroke color. Click the Apply button.
Another tab in the text properties dialog box is the Fill style tab. In the Fill style tab, the "Color" text box will indicate the fill color of the text. Click on the colored box just to the right of the "Color" text box to open the Select color dialog box. Here you can select a different fill color for the text. Click the Apply button.
• Note, the properties will be applied only to the selected text. If you lose selection of part of the text, drag a box around it with the mouse pointer.

The other popup menu can be used to set the Bold (B) Italic (I) or Underlined (U) property of the text. Other selections in the popup menu can be used to select align the text left, center, or right, or to increase or decrease the line spacing.
4. In the popup menu displaying the "t" icon, with the text selected, you can click on the square icon with the black corners to rotate the text. You can click on the icon with the smaller "t" to add a box around the text. There is also an icon to copy the text or delete the text.
To save your work, open Document in the left side menu. In the Document menu, click on the folder icon with the down arrow. The Save SVG document dialog box will appear. Near the bottom of the dialog box, enter a new name for the file, then click on the [Save as file] button. The Opening drawing.svg dialog box will open. in the Opening drawing.svg dialog box, set the o Save File radio button, then click on the [OK] button.

More Graphics Design Tips:
• How to Create a Simple Video with Windows Movie Maker
• Inkscape: Combine the Paths of Multiple Shapes
• Drawing Text with Draw SVG
• SVG Image Masking
• Paint.Net Ink Sketch, Oil Painting, and Pencil Sketch Artistic Effects
• Tips For Hand Coding MathML
• Example Code for X3Dom Basic Primitive Shapes: Box, Sphere, Cylinder, Cone, and Torus
• SVG Example Code to Scale Elements
• Create Animated Glistening Gold Text With SVG
• An Insight to Logos