
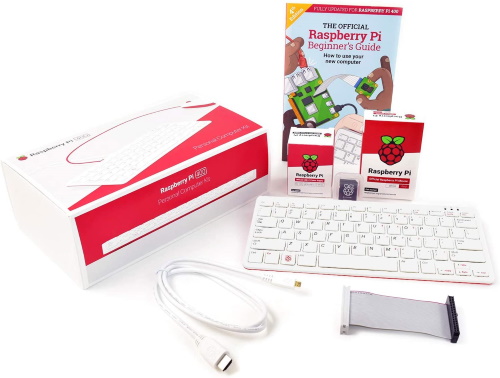
One of the easiest ways to learn assembly language programming is on the Raspberry Pi 400. The Raspberry Pi 400 is a complete personal computer built into a compact keyboard.

Raspberry Pi 400 incorporates a purpose-built board based on Raspberry Pi 4. Featuring the same powerful processor, Raspberry Pi 400 has specially designed thermals to keep your computer cool and silent while you're hard at work.
Raspberry Pi 400 is the perfect educational tool for students of all ages. Low-cost and portable, it is ideal for home study, and for teaching computing concepts like programming, physical computing, and networking.
• A Powerful, Easy-To-Use Computer Built Into A Neat And Portable Keyboard
• Raspberry Pi 400 incorporates a purpose-built board based on Raspberry Pi 4
• Featuring the same powerful processor, Raspberry Pi 400 has specially designed
thermals to keep your computer cool and silent while you're hard at work.
• Raspberry Pi 400 is the perfect educational tool for students of all ages.
• Low-cost and portable, it is ideal for home study, and for teaching.
computing concepts like programming, physical computing, and networking.
Specifications
| Processor | Broadcom BCM2711 quad-core Cortex-A72 (ARM v8) 64-bit SoC @ 1.8GHz |
| RAM | 4GB LPDDR4-3200 |
| Connectivity | Dual-band (2.4GHz and 5.0GHz) IEEE 802.11b/g/n/ac wireless LAN; Bluetooth 5.0, BLE; Gigabit Ethernet; 2 x USB 3.0 and 1 x USB 2.0 ports |
| GPIO | Horizontal 40-pin GPIO header |
| Video & Sound | 2 x micro HDMI ports (supports up to 4Kp60) |
| Multimedia | H.265 (4Kp60 decode); H.264 (1080p60 decode, 1080p30 encode); OpenGL ES 3.0 graphics |
| SD Card Support | MicroSD card slot for operating system and data storage |
| Keyboard | 78- or 79-key compact keyboard (depending on regional variant) |
| Power | 5V DC via USB connector |
| Operating Temperature | 0oC to +50oC ambient |
| Dimensions | 286 mm x 122 mm x 23 mm (maximum) |
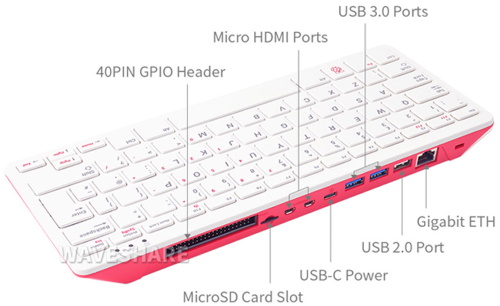
Raspberry Pi 400 takes the same components as Raspberry Pi 4, including the system-on-chip and memory. You can't see them, but they are still there. What you can see are the external perts, starting with the keyboard. At the back of Raspberry Pi 400 are the ports. the Raspberry Pi 400 uses the Raspberry Pi OS with the Raspberry Pi Desktop.
How to Write and Execute an Assembly Language Program on Raspberry Pi
Computer programming languages are categorized as "low-level" or "high-level". Low-level languages communicate more directly with the computer's hardware. The lowest level programming language would be the binary 0s and 1s that the computer actually uses. Just above that would be hexadecimal representation of the binary numbers. High-level languages like Visual Basic and JavaScript are more human understandable and lie on top of low-level languages.
Assembly Language is a low-level language that uses a lot of binary and hexadecimal notation along with mnemonic abbreviations, called Opcodes to specify operations.
Writing an assembly language program requires three steps: 1. in a text file enter your assembly language code, this is called the source file. 2. Use an assembler to compile the source file into object code. 3. Use a linker to link the object code to other object code files to make it executable. This will have created an executable file.
The easiest way to create the source file is to use a text editor in the GUI mode (graphical users desktop mode). With the Raspberry Pi OS, in the Accessories menu choose Text Editor. Open a file, type in your assembly code. Put an empty line at end of file. Save the file with .s file extension for source file.
To compile the source file, in the Accessories menu choose Terminal. Terminal is a window, often referred to as the shell, where you can enter instructions at the Linux command line. At the command line Enter the CD command (Change Directory) to desktop or directory where source file was saved.
pi@raspberrypi:~$ CD Desktop
Press [Enter] key. Remember, unlike Windows, Linux is case sensitive. You can then enter the DIR command to see your source file name.
To compile your source file, at the command line type:
pi@raspberrypi:~$ as -o progname.o progname.s
The as comand executes the assembler, the -o flag stands for object file. When you press [Enter], the assembler creates the object file with .o extension.
To link your object file, at the command line type:
pi@raspberrypi:~$ ld -o progname progname.old stands for link dynamic. To execute your program, at the command line type:
pi@raspberrypi:~$ ./progname
The Most Basic Assembly Language Program
.text
.global _start
_start:
    MOV R7, #1
    SWI 0
Shown above is the most basic assembly program. .global _start creates the entry point for the program.
MOV R7, #1
SWI 0
The first line below the _start label moves a syscall number to the r7 register. This syscall number will cause the program to exit. swi 0 calls the software interrupt.
.text
.global _start
_start:

_write
	MOV R8, #99
	LDR R9, =num
	STR R8, [R9]

_read
	MOV R7, #4
	MOV R0, #1
	LDR R1, = num
	MOV R2, #2
	SWI 0

_end:
	MOV R7, #1
	SWI 0

.data
num: .word 0
As an individual learning assembly language programming, just running a program with no feedback will not do. The code above places a value in register R8 and then prints that value to the screen before exiting. Look for the output value just to the left of the command prompt. The value displayed is the ASCII character for the value in R8.

More Computer Architecture Articles:
• First-Come, First-Served CPU Scheduling Algorithm
• Microcontrollers
• Oscilloscope Required for Serious Digital Electronics Work
• Operating System Services
• AMD's Phenom II Processor
• Capacitors in AC Circuits
• Basic Decoder Circuitry
• Using The I2C Bus
• Digital Logic Levels and Transfer Characteristics
• Inductors in DC Circuits