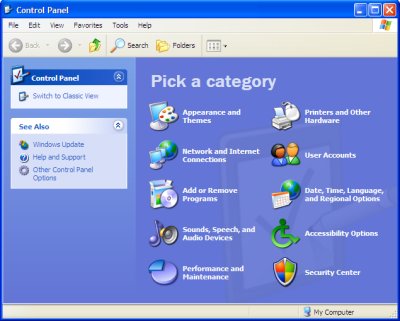
The Control Panel is a "system folder", which means that although it looks and behaves like a normal folder, it doesn't exist as a folder. The Control Panel utilities are not actually in a single folder on your hard drive. This makes it impossible to customize the Control Panel the way you want.
The goal of Microsoft with Windows XP was not to release a legitimate upgrade, but instead to implement its abusive product activation scheme. Windows XP is really just a glorified visual appearance change and rearrangement of the interface.

One of the things they rearranged was the Control Panel, placing the Control Panel utilities in arbitrary categories that make it more difficult to find the one you need. They provided the option to switch back to the Control Panel, but we can do better.
The problem with the old Control Panel is that there are too many unnecessary utilities that we never use. If we locate the utility we need, we still have to figure out which tab contains the control we need. Let's design our own Super Control Panel that contains only the utilities we need, identifies them logically, and takes us directly to the tab we need.
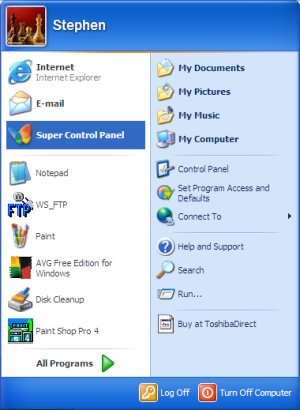
First, create a new folder anywhere on your hard drive and name it "Super Control Panel" or whatever you please. Drag-and-drop the folder on the [Start] button. This creates a Start menu icon for the folder. Next, open the folder and add shortcuts to the Control Panel utilities you might actually use.
For example, I frequently use the "Display" utility to increase my display resolution so that I can "screen capture" a large image. Then, I decrease it back to the lower resolution so I can read text more easily. Therefore, in my "Super Control Panel" I will create a shortcut to the "Display" utility's "Settings" tab. I'll step you though this first one to demonstrate how easy it is.
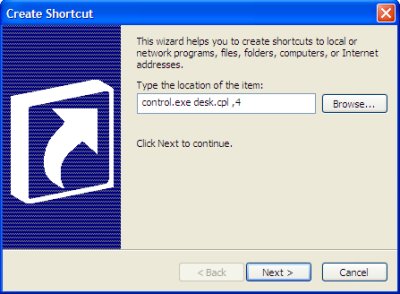
Select Start | Super Control Panel (or whatever name you used). Right-click inside the folder and in the popup menu that appears select New | Shortcut. In the Create Shortcut dialog box that appears, in the Type the location of the item: text box, enter: control.exe desk.cpl ,4

The space before the common is required. This command line executes control.exe to open the Display utility. The number 4 causes it to open to tab number 4. The tabs in a Control Panel utility dialog box are numbered from left to right starting with 0.
Click on the [next] button. In the Type a name for this shortcut text box, enter:
Display Settings
Then click on the [finish] button.
Right-click on the shortcut and in the popup menu that appears select Properties. In the Display Settings Properties dialog box that appears, on the Shortcut tab, click on the [Change icon...] button. A warning message box will appear informing you that the file contains no icons. Click on the [OK] button in the warning dialog box.
In the Change Icon dialog box that appears, choose a suitable icon, then click on the [OK] button. Click on the [OK] button in the Display Settings Properties dialog box.
Now when you click on the Display Settings icon in your "Super Control Panel", the Display Properties utility will open with the Settings tab ready to change your screen resolution.
Below is a list of some of the other Control Panel utilities that you can setup to open immediately to the tab you need.
| Add Hardware | hdwwiz.cpl |
| Add or Remove Programs | appwiz.cpl |
| Display | desk.cpl |
| Network and Internet Connections | inet.cpl |
| keyboard | main.cpl |
| Mouse | main.cpl |
| Network Connections | ncpa.cpl |
| Power Options | powercfg.cpl |
| Scheduled Tasks | sticpl.cpl |
| Sound and Audio Devices | mmsys.cpl |
| System | sysdm.cpl |
| User Accounts | nusrmgr.cpl |
To make our "Super Control Panel" even more super, we can add shortcuts to important system applications that aren't found in control panel. For example, you can add a shortcut to Windows "System Information" application by entering the path below in the Type the location of the item: text box.
C:\Program Files\Common Files\Microsoft Shared\MSInfo\msinfo32.exe
You can add a shortcut to Windows System Configuration application by entering the path below.
C:\WINDOWS\pchealth\helpctr\binaries\msconfig.exe
You can add a shortcut to a help file that you might use frequently, for example, the path below can be used to create a shortcut to the Security Certificates help file.
C:\WINDOWS\Help\cmconcepts.chm
When you have finished adding all your shortcuts, right-click on the "Super Control Panel" folder in the Start menu and in the popup menu that appears select Properties. In the "Super Control Panel Properties" dialog box that appears, on the Customize tab, in the Folder icons section, click on the [Change icon...] button. In the Change Icon dialog box that appears, choose a suitable icon. How about the "butterfly" icon?

• Note: This will change the icon for the folder, not the shortcut in the Start menu. You'll need to remove and replace the Start menu shortcut to update that icon.
• Note: The icons you will be selecting are extracted from the file SHELL32.dll. You can browse to any file and see if it contains any interesting icons to extract, or you can download an icon from the Web, or you can create your own custom icon.
Now the computer technicians among you have probably realized that they can copy their custom "Super Control Panel" to a floppy disk or CD-ROM and carry it with them. This should expedite their troubleshooting and configuration tasks because they will be using their own custom Control Panel configured they way they like. You can also place second party utilities on your Super Control Panel disc, or to your own personal troubleshooting documents, but watch those shortcut links, which must contain the proper drive letter.
Here's an idea for a capitalist charlatan: publish a Windows XP configuration and troubleshooting disc that is nothing more than a custom control panel with shortcuts to what the user already has on their computer.
You don't have to accept Microsoft's inefficient Control Panel. Create your own "Super Control Panel" that contains the utilities and documents you want, identifies them logically, and takes you directly to the tab you need.

Learn more at amazon.com
More Maintain and Upgrade Your PC Articles:
• Recognize And Understand Home Networking Components
• How to Clean the Junk Files in Your PC
• Four Tips to Finding Quality PC Cleaner Software
• Digital Photography Printing - Simplifying the Pixels and DPI's
• Be the Master of Your Printer
• What's the Difference Between DDR1 DDR2 and DDR3?
• Tuning-up Windows XP Computer
• FREE Software - My Control Panel
• Vista Product Activation
• Create Your Own Super Control Panel
