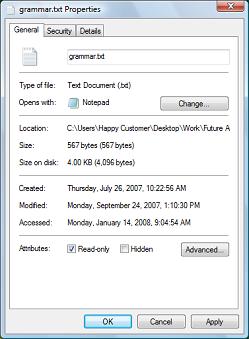
Write protecting a file prevents anyone, including you, from editing or accidentally deleting the file. Follow the steps below to write protect a file.
1. In Windows Explorer, navigate to the file and right-click on the file's name. In the popup menu that appears, select Properties.

2. In the file's Properties dialog box, on the General tab, at the bottom of the page, set the [x] read-only check box.
3. Click on the [OK] button.
More Windows Tips:
• VLC Free Open-Source Media Player
• Cover Your Tracks in Internet Explorer
• How-to Capture the Computer?s Screen
• Change the Default Program for a File Type
• Delete Does Not Erase a File
• What is Airplane Mode?
• How to Restore Files from File History in Windows 10
• Create Your Own Custom Taskbar Toolbar
• Put a Shortcut to Windows 10 Calculator on Desktop
• Remove My Recent Documents from the Start Menu

